My Latest Obessions

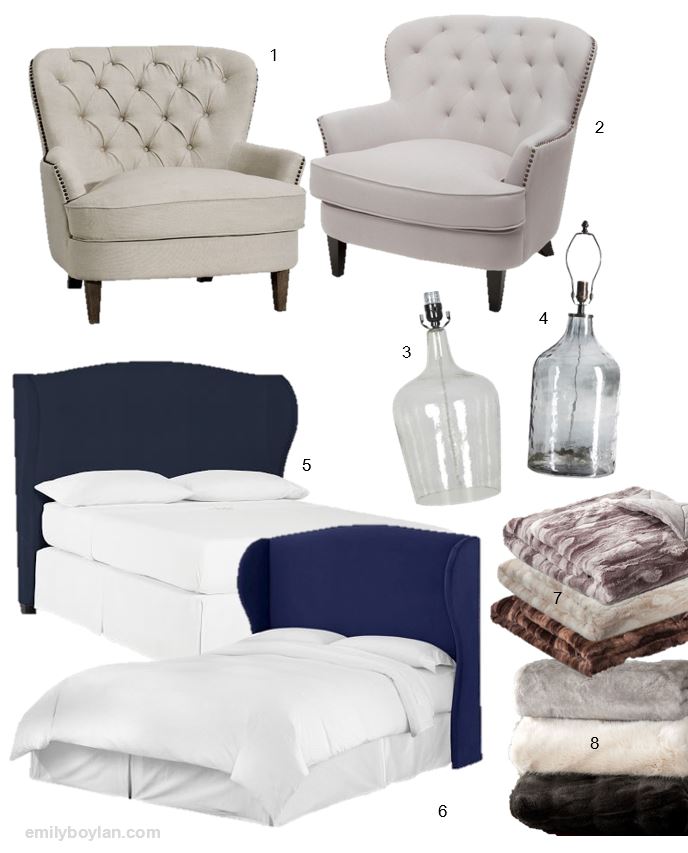
Taking a page from Andy Cohen’s book, HERE’S WHAT I’m obsessed with when it comes to home decor… because I have an entire master suite I am dying to decorate.

Neutrals – White and grey! More please!! I love creating a blank canvas to be able decorate and accessorize with pops of color.  Not to mention white and bright makes a room look 10x bigger, who doesn’t want their room to look bigger?


Floral Accents – This is my way to incorporate a little girly into a space without being totally overt with pink walls … like I would love to do. *smiles* I am completely in love with these pillows and they’re even prettier in real life – because they have flecks of gold in them. *swoon* The candle from Anthropologie also has flecks of gold and an incredible scent.


Navy and Gold – I mean… do I even need to explain? This is one of the most beautiful and classic pairings, in my humble opinion, especially when these colors are used as accents they can make a big impact, although if overdone not so hot.

I won’t lie – you’ll see a few of these beauties in our master suite when it’s all finished. What’re you currently obsessing over? That piece you’ve been eyeing have pinned AND favorited on your Pinterest board.


Product Links:
Neutrals: Unfinished Nights Stands | Upholstered Fabric Chair | Shag Rug
Florals: Pillows | Candle
Navy and Gold: Handsome/Gorgeous Frames | Ottoman | DIY Curtains

Attic Update – 6 months

We’re just over the 6-months into this project, yes definitely longer than both B and I anticipated – but hey! What can you do? Attic Renovatoin Update - Month 6 - the bee life - emilyboylan.comAs fantastic as the holidays were, they definitely helped delay progress as two back-to-back weekends were filled with parties, family, and endless amounts of food and drinks. Two, back-to-back weekends where virtually zero work took place in the attic.

Since, B has been back at it and focusing the weekends on mudding! Damn, mudding. Oh and then there is the sanding… and then more mudding… oh and then you sand again! The endless messy… messy cycle.  All “joking” aside, progress is being made, there are complete sections that’re ready to go and they look so great!

The bi-fold doors for our closets have also been installed, since the last update, and it really makes the space feel like a room. Since we bought the house the closets have been wide open so that was an awesome piece to finish!

Another update is that we ordered furniture for our sitting area along with nightstands, it’s getting us really excited (and anxious) to get on to the next part of the project; painting and trim work – so that we can decorate and live up there! I am obsessed with the chairs, they’re absolutely perfect.

As many times as we’ve wanted to hire someone to get this done, mainly because it would be much faster than our time frame, it’s truly awesome that we (but really, mostly B) have done 95% of the work, building a room from the studs, to insulation, to drywall, to paint, to life.

Hopefully next month we have a fresh coat of paint on the walls!


Target Love

As I have been price shopping around for the perfect pieces for our master bedroom, I keep coming back to one place over and over again – Target. Their prices, convenience and in my opinion quality (for the price) can’t be beat.  I am always down for a bargain – even though as much as I would love to shop at some of the higher end spots regularly like Crate & Barrel, Pottery Barn or Anthropologie – there are many other things I like to enjoy with my money!  See if you can guess which of these is from Pottery Barn and which is from Target (don’t cheat!) – you might be surprised by a few…
Target vs. Pottery Barn
01
| 02 | 03 | 04 | 05 | 06 | 07 | 08

How did you do?  These pieces are pretty similar and nearly identical, but the difference between price point is not even on the same level! Target is the clear winner when it comes to price, but I still love and dream about you Pottery Barn (and Crate & Barrel and Antrhopologie).  I also like to decorate or re-accessorize somewhat frequently, so spending more than I need to on pieces isn’t ideal – I am just lucky I have more rooms to move the ‘retirees’ to!

What’re your favorite ‘bargain’ spots?

Attic Update – 5 month check-in

2

A month ago we were just getting started with drywall but now the drywall is complete! Yes, all 40, 8-foot pieces were used up!  Although there were a decent amount of big pieces, there were also a lot of small random nooks and crannies and grooves.  I can’t say this enough, but B has been doing an amazing job, I know he is completely sick of working on the project – he has put in a lot of long days and nights! But it’s going to look incredible and is already looking awesome!

Since then the mudding has begun.  Which from what EVERYONE… yes, everyone says is the worst part.  So far, it hasn’t been too bad, but then again no sanding has taken place yet.  Which again, I’ve been told I’ll be finding dust in our kitchen 3-floors below, months from now! With the Christmas holiday fast approaching, I am not sure how many useful weekends we will have! But we do have a lot of PTO at the end of this month, so we hope to start painting before 2016!

The important part is that progress is being made! We can’t wait to get up there and start using that space!


Inside Our Christmas

Last weekend was full of decorating for Christmas! And with continual tweaks being made (always) I wanted to share with you our red and plaid Christmas wonderland!

The Dining Room
I wanted to keep the decor simple but still make a big impact and fill the space. I created depth by layering the plaid table runner and the greens.  I used extra bulbs to fill the glass vases and sprinkled some votives throughout for some nice mood lighting in the evenings.

Ornaments
We have a super tall skinny tree in our dining room as well, this tree is used for all of our ornaments, mostly B’s and one’s we’ve collected together.  I have yet to inherit all of my childhood ornaments from my parents, but then I think we will need a much bigger tree! I love opening the ornaments every year, they all have meaning and memories built behind them.

Cozy Living
The Merry Christmas sign was inspired of course by something I found on pinterest and one of my wood crafts! I hand painted the lettering, and used 100-year-old wood from our attic, it’s pretty hefty. The polar bear also holds special meaning, although it was a lucky find last Christmas season – my grandma used to have a ledge of polar bears, and it wasn’t until after she passed I truly appreciated that sentiment and wished I had asked for a few of hers.

The Tree
Here it is!  Our first REAL tree! She is a beauty.  Lots of lights and gold and red accents to trim the tree. And of course an angel as the topper (she was tough to find!)  – the last missing piece is a tree skirt.

I love being able to enjoy the house decorated, last year we were just moving into our house on December 13th – so throwing some decorations up and the fake tree was all we managed amongst the other chaos!

Merry Christmas!

Attic Update – 4 Month Check-In

Our 4-monthAttic update!
Well in case any one is loosing sleep out there, here is an update on our attic! hehe. Since my last update a month ago; it’s been nothing but insulation.  B has been doing an awesome job at insulating the place, adding baffles and making sure everything is “properly breathing.”  Insulation is a messy and time consuming job, but the end is in sight!

Drywall started this weekend, and the space is looking like a room again!  Last week we made a Lowe’s trip and tried to pick up and order a lot of the finishing touches for the attic, like paint, blinds, closet doors and the drywall! So now it’s really getting there.

A few of the questionable items, like what we are going to do with the floor have been cleared up.  We are going to paint it a light grey and call it a day, we bought durable gloss paint for a more heavy-duty finish. We are also hoping to put some sort of carpet tred or runner up the stairs to soften the squeaky steps.

I have a few more fun projects up my sleeve for finishing touches, I’ve made good progress on re-beading our chandelier, and am sketching some DIY plans for our custom wing-back upholstered headboard.  Another part I can’t wait to get doing is customizing the walk in closet with useful shelving and making the most of the “small” space.

We’ve put two-solid days in this weekend of drywalling and will continue nightly after work.  B’s brother and dad will be in next weekend to hopefully finish up the last of it!

Keep your fingers crossed everybody! We are getting there!

DIY – Wooden Christmas Tree

Let the unveiling of wood crafts continue! Here is one to surely be easy with lots of options for customization!

With the 100-year old beams from our attic, we created these beauties.  Figuring out the measurements was half the battle – so hopefully the sketch below will help you! We also created a slightly longer and narrower tree so that we can have a little wooden tree family this holiday season in our front yard!

Wooden Tree How-To
Once we had all the pieces cut, we screwed the horizontal posts starting with the square topper first and worked our way down, eye-balling the distance, we even intentionally made a few crooked to give it a custom feel.  The version below is the one I made for my mom – with the bible verse; “For unto us a child is born.”  I free handed the lettering (with a Q-tip, yes I know strange, but that’s my paint brush of choice) with some white paint I had around the house.  I used some small trim work nails for the star and wove colored string around to create the star pattern.  Last but not least, stick you post in the ground for Christmas and you’re one step closer to decorating for the holidays, you could even wrap some lights around!

Happy Crafting!!

Master Bedroom Inspiration

Oh how things can change within a year! Almost a year to the date, I posted this Bedroom Retreat – which while all in good fun, the idea’s have transformed immensely!  Here are a few of the items on the must-have punch list and some inspirational pictures for elements that I want to pull from.

  1. Wing-back Upholstered Headboard
  2. Matching nightstands with table lamps
  3. Pop of color in curtains, pillows, accessories
  4. Accent Wall – Herringbone Pattern
  5. Cozy and comfy seating area w/ fireplace
  6. Thick baseboard trim
  7. Open concept railing
  8. Classic chandelier (DIY Project)

diy-wingback-headboard-tutorial-king-size: Master Bedroom Makeoverschairs- overstock, curtains, world market, tiny ottoman in tween for sitting area:

Our attic is slowly but surely coming to life and as much as I hate painting, I can’t wait to paint the room and do the finishing touches like the trim and our open concept railing. I am really wanting to have pops of navy, yellow and pink around the room, but still creating something that B will like and isn’t too girly. We are getting so close to the finishing touches it’s hard not to get excited!

DIY – Give Thanks Door Tags

I initially shared some of my wood crafts (see here) that I hoped to do with all of our left over wood from our attic.  Well I’ve made some progress, and wanted to share one of the first ones finished, it’s an easy DIY for your outdoor decor.

IMG_8241
Just a reminder: all wood was reused from our house, so I worked with what we had.

After the cutting was complete I wanted to create a faded chevron pattern, so I free handed the pattern with white paint on the tags.  After that dried, I sanded down significantly so the pattern was faded, enough for the wood grain to show through. Next I carefully free-handed the ‘give thanks’ on the tags, with a permanent marker. For the finishing touches, I found some old rope that the previous owners so generously left at our house and eyeballed the length and cut! Tied a knot, and done. Please I was able to use supplies from around the house, this virtually cost me $0 to make, just a couples hours here and there after work!

Finished
I gained inspiration for this from ‘That’s My Letter‘ – although the tags she made are much larger, I might go back to the drawing board and see if I can make mine a bit larger (with more scrap wood). The best part about these, is they can be reversible for the next holiday, I plan to share the flip side in an upcoming post (hint: green and red).