Bee Holiday Hacks – Christmas Cards

With the holidays quickly approaching, I wanted to share one of my holiday hacks for Christmas cards!  I love creating and sending Christmas cards, and usually like to get a head start on these – but I really got a jump start on this year and also wanted to share some other ways I like to share the Christmas spirit in a thoughtful and personal way, so you can too!
Holiday Hacks - the bee life
Plan Ahead.  Christmas cards can sneak up on you, so try to plan ahead whether it’s booking a portrait session with your honey or family at the end of Summer or early fall, or it’s getting ahead and ordering small batches of cards as you can.

Take Advantage of Freebies! 
I love Shutterfly – and luckily because I have the app and get notifications I can pick and choose which promos I want to take advantage of.  Shutterfly and Tinyprints were having 10-free cards throughout the month of October which can save you a ton of money when you’re only paying a few dollars for shipping!  You can also do this for address labels – I was buying Christmas patterns in the Summer!

Mix It Up.  Don’t be afraid to mix-up your Christmas cards.  Sometimes I can’t decide on which style, color or pattern I like – so I order multiple versions!  This is also a great way to use multiple photos for a gallery or one for more of a statement.  It’s also OK to not send photo-cards to everyone on your list, buy some fun Christmas cards to mix into your group, that way you won’t be breaking the bank!

Glam Your Envelopes.  Don’t be afraid to pick a colored envelope or add in a paper insert.  These can be fun surprises to recipients and pull the entire look of the cards together.  Also, if you use a darker envelop color it can be a fun way to write in gold when addressing your envelopes!

Personalize It.  Beyond sharing vacation pictures or memories throughout the year with friends and family that you might not see often, I always like to at least write our names or a little note on the back of the cards. Sadly, Christmas cards can easily be impersonal with the easy ability of printing/typing whatever you want to say!  So try and find ways to personalize it so you’re friends and family don’t feel like an after thought, or you just stuffed a card into an envelope.

Holiday Hacks - Cards - bee life
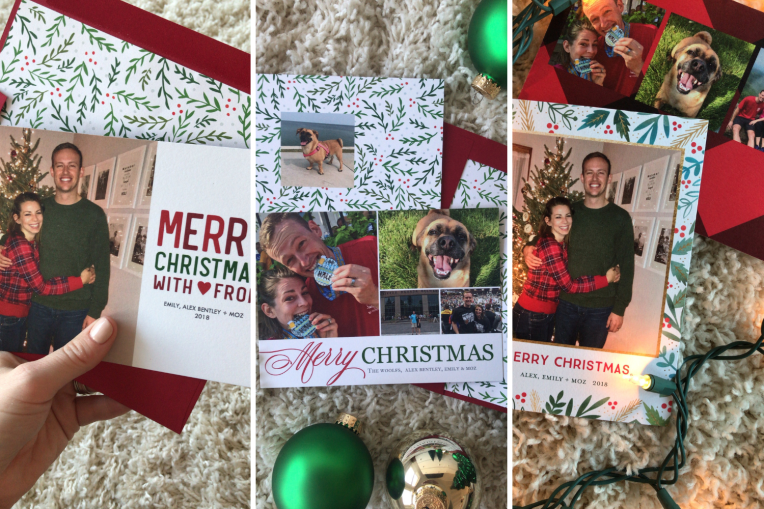
If you’re going the photo-card route, these can add up quick, so find ways to either use a promo code or take advantage of those promotions to get some free holiday cards!  Don’t be afraid to mix-up your styles or photos, my one go-to design pick is always trying to mix in some plaid and having a picture of Moz or two.  One last hack is making sure to purchase Christmas stamps in mid-November, AKA now, so that you can get the cute designs before they run out!

bee (1)


Shop My Cards: Merry Colorful Holiday Card from Tinyprints | Diagonal Wishes Holiday Card from Tinyprints | Gradient Scripted Merry Christmas Card from Shutterfly | Cheerful Foliage Christmas Card from Shutterfly

Hot Whiskey Sours – The Recipe

Towards the end of the summer I shared my Granny’s famous Whiskey Sour recipe – that I mentioned my family is game to drink cold anytime of the year, it shows up at Thanksgiving and at summer parties.  But I thought it would be delicious to try this family famous recipe out with a twist as the colder days start creeping in and make it a hot drink for fall parties and winter gatherings!
IMG_2584
What You’ll Need:
– Ten High Whiskey
– (2) Frozen Lemonade Mixes
– Water
– Maraschino cherries for garnish
– Lemon slices for garnish

Step-by-Step:
1. Dump your frozen lemonade mixes into the pot on the stove.  Fill up empty lemonade canister with water and pour over top – repeat this one-to-one for each frozen lemonade mix being used.
2. Stir lemonade mix and water together and bring to a boil on the stove top, once to a boil, let it simmer and eventually turn off heat.
3.  Pour your whiskey into your glass first, a large shot or a 1/4 of the glass – then pour your water/lemonade mix over top.
4.  Garnish with cherry juice, a couple cherries and a slice of lemon and enjoy!

It was a delicious twist on a great refreshing drink and definitely helped warm us up handing out candy on Halloween!  I’ll always love the cold version, but mixing in this new, super easy hot cocktail will definitely be making a few appearances at our house – plus B really liked it.  Looking for other festive cocktails – get some inspiration with these.

bee (1)

6 Pieces To Expand Your Wardrobe for under $30

Who doesn’t love a good accessory? As the seasons shift and the days get cooler, layering and switching up options for versatility is always a goal for me.  I like having outfits that work daytime and can easily be updated for an evening look for those week after work happy hours or last minute date nights.  The best part is you don’t have to spend a fortune to expand your wardrobe options!  Here are a few key pieces I always like to add to my wardrobe to help switch up looks – plus I’ve found pieces that are under $30 to help you expand your wardrobe too!Expand Wardrobe - bee life(1) More Scarves, Please!  Expanding your scarf collection with patterned and neutral scarves can expand your wardrobe options dramatically.  If you’re working with a  patterned scarf, like this Leopard Print Scarf from Gap  – you can stick to a neutral color palette as your base canvas versus a neutral scarf with a patterned dress or sweater.  Scarfs can also help you transition summer pieces into fall!

(2) Classic Booties. And buy multiple colors! Once you find a good classic pair of booties, stock up! You will quickly find that you’ll be switching these in and out all season long.  A great pair of booties can go with a variety of looks from a dress to jeans, plus they keep your tootsies warm!  Check out these booties from TJMaxx that come in both camel and black… and yes they’re under $30.

(3) Statement Necklace.  A statement necklace can change a whole look taking it from basic to glam.  I love taking a more casual look and adding a necklace making it feel more complete and ready to take on the day.  This is also another easy way to transition an outfit from daytime (no necklace) to nighttime (necklace!)  Pro-tip: Stock up with sales, like this sale at New York & Company happening right now!

(4) A Nude Handbag (or four). You should probably have like four nude handbags in different styles from over the shoulder, to a structured tote, to a work bag.  A nude bag can help make a statement when paired with fun colors, and is also professional for the work week! Aldo has a handful of nude stunners on sale, for under $30.

(5) A Neutral Jean Jacket. For under $30?! Hell yeah! The key is finding one that is classic and neutral both in colors and embellishments like this Jean Jacket from Target.  With the right jacket your wardrobe can be styled from casual to evening and from summer to fall.  Pro-tip: if you plan to layer a lot with you jean jacket, consider going up a size, or you may be somewhat limited to your seasons!  I love styling my jean jacket with a fun dress or styling it down with a t-shirt.

(6) Layering Vests.  Adding a few vests to your wardrobe will not only be functional, but will also give you a variety of options for switching out looks for continued versatility.  Having a few key vest types can help whether you’re dressing up a look (like this Vest from Nordstrom Rack) or being more casual on the weekend for a quick trip to the store or a walk with the pup (shop this Puffer Vest from Old Navy)!
6 Pieces Wardrobe - the bee life
Shop the pieces: Leopard Print Scarf from Gap | Vest from Nordstrom RackJean Jacket from Target | Booties from TJMaxx | Structured Tote from Aldo | Statement Necklace from New York & Co.

I am always looking for easy and budget friendly ways to expand my wardrobe while making sure my looks and pieces are functional!  A lot of these may seem like basics, but the key is to expanding and adding to your wardrobe expanding outfit options for all occasions.  Happy Shopping!

bee (1)

5 Hosting Tips for Fall

It’s getting to one of my favorite times of the year – the time for holiday parties and plenty of opportunities for hosting friends and family.  Whether you’re planning an intimate sit down dinner or a more festive party, these five tips will help cover your bases, wow guests and have a fun night to remember!
Party Hosting Tips - the bee life
These tips will also help you relax as a host while still having those finishing touches and taking your party to the next level.

  1. Consider a Bulk Signature Cocktail. Signature cocktails can be fun, especially if it’s more of a seasonal drink for the fall and winter months.  As a host pro-tip, make these in bulk ahead of time in a pitcher or shaker – that way you won’t be stuck making everyone a drink as they come in.  Don’t forget the garnish and a fun cocktail napkin to top off the full effect!
  2. Make a Killer Charcuterie Board. This can serve as your focal point and will cover the bases on a variety of food categories from meats and cheeses, to breads, jams, nuts and fresh fruit that will make guests want to dive right in.  Check out Skinnytaste or Spend with Pennies on some tips to making a killer board.
  3. Don’t Forget the Dessert! It’s easy to get caught up figuring out the main dishes for the evening and overlook the best part, dessert!  This is something to keep simple whether it’s buying some more expensive chocolate bars, baking fresh chocolate chip cookies or asking friends to help bring this, so you can check it off the list!
  4. Plastic vs. Non-Plastic Plates. The great debate on which to use continues! I often shy away from plastic because I prefer the aesthetic look of plates – but depending on which type of party you’re hosting, one might make more sense than the other.  For example a more intimate dinner party or smaller guest count may call for plates to add that extra touch, but if you’re having a large party that is a bit more casual save yourself the end of the night clean-up and grab plastic bowls and plates!
  5. Create Welcoming Smells. This can be an easy victory – if you’ve been prepping food all day, your house might have a mixture of smells, so to clear it up light a few candles with similar scents throughout your home (don’t forget the bathroom!) or throw in some chocolate chip cookies right before guests arrive for a homey welcome.

If you’re looking for inspiration to host a fall party and ways to keep it simple read; 5 Reasons to Host a Fall Party.  And don’t forget to have fun and enjoy your own party, as the host it’s easy to get caught up in perfection and making sure everyone else is taken care of – but don’t forget to grab yourself a drink too!

bee (1)


Image Sources:  Skinnytaste \ The Effortless Chic | Apartment 34

Granny’s Whiskey Sours – The Recipe

I can’t believe I haven’t shared this recipe with my fellow bee readers.  Before I share this with you all, I have to give you some of the history, why this recipe is so sacred and why it’s so fricken good. And also, I’m sharing this with you because it’s still summer despite what the rest of the social world seems to think!
Whiskey Sour Recipe - bee life blog
Urban legend has it, this is my great-grandma’s recipe – it’s unclear whether this was a family staple, or a staple that was also shared at the bar (Marty’s) they owned in St. Louis near Anheuser-Busch.  Helen was born September 11, 1911, she was the woman who told you to ear your crust otherwise you’ll have long saggy ear lobs, like she did (although, I’m pretty sure they were from the clip-on earrings she rocked) the woman that also smiled, was always dealing cards and laughing.  This recipe is so detailed and specific that you must follow the rules and directions to a tee, or you will mess up the whole thing!  The most important rule to remember is 1-to-1-to-1.

What You’ll Need:
– Ten High Whiskey
– Frozen Lemonade Mix
– Water
– Maraschino Cherries
– Ice

Step-by-Step:
1. Dump your frozen lemonade mix into the blender.  Measure out your whiskey by filling up the empty lemonade canister, pour into blender over top frozen mix.  Fill up empty lemonade canister with water and pour over top.
2. Blend up, until nicely mixed together.
3. Over rocks, in a scotch glass pour mixture – garnish with some cherry juice & cherries.

The recipe is so simple and so DELICIOUS, it’s one of the reasons I love it so much plus it was my Granny’s so that’s just the cherry on top (literally).  Another fun little story about my great grandparent’s bar near Anheuser, is a lot of the brewers and workers from the brewery would come for lunch or after work to the bar.  Which meant my mom and aunts as children had special visits to the Clydesdale barns and were even able to ride the horses!   This recipe is a staple at most gatherings and family events, whether it’s summer or we’re cooped up inside — we always cheers to ‘Granny’ after a batch is poured.

So go ahead and enjoy this delicious drink and don’t feel bad when you’re whipping up your second batch of sours.

Cheers!

bee (1)

Dairy Free Queso – The Recipe

A little while back I shared a few recipes for my fellow dairy-free eaters that want to enjoy taco night!  Coming to terms with my dietary restrictions and not being able to enjoy some of the staples of taco night (sour cream… queso…) has been an ongoing process, but within the last year and a half, I’ve finally mastered saying no and working to find healthier alternatives that work with my diet! Enter; dairy free queso.
Dairy Free Queso - The Recipe - bee life blog
What You’ll Need:
– Cashews (2-cups)
– Nutritional Yeast (1/3 cup)
– Almond Milk (1/2 cup)
– Corse Sea Salt (2 teaspoons)
– Lime Juice (1 tablespoon)
– Chili Powder (1/2 teaspoon)
– Fresh Cilantro, chopped (1/4 cup)
– Rotel Tomatoes w/ chile peppers  (10oz can)

Step-by-Step:
1. Soak your cashews over night in water (5-hours minimum)
2. Drain cashews and mix with all ingredients except the Rotel Tomatoes.  Using a food processor blend ingredients on high until smooth.  I opted to try and use our Vitamix for this portion, I wish I would’ve pulled out the food processor – the consistency wasn’t as smooth as it should’ve been.
3.  Once the ingredients are blended, put mixture into skillet on stove top and mix in Rotel Tomatoes.  On medium/low heat stir as needed to warm and mix everything together.
4. Garnish and serve with chips and salsa!

This recipe was surprisingly easy to make and not time intensive – which is nice for a change when it comes to a dairy-free recipe!  I will definitely be giving this recipe a go with round two, this time using the food processor and probably a little more nutritional yeast to help with that cheesy flavor.  The recipe above was adapted from The Cookie Rookie – but will probably try a few others and adapt together. Do you have a dairy free queso recipe? Tips? Leave a comment, below!

bee (1)


Latest Obsessions 08.18

Surprise, surprise – this month’s latest obsessions are mostly house obsessed, as I’ve got my eyes on the next prize and the projects just seem to keep getting bigger and bigger.  Beyond the house project bug, weekend getaways and trips or seasonal parties also have me heart-eyed with excitement.
Latest Obsessions 08.18 - the bee life
Basement Projects.  This is a two part.  Part one has been talked about off and on with B, but seriously discussions and planning have started to take place to build out a full-bathroom.  A good friend is a plumber, so with his expertise and help it doesn’t seem so daunting, yay!  Plus, it will add value to our home, making it 2-baths vs. 1-bath. Part two, is making the other space a bit more livable – we have a decent amount of space for storage, so the configuring has been playing out in my head and I think we can make it work.  The livable space might just be a bit industrial chic vs. completely finished basement. I love this article for some inspiration on finishing touches for your unfinished basement.

Seasonal Parties.  I can’t help but get excited for upcoming season parties, whether we’ll be hosting or attending – from the calm bake, to dare I say it…. Christmas?! Yup! I’m just looking forward to creating new memories and fun with family and friends.  And the only reason I have these on my mind, is because schedules get so crazy – we have to plan that far ahead especially if we want any chance of getting on our family/friends schedules!

Getaways.  Whether it’s a quick two-hour drive or a flight across the country, the travel bug continues and I’m excited to get out of town for a bit in the coming months.  With that, I can’t help but want to find the best brunch spots, shop for a few new outfits, and figure out other fun details to weave into the trip.  I’m trying not to wish these to come too soon though, because time has certainly been flying lately!

What’ve you been obsessing over? New house project or fashion trend – leave a comment, I want to know!

bee (1)


Image Sources: Bathroom Inspiration Party Decor Inspiration Unfinished Basement

Blueberry Mint Mixer – The Recipe

Summer may feel like it’s coming to an end – but let’s hang onto it just a little longer… I have an easy and tasty cocktail to help fill those hot summer days and long weekends!
Blueberry Mixer Recipe - the bee life
What You’ll Need:
– Vodka of your choosing, I used Tito’s
– Tonic water
– Frozen blueberries
– Mint leaf ice cubes

Step-by-Step:
1. Prep! The night before, get some fresh mint and make some ice cubes with mint in them! Rip off mint leaves and place into the cube tray and then pour ice over, have it sit overnight and you’ll have some fancy and tasty ice ready for your drink!
2. Okay, time to make the drinks! Place your mint ice cubes into the glasses and sprinkle a spoon or two of frozen blueberries over the ice cubes.
3. Use a shot glass and pour your vodka in, this is totally on preference, but I usually keep my drinks 1-to-1 with alcohol and the mixer. Once you’ve added your vodka, top off with your tonic.
4. Give it a stir, cheers with your boo and enjoy!
the bee life.pmg
This one is easy to have all the ingredients stocked around the kitchen and has hints of summer written all over it with the light flavors from the mint and blueberries.  The pinkish-purple coloring really make this a fun drink – not to mention the pretty mint garnishes from the ice cubes!

bee (1)

Dairy Free Taco Night Recipes

There are a few staples that I miss dearly being dairy-free among my many other dietary restrictions, a few of those being staples at taco night… *clears throat* queso… sour cream… cheese… all the good things!  So since I’ve been sticking to the opt-out of dairy lifestyle and finding substitutes or alternate recipes to fill in those gaps, I wanted to share a few recipes I have my eyes on and will be testing out in the kitchen here shortly.
Dairy Free Taco Night - bee life blog
For any of those newer to the dairy free world, in case you didn’t know but a lot of recipes use cashews as a substitute for cheese.

Vegan Queso: I’ve been scoping out a few different recipes a spicy jalapeno recipe, this delicious looking one, and then one surprisingly with eggplant instead of cashews! I’ve already assessed a few of these and know I’ll have to peel back on some of the ingredients and alter accordingly to make sure they’re kosher for my stomach – but that is the fun part about cooking!

Dairy-Free Sour Cream: A 10-minute recipe to give you the taste and texture of real sour cream, sign me up!  This recipe looks so easy it would be silly not to try it out – and have as the perfect topper for build-your-own tacos!

While I continue to research and look for more dairy-free recipes to try, I feel like I can at least start getting back to a normal taco night by incorporating these recipes in.  I’m also super lucky that B not only is game to eat and try these different recipes out, but he often takes the first step and makes a lot of them with me!  It definitely helps being on the same page when it comes to diet and restrictions, because it can become a lot to remember!

Do you have any dairy free recipes that you just love? Leave me a comment! I want to try them!

bee (1)


Image Sources: The Cookie Rookie | 24 Carrot Kitchen (recipes also linked above)