As we were working through our backyard makeover, one of the curveballs B threw at me was wanting to hide the paint chipping white garage, in addition to adding the raised planter boxes for extra greenery. I instantly jumped on Pinterest searching for inspiration for a decorative solution that we would be able to customize. I searched ‘modern decorate fences’ and found some inspiration that we could easily recreate and pitched the idea to B.
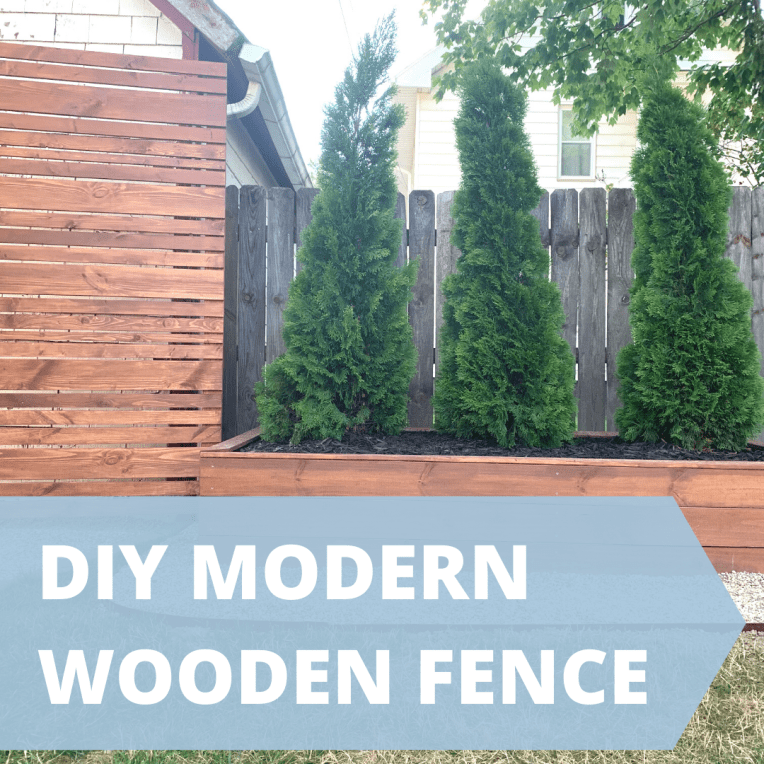 The pitch was a success and the project was a go! The advantage of this project and any DIY project is being able to create a completely custom fence that fits your space and dimensions. We ended up throwing in two other fences to place around our ‘property,’ one in front of our garbage cans along the side of our driveway, and then another on the North side of the house in front of our air conditioner. The thing to remember with these fences is they weren’t going to be complete privacy, but help off-set and distract from the ugly things.

Project Supply List:
– (13) 1ft x 3ft x 8ft
– (6) 1ft x 2ft x 8ft (post supports for smaller fences)
– (5) 1ft x 6ft x 12ft
– (1) 1ft x 6ft x 6ft
– (2) 2ft x 4ft x 10ft (post supports for large fence)
– Thompson’s WaterSeal Stain & Foam Brush
– Post Hole Digger
– Quick Time Concrete
– Nail Gun / Screw Driver + Screws (large fence)

Figuring out the number of pieces of wood and sizes to get and make all three of our fences, was a headache and quite the math equation that B successfully conquered — even though it took us awhile to get there. As I knew I wanted 6″ wide pieces and 3″ wide pieces, I just didn’t have the complete layout and patterned figured out based on the height variations. There has also been a wood shortage this summer, so B had to do some home improvement store hopping to get all the sized pieces we needed — luckily we were able to get everything!
Our Fence Dimensions:
– Back Fence: 7-feet tall* by 4.5-feet wide aka (16) 3″ pieces, (5) 6″ pieces and (2) 1″ pieces
– Garbage Fence: 5-feet tall* by 3-feet wide aka (12) 3″ pieces and (4) 6″ pieces
– Air Conditioner Fence: 3-feet tall* by 3-feet wide aka (8) 3″ pieces and (2) 6″ pieces
*This is the height above ground, we accounted for 1-2ft in the ground depending on the overall height.
Once we secured our wood, based on our estimations, B cut away to get the estimated pieces per board. Once we had everything cut, I was able to play around with the pattern and get the pieces figured out — it was definitely a move around, take a step back and see what looked and felt right. Once we had our pattern in place it was go time. For the two smaller fences we used a nail gun and getting these put together was relatively quick, as we also just eyed the spacing between each pieces, made sure things were level and fired away.
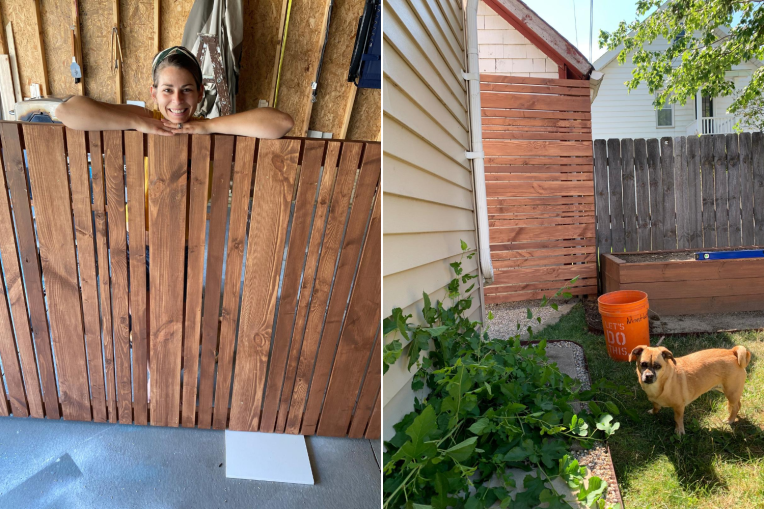
The large fence was a bit different and took some adjustments after we created the two smaller pieces. One adjustment was switching up the support pieces to 2ft x 4ft x 10ft — due to the size and slatted wood pieces, this fence was not only heavy but also pretty big (see me standing with it above), especially accounting for 2-feet to put in the group, it was a bit guy to navigate. We also ended up screwing the large fence together (instead of a nail gun) and did the screwing from the back, so that you wouldn’t see any holes from the front.
When it came to staining, we used the same stain we had from our planter boxes, we had plenty left over to create a cohesive look. I ended up staining the fences two different ways, one with the fences built and one as individual pieces — I’m not sure which I liked better, the individual pieces was definitely a bit more tedious. But, I do know overall I would pick staining any day to painting — it’s so easy and workable to make it blend the way you want. Luckily we were staining in the heat, so they dry time was quick if we wanted to apply two coats.
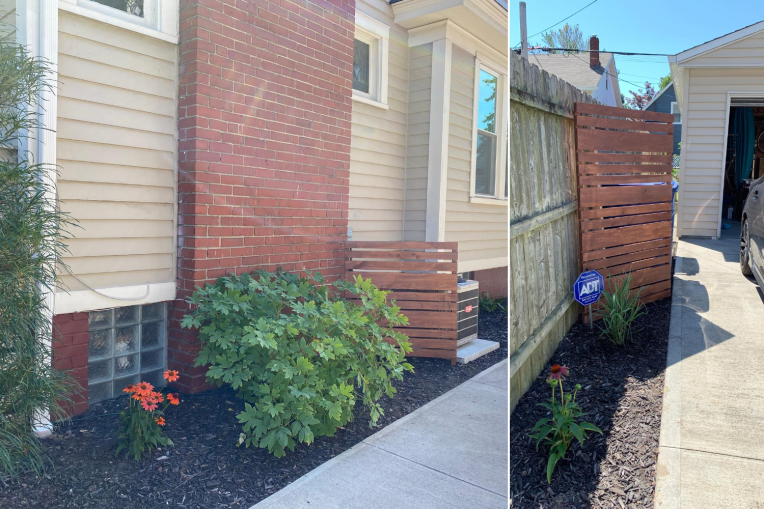
We ended up angling most of these fences for final placement so that more space was covered and we were blocking the ugly things just right. This of course, took a bit of time and tapping to get just right! We also made sure to strategically place the larger back fence in front of the garage, so that form a farther distance you couldn’t see the end of the fence! I think my favorite fence beside the big one, is the one in front of the garbage cans, when you walk into our backyard it’s just such a welcomed look and as we’ve worked on adding flowers along the side it definitely makes it feel more complete!

 We had two different ideas on how we could do this. Mine was making planter boxes and B’s was building up the ground and using rocks to build a sort of wall. I quickly sold B on the planter box idea, for a few reasons — (1) we could customize the dimensions and look however we wanted to fit our space and (2) the stones I would want to put in the backyard would be expensive, as I’m not the biggest fan of the more generic ones you can find in stock at home improvement stores. Thus the planning begun and the measurements started. We ended up adding in a second planter box to the right of the main area to help B out with another dead grassy area that he hates!
 The larger planter box we made was 8ft by 4ft and the smaller planter box was 4ft x 3ft, both 18 inches tall. We used 2×4’s for the posts and then used pressure treated wood for the exterior sides and stained them for extra weathered protection. We cut all of the wood and I stained it while B worked on getting the holes dug for the support beams.
 Once we got the boxes in place, we felt super accomplished and add top pieces to help finish them off! From there we ended up lining the insides with a
 Once we finished the edging off, it really brought this space to life and separated it from the rest of the yard — without taking away too much from our green space (which was a constant concern for me!). We got three yards of dirt delivered pretty quickly – for the record, we ordered way to much and could’ve gotten away with two and a half yards or so. We also got this delivered on one of those red hot July days, B busted his butt and filled the planters (not recommended). When we actually got to planting, we had to remove a lot of dirt so that was why we ordered too much! For the plants, we knew we wanted to get arborvitaes for the large planter box to add a bit more privacy, so we did our research and visited the nursery to pick out trees! We ended up buying a bit more expensive ones that were already 4+ft tall. We also kept going back and forth between getting two or three — we ended up choosing three knowing that we will need to trim and maintain them a bit more!
 For the smaller planter box we got a hydrangea – which I think I’m going to switch out for a Limelight version, like we have in