Attic Update – 4 Month Check-In

Our 4-monthAttic update!
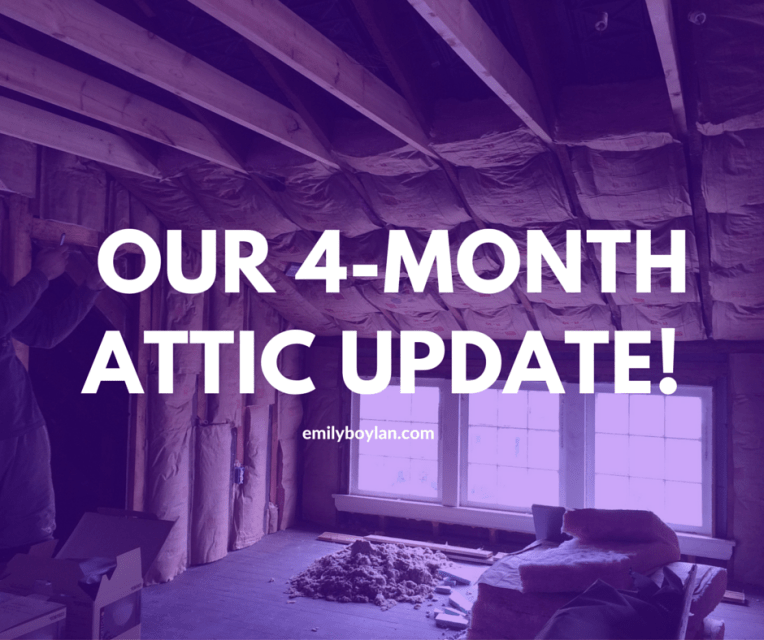
Well in case any one is loosing sleep out there, here is an update on our attic! hehe. Since my last update a month ago; it’s been nothing but insulation.  B has been doing an awesome job at insulating the place, adding baffles and making sure everything is “properly breathing.”  Insulation is a messy and time consuming job, but the end is in sight!

Drywall started this weekend, and the space is looking like a room again!  Last week we made a Lowe’s trip and tried to pick up and order a lot of the finishing touches for the attic, like paint, blinds, closet doors and the drywall! So now it’s really getting there.

A few of the questionable items, like what we are going to do with the floor have been cleared up.  We are going to paint it a light grey and call it a day, we bought durable gloss paint for a more heavy-duty finish. We are also hoping to put some sort of carpet tred or runner up the stairs to soften the squeaky steps.

I have a few more fun projects up my sleeve for finishing touches, I’ve made good progress on re-beading our chandelier, and am sketching some DIY plans for our custom wing-back upholstered headboard.  Another part I can’t wait to get doing is customizing the walk in closet with useful shelving and making the most of the “small” space.

We’ve put two-solid days in this weekend of drywalling and will continue nightly after work.  B’s brother and dad will be in next weekend to hopefully finish up the last of it!

Keep your fingers crossed everybody! We are getting there!

Front Door Makeover

If you may remember, I was having quite the dilemma figuring out which color to paint our front door.  After much deliberation and making sure B liked the choices too, we decided on… <drum roll please> … on Sherwin Williams, Commodore!

We went from blah to blue! And it looks awesome.  I think the part that makes this blue pop even more, is the life I restored back into our original door knocker.  It too had been painted the same ugly tan color as the door… the original brass knocker… painted! I couldn’t believe it! Nicole Curtis would be proud of all the elbow grease and extra effort I put in to restoring this.  My initial thought was to just spray paint it gold – but I just had to try and get all the (2-layers) paint off and restore it to it’s original, gorgeous glory.

IMG_7785

IMG_7783

IMG_7788

How did I get all of that paint off? Boiling water soaks and SOS/Brillo pads, a lot of them! It was tough getting around all the detail in the top, but I kept on and it totally paid off.  Next steps is to swap out that storm door with a full glass storm door – as much as I would love to ditch it completely, I like having the front open for a breeze in the summer and guarding the cool wind and snow in the winter.

This was such an instant upgrade and I’m so pleased with the way it came out, better than I thought!

House Hunters – Attic Retreat

One of the things that we loved about our house was the attic.  Especially after we had seen a dozen or so homes with not so great attics and just as bad basements.  In our city, 100 year old homes are the standard, no cookie cutter houses here, but with that when you find a gem you have to move quickly… unless pure fate is on your side. So when we saw our bright open, massive attic space we instantly had dreams of making it our master… our own retreat.

Beyond just the furniture which we have some loose ideas around, as seen in my previous post House Hunters – Bedroom Retreat.  One of our larger projects was to raise the roof! Not literally but we wanted to raise the ceiling.  Having a 6’6″ boyfriend with a 6’7″ clearance… doesn’t leave a lot of head room. hehe. So this past week and weekend, we have been removing the ceiling and all of the insulation to see what was up there.  We were able to gain 6-inches of clearance, which is better than having B’s hair brush against the ceiling. Some electrical needs to be reworked and we need to figure out insulation. From there it’ll be drywall and finishing touches.

I can’t wait until it gets finished, I’m so excited for my walk-in closet (which I am sure I’ll end up sharing with B, because I’m too nice). The second thing I am most exited about it is getting a king sized bed. Surprisingly (or not) we don’t even have a queen size for as tall as B is. Beyond those things; the ideas are endless with finishing touches and organizational ways to fit within the attic space. Here are some ideas we’re hoping to replicate:

Can’t wait to show off the finished photos, although I’m thinking this is going to take some time! I know our goal is to get most of this complete by the winter!

Transformation Tuesday no. 8

This past week, B and I did a quick and easy DIY makeover – this has been in the works for a few years now.  B had these sort of hideous black shiny dressers with golden knobs.  Although not that pretty, super functional and great to have. So we finally refinished and painted them!  The knobs got updated too, the cheapest route – because if any of you know knobs/light covers, etc. are the most expensive items that add up quickly!  If we wanted to replace all of the knobs it could cost almost $200 (on the high-end)… not the point of an easy, inexpensive DIY.

We grabbed some spray paint and started sanding to get as much of the shine off as possible.  The sanding was probably the hardest part – B tackled this like a champ.  I was the go-to spray painter – after two coats they were good to go! Not only are they more our style, but they open up our room so much more, we no longer have these glaring shiney black pieces staring at us! I bought a table runner to place on top so that our TV and items won’t mess up the new paint.

It was such an easy, and relatively inexpensive update, we are both so happy with the way it turned out.

Transformation Tuesday no. 7

A little over a month ago, I was brainstorming some ideas for our empty, yellow and brown sun room. Well we ended up going in a completely different direction, but I absolutely love it. We ended up painting the room white, and adding some base and crown molding to give it more of a finished look.  Since we got new furniture, the big debate was what to do with our old leather couch and our super comfy, yet not so cute recliner. Solution? The sun room! Not to mention I had some fun colorful pillows that just didn’t go with our new furniture – B had the brilliant idea of re-purposing in this new space.

One of my favorite parts is the curtains, we used PVC pipe and little hooks to make the curtain rod, it goes around the entire window frame, it was super inexpensive and all custom. I also love our Jackson Hole pictures topping off and making this a true retreat. I love all of the color and patterns, I realize it’s not everyone’s taste but I love to mix it up and have some fun.

Transformation Tuesday no. 6

Our living room is finally looking grown-up, and I absolutely love it. One afternoon of; “Let’s just go look at furniture” turned into us actually pulling the trigger and buying it. One of our challenges was finding furniture that was deep enough… B is 6’6″ and I wanted him to be able to fit and be comfortable, plus once he tried out a deep couch he was sold; that was what we needed.  Mind you 45″ deep couches aren’t that popular; nor do they come in a lot of styles. With our oblong living room I wanted pieces that could be versatile and could be rearranged. Our other sticking point was the fabric and color, we wanted something light colored and also more lineny – no microfiber in this house! So once we found our pieces, we knew they were it, hitting our size/color/fabric requirements while being the perfect mix of the style we wanted.

Before:

After:

Luckily we could keep some of our original pieces: the coffee table was a steal from an antique store, while the light blue ‘car seat’ chairs were from B’s parents.  The rug was a steal from target being $40 and it’s Moz’s favorite – every time we get a rug she just goes and lays on it. It’s the cutest thing. There will always be finishing touches, but I am loving how this has come together so far.

Transformation Tuesday no. 5

Another Tuesday, another Transformation.  Our bathroom has come a long way since it was initially revealed in TT no. 2.  Small fixes along they way have been made like a new faucet, a new mirror and finally our open closet shelving.  The closet in the bathroom was sort of an odd ball, but had so much potential.  We opted to keep it without a door but wanted to spruce it up by adding some open-concept shelving.

Before
It was just an open space with a few hooks, and horrible pastel blue color, just wasted space.

After
A pop of color was needed to add some contrast with the white shelving and accents. My glass holders are recycled from Bath and Body Works candles, a little soaking and scrubbing and they’re perfect for cotton swabs, Q-tips, and other necessities! Baskets were newly purchased from Target, to continue with the clean white accents, a few more are needed for various things and new white towels will be a future purchase too! I love that everything is in one place, a one-stop shop and organized – it’s perfect for me and B, and guests!

Our next project in the bathroom will be getting rid of the horrid flooring and tile on the walls! I need some white subway tile in my life.

Transformation Tuesday.

It’s my inaugural Transformation Tuesday! Are you excited? I am, this means we are starting to wrap this up! But since we aren’t quite finished or moved in, here are a few of the projects we’ve completed, although small in tow, have made a huge difference.

1. Carpet Removal – Hardwood Please
This one was simple… as soon as we saw this carpet, and the gorgeous hardwoods in the rest of the house we just had to tear this up. So we did, the first weekend we got in the house.  And with Moz’s help, poof! The carpet disappeared… luckily it was in a small area of the house.


2. Wallpapered Built-In’s
My first initial instinct was to add a little more life into these beauties by painting the inside yellow so they would pop! Then I remembered I had some left-over embellished wallpaper from when we made our bar (I’ll share in a future post).  After some measuring and cutting, I soaked the pre-glued wall paper, waited 5-minutes and then placed into the built-in’s… wah-la! Instant character.  I love this patterned wallpaper because it reminds me of tin ceilings, without actually having dark tin ceilings in your house. The pattern is subtle enough that it isn’t too distracting, and it brightens the cabinets up just enough, I love it.

I can’t wait to share more before and after pictures with you! Honestly, I have to keep reminding myself to take the before AND after pictures… hopefully we can get the majority of the work finished up this week.  We have been putting in long nights after work, and full weekends for the past three weekends. It’ll be nice when it’s all over.

Happy Homeowning!