Transformation Tuesday no. 4

This TT (Transformation Tuesday) is one of my favorites yet. I totally underestimated what a change this would be, especially to such a small space. Our side entry aka ‘mud room’ was a huge eye sore, dark paneling, layers of old flowery wallpaper, and crackling ties.

Before

When we first got our keys in November, starting to tackle taking down the wallpaper was a random project that I worked on for one afternoon and then just stopped as I got to the third layer! And then it sat like that for weeks until finally I had the white paint open for another little project and I decided to paint over that wood paneling! Then B got into it, and we removed the rest of the wallpaper one afternoon … then I tore up all the floor ties, curious to see what was underneath, and after a few more rounds of paint… wah-la!
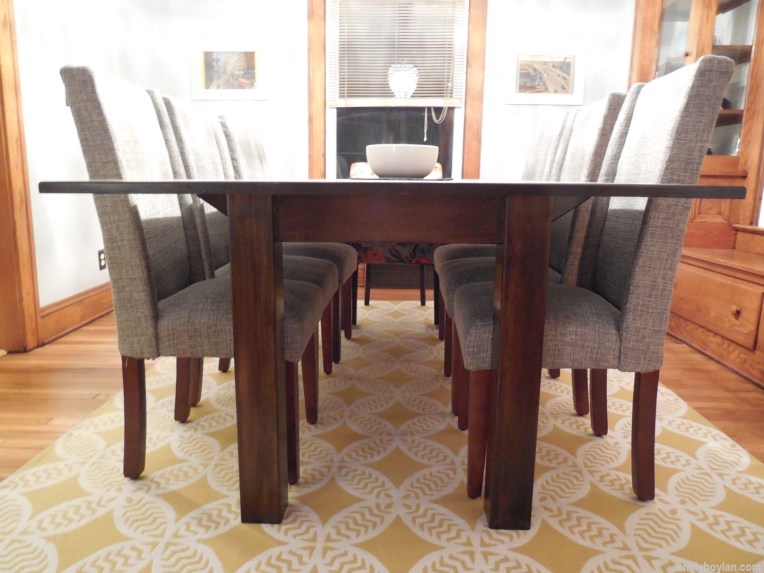
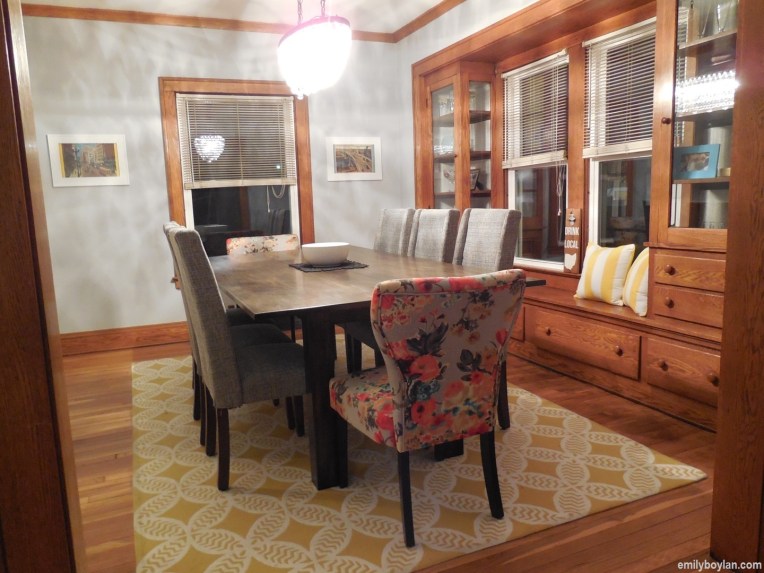
After

Rug / Roller Shade / Hooks / Shelf

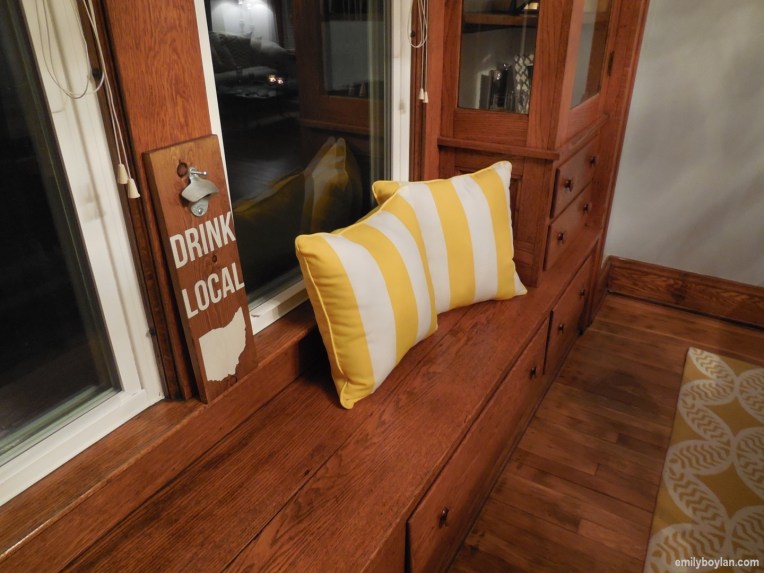
We had all left over paint for the white and even the walls, which just looks so crisp paired together! The wall color is the same color we used in our hallway stairs going up to the second floor. Underneath the tiles was wood that was half painted and half not, so we decided to go all white again, eventually we would like to get some stone tile down. We bought a decent size rug, new roller shade for privacy and sunlight, and a floating shelf and some hooks to complete the coat area.  I grabbed the white standing shelf from another closet to finish the look. I truly can’t get over this, it’s so bright and big, for a small space, (it looks even better in person).

More things will be added along the way, of course, but this is one of my favorites so far!

Weekend Update

Happy Last Monday of February!!

I know not all of you are lucky enough to live in the Midwest, but this past month has been freezing cold with snow-filled weekends! Living in a 100-year old house, and negative degree temperatures for consistent days in a row means frozen pipes.  Luckily(?) our frozen pipes are isolated and only in our kitchen, each time they freeze we learn something new… so long story short one of the fixes was putting in a new faucet.  B and I are now trained plumbers, thank you very much! Teasing, but we did it all by ourselves and it’s such a change physically along with hopefully helping the pipe freezing problem (we can now run cold and hot water at the same time) … and that was only Friday night!

Saturday morning I helped my aunts out while they went out of town and went over to feed their girls, Opa! the puggle and Maya, the black lab, also meaning Moz got to play with her cousins!  Of course Saturday morning was a mini blizzard, nonstop fluffy snowflakes falling and terrible, not plowed roads, so shoveling was a necessity. With bad roads and the beautiful snow fall, a relaxing day at home doing some little projects was the plan! Followed by a night-in, our own little happy hour with a cheese board paired with some Manhattans. And we topped the night off with DiGiorno pizza and a movie. We watched Sex Tape with Cameron Diaz and Jason Segel, it was actually pretty very funny!

Sunday was productive and relaxing as well (well sort of).  Breakfast and coffee and some Millionaire Matchmaker in the morning, followed by Church, the gym and some shopping/errands (which of course went longer than expected).  Home to relax for a bit and do a few more little projects (can’t wait to share these soon!) before dinner with the aunts and of course, more snow!

It was a very nice weekend, it wasn’t over complicated with endless trips or errands, it was productive and relaxing all at the same time.  Hoping to have a few more of these in the future! Hope you are all staying warm, wherever you may be.

House Hunters – Centerpieces

One small decorating detail that I have been rambling my brain on is a centerpiece arrangement for our massive dining room table.  Ideally I would like it to be usable year-round, but allow the possibility to add holiday touches.  Surprisingly, Pinterest has not been much help.  I like portions of centerpieces I’ve seen, but not the whole thing, so I am just going to have to get creative!

Wishlist:

  • Something that is classic and clean
  • Fresh flowers (everyday)… but highly unrealistic – fake flowers are not an option
  • Year-round
  • Airy and light

At this point I am leaning towards different size glass vases/cylinders that would house candles.  I also like the idea of candlesticks, but I want to potentially do this for our fireplace mantle, which is also a constant thought and struggle – everything I see is holiday related!

Pinspiration:

My search for that first piece to drive the inspiration is ongoing, even window shopping in multiple stores looking for that one piece has been unsuccessful, but I am determined! I can’t wait to share the end result, hopefully sooner rather than later. Until then any advice, pictures or tricks you did would be awesome!

DIY – Race Medal Display

I am excited to share with you my adaptation and more affordable DIY version of a Race Medal and Bib display for our home office.  I first saw the idea at a friend’s apartment, she had a cute single-bib holder with some text and hooks for metals.  As the weeks wore on and our race medals sat in a box in our office, I remembered the idea and went online to see how much these were! On Etsy, they range anywhere from $30 – $50, which while affordable, I knew I could do this much cheaper!

Step 1: Find a piece of wood that fits the desired size. Since B and I both run, I wanted to be able to display both of our bibs, separately so this had to be long enough to accommodate two 8-inch race bibs. I also wanted to have a catchy/cute phrase on the board too… more room needed.   It just so happened that we had a wood piece from our table that we got to sample stains from the carpenter… turns out this board was the perfect size to a T.  Cost = $0

Step 2: Measure + determine design.  I grabbed our race bibs, placed them on either side and penciled in the top holes for place makers and then eye-balled where I would want the hooks to go along the bottom for the medals.  The phrase I decided on was borrowed from one I saw online; “Soul Mates in it for the Long Run.”  This phrase is so fitting for B and I and goes back to the roots of when we started dating, four years ago.  It was maybe a week into dating and I was running my first half-marathon, while B was running a 10k.  The first person I ran into, in the crowd after the race was B, literally ran into each other, and if you have ever been in a race before you know how crowded they are! I knew it was something special when that happened.

Step 3: Paint backdrop. I had some left-over acrylic paint in grey and white (just what I needed) so I grabbed those and started to paint! Cost = $2.50

Step 4: Buy hardware. I needed little hooks for the bibs and then larger hooks for the metals.  The hardware store is literally 5-houses down the street and around the corner so a quick trip there and I was in business!  I ended up needed 1-pack of the smaller hooks  ($1.29) and 3-packs of the larger hooks ($1.35 each).  We also needed sawtooth hooks for the back and other hooks for the wall (about $5). Cost = $10.50

Step 5: Stencil + paint phrase. I wanted this to look better than all free-hand painting, so I printed out the phrase and cut the letters, traced in position to make sure I could fit everything, then painted! I then free-handed the other writing and added a cute personal touch of “est. 2011” – not perfect but it works!

Step 6: Apply hardware. This was a little tricky getting the square bent hooks into place and definitely took some patience, after starting a hole with the screwdriver we were able to get these screwed into place.  Afterwards I placed two large sawtooth hangers onto the back and then nailed 50lb weight picture frame hooks into the wall.

Step 7: Hang up + decorate with metals + bibs.

Total cost: $13.00

Now our race bibs and metals have a nice home… and plenty of room for more to come in the future!

Transformation Tuesday no. 3

Remember that post when I “designed” our future dining room? (In case you missed it see here: House Hunters – Dining Room Design)… I also mentioned that we were having a custom table built, well table is complete, and dining room is complete!  We ended up going with my original design, but ran into some problems with the chandelier.

WORDS OF ADVICE: Don’t fall in love with something “available online” only to find it’s no longer available online or in any of the stores… also try and find similar models from different sights, just as back-ups or comparison.

I could not find a replicated chandelier of the one in my original design post ANYWHERE. It was my mission, I was so determined, but found nothing! And I called almost every Home Depot asking for the Hampton Bay, Menlo Park 6-light chandelier… I even went as far as upstate NY near my parents searching for this bad boy. Sold. out.

So… I had to try and find something else, it was hard but we finally found a replacement that we both liked and played into the character of our 100-year old home. We also went with chairs from Target, not only are they durable (and beautiful) but getting two chairs for the price of one (if that) is unbeatable!  Our table was built by a friend’s friend who is a carpenter, we were able to pick the wood, customize the size (8-feet by 4-feet), legs, spacing, height…everything. We ended up staining and finishing the piece ourselves to save some money and it came out great.

Before

After

photo 2

Final touches; side table with table-top lamp, new blinds, decorative bowl for the center of the table and place mats, and I am sure about a million other things along the way! I am completely in love with this space and can’t wait to entertain and have many dinners, game nights, and parties around this table.

Happy Dining!

Transformation Tuesday no. 2

Hello Transformation Tuesday!

We are finally moved in, and it’s a strange feeling to have this whole house to ourselves. Again, I am realizing that I have been doing a horrible job at taking up-to-date “After” photos – but I still think the ones I have say a lot!

Bathroom Makeover

I underestimated what a little paint could do and switching out the original shower curtain… oh and I didn’t realize the ceiling needed to be painted until the first coat on the walls was up to reveal the ceiling was the same color.

For now this will work for us, but we eventually want to get a larger vanity and light fixtures, maybe even new flooring. But for now this paint job has made a huge different, it makes the room look 10x bigger, not to mention we didn’t need to break the bank.

Yellow Room Makeover

This room initially to me, didn’t need to be touched. But after the plaster cracks were fixed, the walls needed to be painted. Not to mention after we had the electric updated, the base trim had to be repainted, as it was completely removed from the workers. Hence, more painting… but what a difference. The top trim also had a large gap at the top near the ceiling, either it was from the house settling or a poor job to begin with. So, instead of replacing, we caulked in the gaps and painted to refresh… wait until you see…

We have also since replaced the ceiling fans, so they are less obvious and a little newer looking. Once again, inexpensive fixes, that make a huge different –

  • Caulk – $5 each (about 1-2 tubes needed)
  • Yellow Paint – $33 gallon
  • White Trim Paint – $41 gallon
  • Ceiling Fan (not pictured) – $34
    Total Makeover Cost = $118

Can’t wait to share more transformations with you!

Transformation Tuesday.

It’s my inaugural Transformation Tuesday! Are you excited? I am, this means we are starting to wrap this up! But since we aren’t quite finished or moved in, here are a few of the projects we’ve completed, although small in tow, have made a huge difference.

1. Carpet Removal – Hardwood Please
This one was simple… as soon as we saw this carpet, and the gorgeous hardwoods in the rest of the house we just had to tear this up. So we did, the first weekend we got in the house.  And with Moz’s help, poof! The carpet disappeared… luckily it was in a small area of the house.


2. Wallpapered Built-In’s
My first initial instinct was to add a little more life into these beauties by painting the inside yellow so they would pop! Then I remembered I had some left-over embellished wallpaper from when we made our bar (I’ll share in a future post).  After some measuring and cutting, I soaked the pre-glued wall paper, waited 5-minutes and then placed into the built-in’s… wah-la! Instant character.  I love this patterned wallpaper because it reminds me of tin ceilings, without actually having dark tin ceilings in your house. The pattern is subtle enough that it isn’t too distracting, and it brightens the cabinets up just enough, I love it.

I can’t wait to share more before and after pictures with you! Honestly, I have to keep reminding myself to take the before AND after pictures… hopefully we can get the majority of the work finished up this week.  We have been putting in long nights after work, and full weekends for the past three weekends. It’ll be nice when it’s all over.

Happy Homeowning!

House Hunters – Office Space

After two full weekends of house work, and keeping Lowe’s in business, the anticipation of moving into our house has been building… I just want to decorate and organize!!

Again, I blame pinterest for all of my design aspirations, including our future office. I want our office space to be chic and elegant but also sporty, we have some sports memorabilia that I’d like to be able to include in the same vein. So I feel like (once again) the contrast between dark navy blues with whites and greys is a good balance – but I know I can’t use this color pallet for every room… right? Another reason I love this color pallet so much is that it’s still sophisticated without being too girly, because frankly I would love to do something like this… But I wouldn’t do that to B. *smiles*

My inspiration:
MadeByGirl: Anya Kucheryavenko, small office defined by navy wall behind shelves, darling

Pulled from “Made By Girl” Blog via pinterest – Site linked to picture.

How to make this my own:


01 / 02 / 03 / 04

In the next week or two, we should finally be moving into the house. All of the work we have been wanting to get done is nearly under wraps! Then the before and after pictures will start coming… so get ready!

Until next time…

House Hunters – Dining Room Design

Well it has been nearly 3-months since we began our house hunt, and we are happy to report that we got a house!  We probably also have the most lucky and unique story when it comes to our house. To give you the cliff notes version; we saw this house our second day looking at houses, B loved it – I was stuck on a house we lost. The house had an offer placed on the house, so we went back to look at the house and ended up placing an offer – we freaked out and pulled our offer. The house was gone – contingent with the other offer. A week or two later, the house was back on the market. Two weeks after that we went and looked at it again. Two weeks after that, we went back again with my contractor uncle and did a more technical walk-through (so in case your counting, we saw the same house 4x).  After that, we made a real offer, and after a bit of negotiations our offer was accepted!!

Now the fun part begins -decorating! Here are our plans for the dining room; I want a mix of patterns, modern and a classic look to tie into the bones of the house, (which will be 100 years in 2015)!  I am obsessed with the floral chairs (05) – I think these would look good  for the heads of the table. We are also looking into having our table made, so that is it a little more affordable – more details to come on that.

Dining Room Design
01
/ 02 / 03 / 04 / 05

While we wait to close on the house I have been doing plenty of on-line shopping and deal hunting – any suggestions for hidden online (or places) treasure troves for a great deal? I am always game for a good DIY project!