How to: Upgrade an Old Dresser

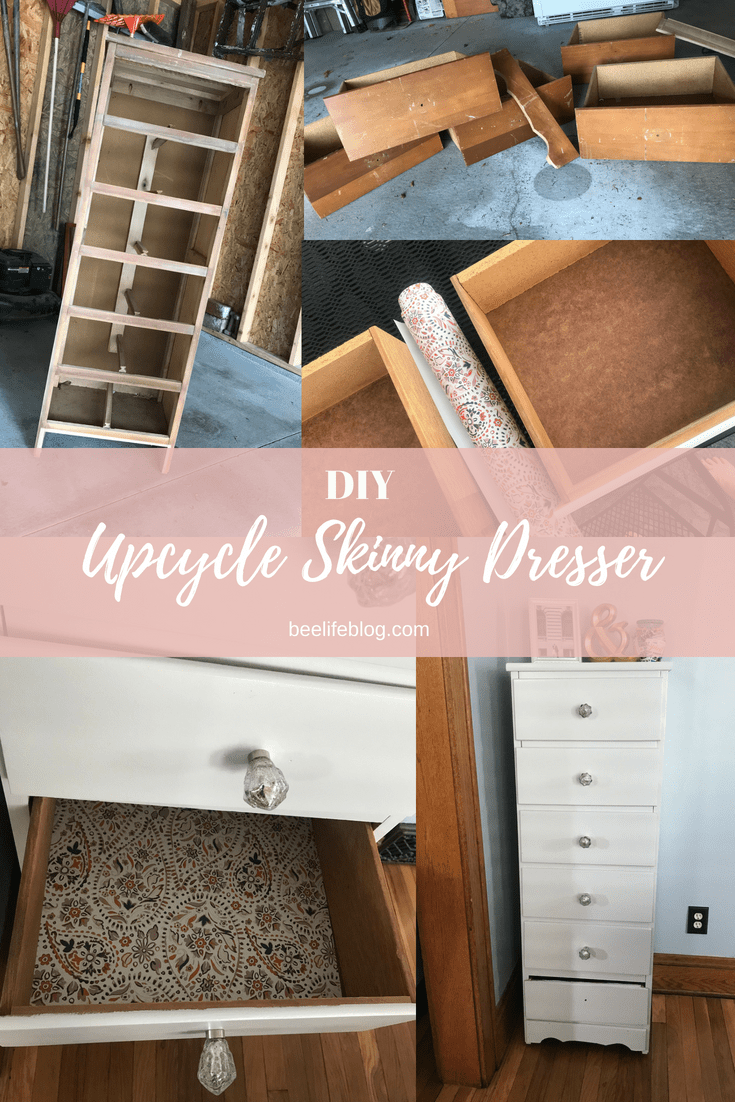
Almost four years ago, I updated our bedroom dressers to better fit the aesthetic of our bedroom.  The dressers were originally B’s – and they were a glossy black with old gold handles – they were just dated and super dark!  So in order to do a quick update we had sanded and spray painted the dressers and the knobs, in order to save some money by NOT replacing the knobs.  It was an easy half a day project with a huge upgrade, you can see the original before and after here.

…. Well it was time for another easy upgrade – this time a color upgrade AND hardware upgrade.  I found a 25-pack of knobs for $32 on Amazon – when you’re updating knobs, be sure to check how many holes your current knobs use (one or two), if there are two holes you’ll want to measure the space between and find knobs appropriately! Of course you can fill holes and drill new ones – but that is a whole other ball game. 🙂
Dresser Makeover - the bee life (2)
As I mentioned above, when I first made over these dressers, I went with the spray paint route – which I do love the magic of spray paint. But this time around I wanted to use paint for ease of application and clean-up!

Upgrade Step-by-Step:
(1) Buy your supplies: paint, sand paper, roller, brush, new knobs, paint tray, hand-held screwdriver
(2) Remove your old knobs
(3) Sand all the surfaces you’re planning on painting – just a light sand to rough up the surfaces works.  Knowing I had dark black under my light grey – I didn’t want to have to do 50-coats of white by revealing too much of the original color.
(4) Be sure to wipe down your surfaces after sanding to get rid of any access dust before you paint!
(5) Start painting!! You’ll want to do at least 2-3 coats depending on the original color you’re covering up – make sure your surfaces are dry between coats and use a brush to get are the roll places for every covered.
Pro-tip: You might want to add an additional coat onto the top of your dresser surface since this will be getting a bit more wear and tear. 
(6) Once you’ve painted and everything is dry and covered it’s time to get our dresser back into place and had your hardware with a handheld screwdriver!
(7) Stuff with clothes & decorate!
Dresser Makeover - the bee life (3)
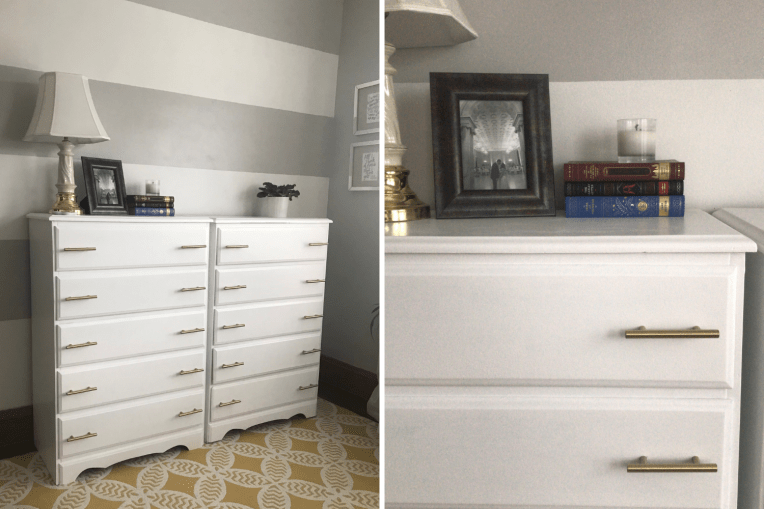
For the color, white was a no brainer and the gold knobs were an easy way to modernize the dresser with an elevated touch.  I was able to get these dressers updated within a few hours – the weather helped being so nice that the layers of paint dried pretty quick, so I was able to keep it going with little breaks in between!

Since these aren’t in our bedroom anymore, this was just another way to update one of our spare rooms – and these are the dressers B uses everyday so they definitely get used and needed more sprucing. I’m pretty happy with how this turned out although I do wish the knobs were a little more centered on the drawer, but I was using the existing holes so I’m ok with it! Dresser Makeover - the bee life (4)
After it was all said and done, this dresser upgrade only cost $32 and some change between the new hardware and a paint tray – I used white paint I already had around! The upgrade with the white helps brighten the room and the knobs get rid of that dated feel and make these dressers feel new and modern!

bee (1)

Latest Obsessions 02.19

If you’re a frequent Bee reader – you might be noticing a pattern – the beginning of the year I start organizing and decluttering the house… and then I start scheming for upcoming house projects planning for when the weather finally breaks, and even a few while we’re stuck inside! So as I’ve been decluttering, I’ve started a list of projects that I’m looking forward to but also still looking for a bit more inspiration and direction!

Front Door Makeover. I shared my front door makeover wayyyy back on the blog and I love our blue front door, but a part of me wants to maybe explore another color? I’m just not sure since our tan house feels like it limits a few options – I was thinking maybe a deep pink? Or another shade of blue? Or a really stunning green? Or maybe back to it’s original wood? We shall see! But she is in need of a little love, or a fresh coat to say the least. More to come on this project!
Latest Obsessions 02.19 - the bee life1
Shear Statement Curtains. Yes, I’ve been on the hunt to replace curtains in our stairwell bay window.  It’s great to have such big windows in an otherwise dark and narrow space, they’re the perfect spot for our plants – and I like keeping them fairly open without blinds, while still giving us a little privacy with the pattern on them.  They’re a bit loved and just need a refresh – but I want to find a 2-pack and enough distraction for the shear. I love the idea of these Ruffle Diamond Curtain Set from Target – but keeping an eye out for a better sale since I’ll need 4-panels!
Latest Obsessions 02.19 - the bee life2Front Coat Closet. After updating our kitchen pantry and then our upstairs hall closet (above) with a fresh coat of paint, fun contact paper and matching baskets for better organization – I start thinking about our throw-all front coat closet.  Although it’s fairly functional, which I thought our kitchen pantry/hall closer both where, I think it could be improved more with better shelving and some purging! So I’m looking forward to giving the inside a fresh coat of paint, building some custom shelving and fully utilizing the space! Latest Obsessions 02.19 - the bee life3
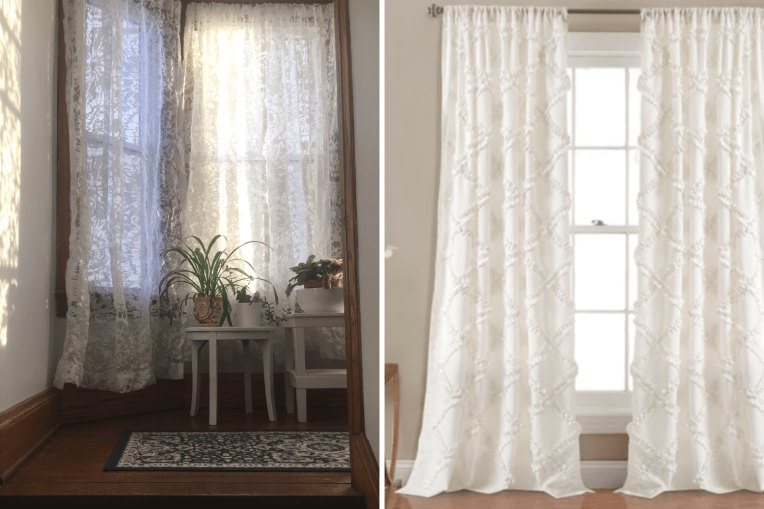
We’ve been working through some other projects like our bathroom remodel, which was moving quickly but now we’re just waiting to gear back up on it for finishing touches – which I use very lightly! In between, I’ve been decluttering and better organizing these commonly used spaces around the house.  Beyond planning for house projects, we’re starting to plan for trips this year – it’s always important for us to get away, recharge, explore new places and eat some good food!

What’re you plans for the year?

bee (1)

Easy Small Pantry Makeover

Being cooped up with the cold weather, I’ve been slowly working through the house and either deep cleaning or organizing and cleaning stuff out.  And one space that is neglected but highly needed and functional is our kitchen pantry! We already have a tiny kitchen with not a lot of storage so making sure this space is utilized and fully functional has been on the to-do list.
diy - small pantry makeover
I was inspired to organize the space, but as I was thinking about that I thought – what if I paint it? Which then spiraled into, oh! I have some left over wallpaper – so this turned into a mini-makeover that I did in a few hours. Our pantry was a place where we just threw stuff – probably because it helped cover the old and ugly, hence not being the most functional.

Tips for Organizing Your Pantry:

  1. Expiration Dates.  I know I’m not the only one that had a few pantry items that were expired – these are easy items to toss, especially if you’ve just been holding onto them – but not actually using them.  Even if things aren’t expired – clean up those straggler bags with the crumbs in them!
  2. Consolidated. This is crucial when you have a smaller space – I had multiple bags of confectionary sugar – so combining those into a container quickly gained space.
  3. Get Creative. Even though this is your pantry, have a little fun with the space! It would’ve been easy to paint it white and use generic shelving liners – but if you have some wallpaper consider using it for the shelf liners or the wall backs!
  4. Get Storage Containers/Shelves.  Luckily I had shelves that were white and useful in our odd space – so I just made a list as I was cleaning out my pantry of things I needed baskets or containers for.  In between coats of paint I made a Marshall’s run and was able to stock up on some containers to dried goods and clear trays for spices and such! I would’ve preferred all white lids, but since this was a bit impromptu – I bought what was in stock! I’m sure I’ll upgrade eventually.
  5. Organize By Food Group. I tried to think through the layout and organization by food group/pairings – for example – all of my baking ingredients on one shelf, spices and other cooking supplies consolidated together, etc.

8For our pantry makeover – I ended up painting the entire inside, this is one of the few spaces that lingering green from the previous owners – and although I’m a fan of some color, I love what white paint does to a space, especially a small one!  Since this space is not the greatest constructed – I didn’t want to mess around too much so I stuck with aesthetics and just updated the existing layout & pieces.  Here is the evolution off the de-greening. 9
I ended up taking the shelves out and gave them a good scrapping to get off the old wooden shelf liners.  They were so gross, not to mention hiding a few layers of other stickers underneath! So it was good to give it a good clean and fresh couple coats of paint. I had leftover wallpaper from my Skinny Dresser Upcycle – which I initially wanted to use this on the backs, but luckily decided to go the easier route with using it to line the shelves, which worked out because I wouldn’t have had enough! Plus I love the subtle pop of color and pattern that it adds to the shelves with the white backdrop.

67
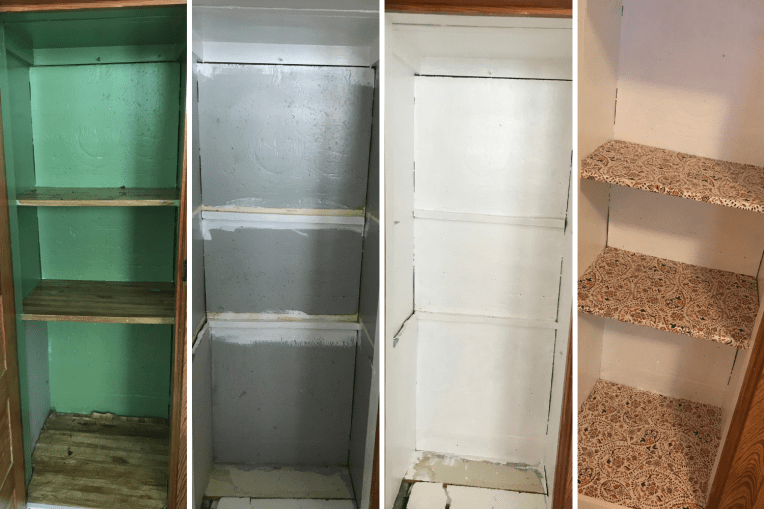
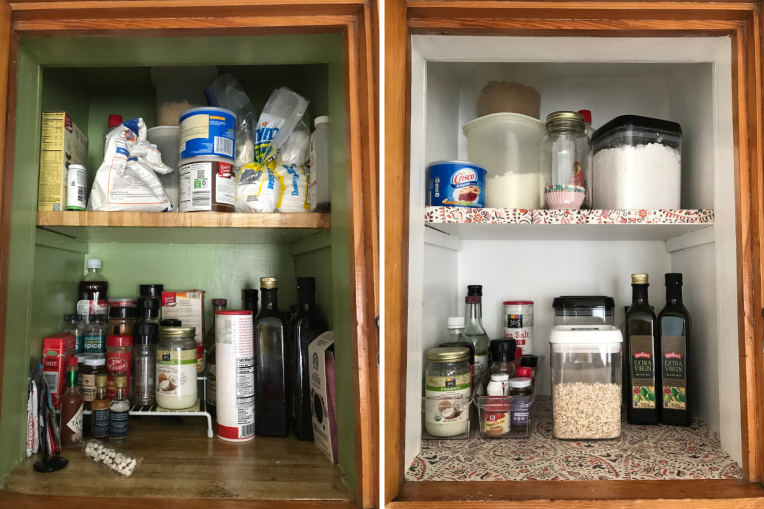
The other benefit of cleaning up the pantry was I ended up organizing and consolidating some things like our tin-foil, plastic wrap and sandwich bags into a hanger on the pantry door which basically freed up an entire drawer in our kitchen! So the organizing, consolidating and purging spread out beyond the pantry which actually gave us room for things. With using up leftover paint we had, and buying some organizers and the leftover wallpaper I spent about $60 for a small thing of paint and 10-different organizers.  I’m unsure about adding labels, so I may still add a few more fun and functional finishing touches.

Beyond this space looking pretty awesome and making such a difference – it feels good to have this space cleaned up, organized and efficient.  Plus it was an easy weekend DIY with a HUGE impact, although I’m sure I’ll rearrange it like 20-more times. Yay, for easy makeovers!

bee (1)

Bee Holiday Hacks – My Go-To Gift

I’m going to fill you in on another little secret of mine, it’s the gift I give every year… and sometimes even to the same people! But trust me, it’s anything from lazy, unoriginal or impersonal.  My go-to gift is ornaments! Growing up, every year we would get an ornament before the holiday – my brother collected the Puppy Love series from Hallmark, and I was usually a mix-match but usually went for the Barbie series from Hallmark.  Regardless, every year unboxing the ornaments and carefully finding a place for them on the tree is one of my favorite parts of the holidays, so I like giving that gift to others as well.
Holiday Hack - Ornaments - bee life blogOrnaments hold special memories, can mark significant moments or important dates, places traveled or a moment in time.  From an engagement, wedding, anniversary, to a lost pet or a new house our lives are captured into sweet little keepsakes to trim our Christmas tree year after year.

How I Make My Ornaments: I like to switch up my base for my ornaments whether it’s a large clear glass globe, wooden circular ornament (I used real wood we cut), shaped wooden ornament, or a round plaster ornament.  From there I like to search my nearest and dearest friends social accounts and find a few perfect pictures from the year that could easily be translated onto an ornament and make copies at a print-in-seconds Kodak machine.  Mod Podge is my best friend when it comes to putting these photos onto the wooden ornaments or ceramic.   I’ll add gold glitter around the edges so you can’t see where the picture doesn’t overlap – most important part is adding the year!   With my wooden ornaments I drill a whole so the ribbon can string through to be hung.  For glass globes, I’ll fill with glitter or sequins, or even ribbon or string and write on the outside – from fun hashtags, to new homes addresses, these are classic ornaments that are so simple and fun and make a big statement.
Holiday Hack - Ornaments - bee life blog (1)
Creating special ornaments of friends kids or dogs, special events, or anniversaries – I use stickers, gold markers and fun ribbon to add the finishing touches to these unique ornaments year after year, and my favorite part of all of it all is seeing these ornaments on our friends trees each year.   On top of making ornaments I do love shopping Hallmark’s ornaments each year and finding fun keepsakes for my family or even for B and I to hang on our tree.

What’s your favorite ornament?

bee (1)


Happy Halloween – Throwback Ed.

In honor of Halloween, I wanted to share a few throwbacks from Halloween pasts.  Apparently I liked keeping my costumes simple – so I frequently did repeat costumes (more than I realized!) like Dorothy from the Wizard of Oz, I think it’s because I liked the ruby slippers so much!  I also recycled the 50’s poodle skirt girl in Pre-K and 3rd grade and then my Miss America costume was a hit in first grade and then repeated with an old prom dress my senior year of high school (not pictured!)

I’ve definitely had a few years that were not so hot and filled with extra chubby cheeks!  But the fun part for our Halloween costumes growing up is a lot of times we did the DIY route (before DIY was a thing) or found vintage clothes for the look.  Lately, the occasions for when B and I need to dress up for Halloween lately have been few and far between — but our last two decent costumes were Amy & Sheldon from the Big Bang Theory and Jim and Pam from The Office but that was even 2-years ago!

Did you ever repeat a Halloween costume? I want to know if I’m the only one, comment below!

bee (1)

How To: $60 Shiplap Wall

One of our side projects for our Basement Renovation was a statement wall that we decided to finish with shiplap.  If you read my post about Shiplap Wall Inspiration, you saw there are a lot of options and considerations for a shiplap wall! Well, B and I weighed our options and since our basement look is more of a unfinished-finished look, we didn’t want to drop too much money into this and opted for a more natural wood look vs. painted.  And I’d say we were successful with the whole statement wall because it is definitely a statement and looks more than just stained plywood.

We also decided to do long singular unison pieces, since we were working with a smaller wall vs. doing alternating pieces.  Our wall was also not level – being a century home and in the basement so we had to get a little creative once we started placing the actual boards.

What You’ll Need:

  • Measure your space & determine your measurements; we bought (2) 4×8′ maple plywood boards from Lowe’s ($25 ea.)
  • Table Saw – this will ensure even and straight cuts for your panels, we cut our panels to be 8″ wide (my dad helped us with this one!)
  • Stain of your choosing, we used Minwax – light Walnut ($9)
  • Nail Gun w/ compressor and finishing nails
  • A couple of popsicle sticks

Step by Step:

  1. Before you get your wood, you’ll want to prep your area, we removed some walls/studs and had to put up new studs since we were working with some odd configurations – we also made sure that all of our water proofing paint was taken care of on the wall, floor and the pole in that area.
  2. Upon determining your measurements and purchasing the wood, you’ll want to measure and cut your boards to create your panels – as I said we decided on 8″ for our panel width. A table saw will be super helpful in this case to make sure your panels are straight all the way across! Be sure to use the proper safety precautions when cutting.
  3. After we had our boards cut, we picked out a stain – light walnut to be exact. We applied two coats of stain over the course of 2-days.  I used a foam brush for easy application.  I wasn’t too careful about the thickness of the stain for the first coat since I knew it would soak into the wood, which it did. After the second coat the color was the dark hue I was looking for, we were ready to hang!  If you’re using this in a more finished space, you might want to consider putting a poly over top to keep it a bit more polished and shiny.
  4. Thanks to our handy friend C – we were able to borrow his compressor and nail gun, which allowed putting up the boards quick and easy.  We measured each board and made final length cuts on the site before securing into place, because we were butting these up against an uneven wall.  You may be wondering about the popsicle sticks, well we used these in between each panel to have even space, we put these in tight and removed once we had our next panel up.
  5. Beyond the minor cutting of the ends of the boards, we only had to cut around one outlet and had to do a smaller skinner piece across the top that took some measuring twice and cutting three times. *smiles*  We were able to get all the boards up in one night, although it was a little late by the time we finished!

The nail gun was crucial to getting this wall up and making the boards look almost like they’re glued up and hole free! It was a dream to finally get to use one, they’ve always looked like fun and I have to say it was awesome and efficient.  I am trying to think of other projects and excuses to borrow it again…. but I digress. With our Shiplap statement wall complete we were one step closer to wrapping up this makeover and adding the finishing touches!

For $60 we made a huge impact and it was super easy to pull together, the natural wood and color pull into the ceiling of the original beams and makes this unfinished finished basement feel cohesive and complete.  B was pretty impressed and happy with the way these turned out, it was an all around win!

bee (1)


DIY – $50 Trunk Makeover

You see, we found this old trunk on a neighbors tree lawn and had to snatch it up, it had admittedly seen better days… but that never stops me.  I didn’t know what I wanted to do with it just yet, but that would come in time… after some trunk searches on Pinterest I determined to flip this baby into a coffee table, but I had a hard time figuring out how I wanted to finish this piece.   I was tempted to go the all white route or maybe pink with gold accents? And then the inside… what was I going to do with the inside?!  Oh, and we didn’t need another coffee table. *smiles*

The trunk was pretty banged up, it had old stickers all over it and then the inside was a little stinky with some blue paper that was torn.  It was a little daunting – how easy was the inside paper going to come off? What about the outside… and getting those stickers off?  Well with a little bit of water and a scrapper the paper came off with a little added elbow grease and help from B.  To my surprise, the stickers came off the same way! Although, I still didn’t know how I wanted to finish this sucker.

After doing some research, I liked the look of Hairpin legs and found these 6″ black ones on Amazon, so I purchased – still trying to figure out the color scheme, knowing I could spray paint to match if the black wouldn’t work.  I finally decided I was going to stick to the trunks original colors and just bring some life back to it! I loved the gold accents and couldn’t cope with the idea of painting over them in white or another color. After a good clean and a few layers of paint, this trunk was seeing new life.

To finish off this DIY, I finally went with some fabric for the inside vs. peal and stick paper.  I thought the fabric would be nice to work with, and a lot of options for the patterns and colors.  $18 later we had our fabric picked out, I bought 4-yards just to be safe and within one night cut and place the fabric to line the trunk with 3M Adhesive spray.   Before adding the fabric, I did spray the inside with bleach a few times (with weeks in between) to help with the smell and kill anything that might be hanging out!

DIY Cost Breakdown:

  • Trunk = $0.00
  • Hairpin Legs = $25.00
  • Paint Supplies = $12.00
  • Fabric = $18
  • TOTAL = $55.00 

We also figured out a home for this guy, with our Basement Makeover happening, this was another piece of the puzzle that fit just perfectly with the overall look and feel of the space.  It’s a little side table and perfect for some extra storage for blankets, games and extra candles!  Of course, I love the way it came out and how the gold pops against the black – plus it looks perfect in the new space.

bee (1)

Shiplap Wall Inspiration

Mini-spoiler, we’re working on our own shiplap/wooden plank wall for our Basement Makeover. Since it’s just for our basement and we’re going for the unfinished-finished look, we wanted to keep it simple and not spend too much money.  With that said, when I started looking into DIY’s on the different options of how we could accomplish our shiplap wall, I was overwhelmed at the options and price variations.
Shiplap Wall Inspiration - bee life blog
So if you’re like me and researching the many options of how to shiplap your space,  here are some things to consider while you plan your own DIY.  Take into consideration the overall look, how you’re finishing the rest of the space and how much effort you want to put into this project!

Straight vs. Alternating Boards. The way you decide to finish the space is something to think about! Whether you’re going for a straight across board look or mix and match sizes they’re two completely different looks, especially depending on how you finished them and how much you’re shiplapping.

Pre-finished Wood.  This seemed like the path of least resistance, although the price point and the amount of pre-finished wood we would need with this option added up quick. Although from a low maintenance perspective these options like this Home Depot’s Nantucket Gray Poplar Weathered boards or this kit from Lowe’s of White Barnwood Shiplap Plank Wall kit are great options.

Painted vs. Stained. Depending on how you’re placing your boards – straight or alternating, this may determine the way you want to finish the look!  Also thinking whether you want something painted or stained may affect the pattern you decide.  We decided to go the stain route, because it’s easier and we ended up painting way more than we expected with other projects.  Plus, I think the stain look with bring in a nice place with some of the other unfinished elements.

Type of Wood.  Determining the type of wood you want to use, can also affect your cost and overall look.  Whether it’s plywood, finished wood, actual barn wood, or the pre-finished wood mentioned above.  We ended up going the maple-wood plywood route loosely inspired by this DIY tutorial by Angela Marie Made.

I’m looking forward to sharing more details on our Shiplap Statement Wall DIY in the coming weeks – we are definitely excited to see how it turns out and think it’ll be the right amount of finish for our unfinished basement.  View more shiplap wall inspiration here!

bee (1)


Image Sources: Half Stained Image | Straight plank with wreath | White plank bathroom 


DIY – Upcycle Skinny Dresser

You guys, I’ve been so excited to share this DIY with you all.  We first picked up this piece in the winter on a curb, it was calling my name – although banged up with multiple broken drawers, I saw the potential.  I didn’t even have a space for it at first, but I just needed to take it and make it over – and I wanted to pull out the stops to make this a show stopper.

First we had to assess the situation, three of the six drawers were busted up, one significantly cut that needed a little extra TLC (still a work in progress).  With a little bit of wood glue and updating, B helped put these back to life.  The old handles really dated this piece, so we removed those and got to work sanding down the surfaces.  Surprise, surprise we went with an off white color that we had from the house and painted this piece instead of spray painting, which is usually my go-to.  Painting was surprisingly really easy, and covered the piece well with only a couple of coats needed.
DIY -- Upcycle Skinny Dresser - the bee life
Let’s talk finishing touches. I wanted to splurge a bit on the finishes and was really hoping to indulge in some hardware from Anthropologie, as mentioned in my Latest Obsessions.  But I didn’t want to order them online, the store near me was SUPER picked over and I couldn’t talk myself into spending $8 or $10 per knob, when I needed six!  So I stopped at Pat Catans on a whim, and found some knobs I kind of liked ($2.99 each) – the first knobs I bought didn’t do much on the drawers, they were small – I need something more… bold. I went back and traded the pink blah knobs for these chunky stunning silver ones.  These still might get switched out one day…

Inside of the drawers was another place I wanted to find something a bit more fun and fancy.  Just as I was about to compromise on some typical contact paper from Target, I ended up getting distracted, swooning over some Opalhouse when too my surprise noticed the wallpaper was 50% off! Light bulb! I put down the gross contact paper and bought this elegant peel and stick wallpaper! For $15, I was leaving with my show stopping piece I wanted to help finish off this piece – not to mention the peel and stick was super easy to work with and customize per drawer.

Cost Breakdown:

  • Knobs: $18
  • Stick Wallpaper: $15 (on sale)
  • Paint: $0 (already had it)
  • Sandpaper: $5
  • TOTAL COST: $38

We have this piece in our dining room for now, and aired out a few other pieces to make this work.  Worst case I will put it in my walk in closet and use it to organize my clothes (bummer!)  But it was a fun piece to update and bring back some new life too.  The drawers still aren’t perfect – but you’d never know!