House Tour – Backyard Patio

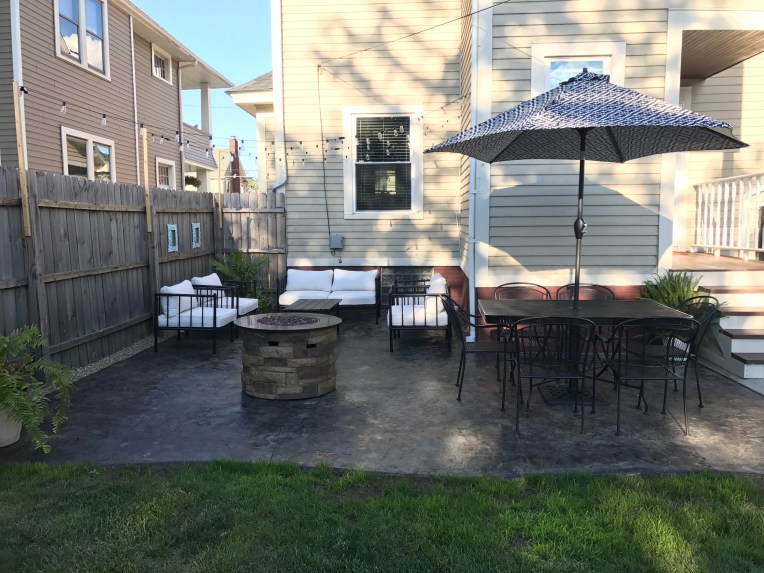
If you’ve been reading along, you may have gotten hints of our latest home project/renovation… our backyard patio!  This project was 100% a want on B’s end, and maybe about a 55% want on my end.  Sure I’ve wanted and dreamed about a backyard patio in our blank slate of a yard, but we’ve gone this long, so why not wait some more? But once B started getting quotes and kept moving the project forward, I jumped on board and helped from an aesthetic perspective to help pull it all together and finish it off.

The space we picked is off the back of the house, and connects seamlessly to the driveway for a universal flow for expanded living space. We’ve got plans for the house in a few of these areas so we designed with that in mind. Last summer we were looking into doing a square paver patio, but after numerous chats with family/contractors, it didn’t seem like it’d last for the price we’d have to pay. Plus it was WAY more than we were expecting at the time.  So we started exploring stamped concrete this time around figuring out textures and colors we liked.   It all came together just how we envisioned it!
House Tour - Patio(7) - the bee life

Since we only had one piece of furniture, the dining table a hand-me-down from B’s aunt & uncle (2-years ago!), we went shopping for some pieces.  We had our eye on black iron chairs that matched the table pretty well and found a similar base for the umbrella, so we were able to use the table. The dining space works out perfectly and we’ve already had a few dinners out on the patio.  The conversation set was a find that I fell in love with thanks to Emily Henderson, but luckily we were able to take advantage of some Memorial Day sales and got a great price on everything!

The last finishing touch that really pulls the space together (besides the super comfortable wide chairs – that I am OBSESSED with) are the bistro lights!  I’d bought almost half of the lights we needed when they were on sale last season for a steal of $8 each compared to $24.99 *WOW* – moral of the story, always buy more than you think you’ll need, especially if they’re $8 and you don’t have a use for them at the time!

We’ve spent so much time outside in these last few weeks now that we have this additional living space.  It was definitely worth it and I’m glad B pushed for this, because we love how it turned out and having another space to entertain in!

// Want the look?
Dining Chairs; Lowes || Outdoor Fire Pit; Lowes || Table Umbrella; Target || Umbrella Base; Target || Bistro Lights; Target || Conversation Set & Chairs; Target 

DIY – Side Entry Tile

Our latest home project was tiling our side entry and the stairs that lead up to the kitchen area.  When we first moved in, the space was drab with gross stick-on tile with wood panels and layers of wallpaper.  Well our quick fix was an easy paint job and removing the wallpaper and floor.  We painted the revealed wood floor white and added some grips on the stairs – but as you can imagine white floors for an entry is not the cleanest or the prettiest. So, like I said, it was a quick fix in need of more help.

So it was Bentley’s idea to finish this space and add tile to the landing and to the stairs. This was the first time we tiled a space, so it was a little daunting at first figuring out what we needed, what tile we wanted, and when we would be able to do this.  The biggest piece that helped save us and this project, was being able to borrow my Dad’s wet saw to cut the tiles. B and I split up tasks, he would cut the tile and I would lay the tile!

The stairs went surprisingly well, but because we used large tiles there was a lot of cuts involved, although less pieces. I’m not sure if the stone we picked was the most cost effective (actually I am fairly confident it wasn’t) but we were going mainly off of aesthetic. Once we got to the platform it was very messy and hard to maneuver in the tight space without stepping on the tile! But we finished with only three trips to the hardware store once we got started. *smiles*

We waited the appropriate amount of time and then some before B finished the space with the grout and once that was dried he added some trim work. We finished off the space with a new storage piece to hide shoes and we were wrapped up!  It was fairly easy project once we got going, and we definitely feel like we’re tiling pros now.  This space has been instantly upgraded, it’s more durable, weather resistant and easier to clean up. We love how it turned out!!

Easy St. Pat’s Day Decor

Top of the morning, to ya! If you’re like me and wanting to spruce up your place for the next week before Easter, here are a few easy ways to add a touch of green in your home, remember – the main tip is green.  No need to go crazy with St. Patrick’s Day specific pieces, reuse existing greenery pieces you have, or do these simple DIY’s to add a touch of luck.

Front Door: This is one of my favorite spots to switch out and add a statement and pop of color! If you don’t decorate your house, the easiest way to add a touch of green to your home is with a great wreath or sign on your front door!

Banners: These banners from Ella Claire Inspired are super cute, because (1) they’re printable and free! (2) you can still make them and feel like you accomplished something without going crazy! Drape across your mantle or large opening between rooms.

Tabletop: Keep it simple with your table top, that way you’ll be able to use as a dining room centerpiece or in your living room on coffee or side table. Again an opportunity to reuse/buy something or an easy DIY with some mason jars and paint! Top off with some fresh flowers and you’ve got the perfect touch to your home.

If you haven’t already decorated for St. Patrick’s but your wanting something, remember to keep it simple.  This holiday goes just as quickly as it arrives, so unless your throwing a St. Patrick’s Day bash, there is no need to go crazy buying new decor or spending hours on DIYs! It’ll be taken down within a week.

Cheers!

Sources: Front DoorBanners | Tabletop 

Guest Bedroom – Reveal

It’s Friday! And I’m happy to share our latest and first little home makeover of the year, one of our guest bedrooms. The reason we did an impromptu makeover is because this room always felt like it was an after thought and just thrown together. It was a combination of my first apartment furniture; a dark brown book case and TV stand, and brown curtains – mainly because we had them so we made it work. The color of the room was yellow, we had kept it the same as when we moved in to keep it simple, but it was really bright! This is also the most used guest room, so it just made sense to give it more love.
spare-bedroom-reveal-the-bee-life-emilyboylan-1
spare-bedroom-reveal-the-bee-life-emilyboylan-2
Instead of buying all new furniture, although I was tempted, we ended up, updating old pieces and buying a few new key pieces. We updated the book case and TV stand with some white spray paint and added some legs to the TV stand (B’s awesome idea) in order to raise it off the ground a bit.  And if your an avid Bee reader, the night stand might look a bit familiar – yes I redid it again, this time with some fun colors and new handles! I am a bit obsessed. We also painted up an old window and found a fun green wreath to create some rustic wall art.

New pieces include the curtains (LOVE!), the bedspread, the hanging light and the rug (which will probably be replaced again) and a few new picture frames and little accessories around the room. I am sure there will be some more accent pillows and blankets added to keep the space cozy and colorful.

I love the updates we’ve made, the wall color feels more calm and relaxing, and it’s fun to add some pops of color. I’ve always been a fan of color, but finally found a way to do it in a mature way and not childish. I also feel like the space feels so much bigger with the update of the white furniture. Can’t wait for some friends and family to enjoy the space this year! We will definitely be having a lot of guests ❤

Shout out to my little peanut for posing and being a good sport in all my pictures!


Spare Bedroom – Makeover

I must admit, I’ve had some major writers block on top of feeling uninspired.  Then I realized I should share my latest obsession aka inspiration – our impromptu spare bedroom makeover! It started this past Friday, after a crazy week back to work, a stiff drink, and a few scrolls through Pinterest, I thought out loud to B; “Let’s paint the yellow room.” And B’s response was; “pick a color” – gosh I love him.

Of course, I had a color in mind, so we went to Lowe’s on Saturday, found the color, bought the paint, oh and another can for a different impromptu project and got right to work once we got home. This of course has spiraled into a full room makeover, remodeling some old and buying some new.  *grins*

I’m going for something chic, classic and colorful. My goal is not to rush this and look for solid pieces and see what works in the space as I add in curtains, bedding and DIY’d furniture.

Can’t wait to share our first house project of 2017!

Inspiration sources can be found here

House Tour – Our Christmas

Eleven more days until Christmas! Our house is full decked out and ready for the holidays, it’s cozy and festive… I may be a bit biased, but I’m in love.

With this being the third Christmas at our house (wow!), I’ve definitely continued to perfect the finishing touches but also try a few new things! This year I took to Pinterest for some new ideas, specifically for our front door and dining room centerpiece. I looked for ideas that I could use preexisting pieces/decor but also be able to put my finishing touches on them!

Front Door: We amped up the front door to really make a statement, now that we have a full glass storm door, we can fully utilize all the real estate.  I’ve mentioned this many times, but your exterior of your home is the first impression guests receive, so why not make a statement?

My hack was to use wire to connect the three wreaths together, and then wrap the ribbon around to cover it up.  I probably spent $10 for the berries to add into the greens and the ribbon (sale at Joann’s!). I already had the wreaths, door hanger and wire.  I just hot glued the ribbon on the door hanger to make the ribbon look continuous! I love how the red pops on our blue door.
front-door_3front-door_1
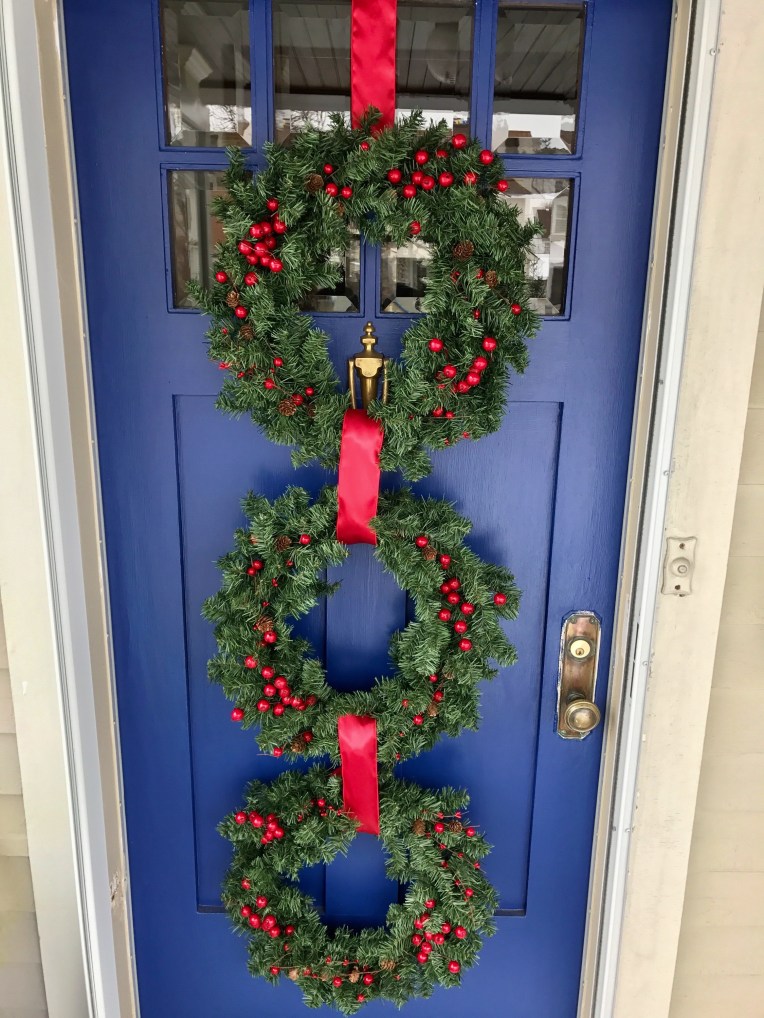
Dining Room Centerpiece: I wanted to switch up the centerpiece, since as much as I loved last year’s centerpiece it wasn’t conducive for entertaining with friends and family.  I often had to move it for space or take certain parts out of it.  I needed something a little more low maintenance, less intrusive and easy to move. I saw some inspiration on pinterest with a wooden box and since we found one when we first moved in (under our front porch of course), it was the perfect idea.  I used greens from the Christmas tree farm and just had to buy the candles. I added in some color and it’s completely portable if we need to move for a game night, dinner or cookie baking!
dining-room_1
dining-room_2I definitely got my “Martha Stewart” on and love the way these two spaces turned out! Everything I got too can be reused or altered next year – which would be my second hack for all of you is to think of DIY/Pinterest solutions that work multiple years, aren’t too trendy.

House Tour – Front Porch

One of my favorite parts of our house is our front porch.  I love dressing it up for the different seasons, but especially the fall! Filling it with mums, pumpkins and other warm and welcoming elements to highlight our home (and blue door)! The front door and porch are the first impression of the house; so although a lot of the pieces have been a work in progress and the patio furniture isn’t up to (my) snuff it’s a place where I like to focus time and effort to create a warm impression! fullsizerenderimg_7334fullsizerender-1
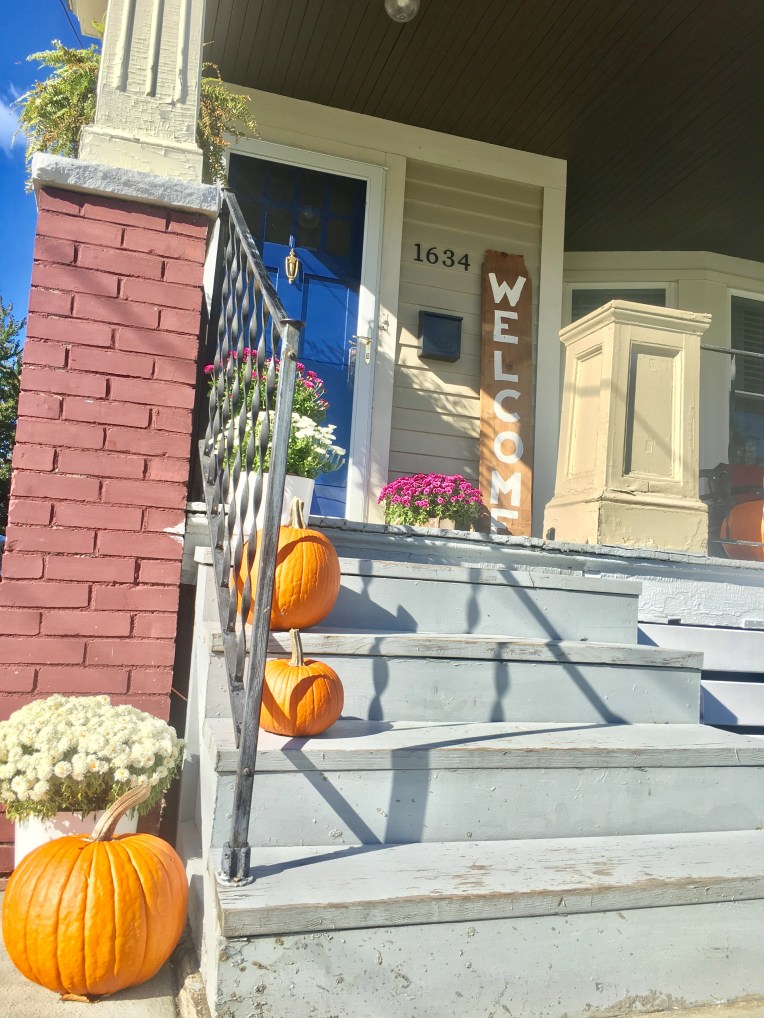
This year I went for whites and purples for my mums and mixed in some white pumpkins with a lot of bright oranges ones! The pumpkins and mums line the pathway leading to the front door and the large wooden Welcome sign. I just love how the wooden sign turned out with the rest of the fall decor.

Share your front porch decor with me; tag me on instagram @mmariebee. 

Thanks for visiting!

#BestOfCle – 2016

We are just a few short days away from one of my favorite months. October is one of my favorite months for many reasons,  but one of those reasons is because of  Cleveland Magazine’s annual Best of Cleveland Party! I’ve attended this event for the last six years and I’m amazed that it keeps getting better, it’s such a fun time.

img_0033
Photo cred: Thom Sheridan, Cleveland Magazine

Reasons To Attend

You’ll Be Surrounded By The Best... for an entire night! The best food, best drinks, shops, local businesses, apartments, sweet treats, music and organizations. Nearly 70 of the best will be at your finger tips.

Giving Back. This event raises money every year to help benefit the Breakthrough Schools of Greater Cleveland. An organization striving to give back and excel our youth with high-quality education.

Keep On Celebrating… our NBA Championship! Every year has a theme and this year’s theme to no surprise is all about our huge and historical championship this past June. What better way to keep on partying and celebrating our win with 1,700 of your closest friends – it won’t be as packed as the parade. *winks*

Legendary Venue… Public Auditorium has been the host of legends and the Rock n’ Roll Hall of Fame Induction ceremonies, what greater stage and venue to enjoy the best than be in the presence of the best.

img_0068
Photo cred: Thom Sheridan, Cleveland Magazine

Tips for the Night

Go with Friends: Whether it’s a double date or a group of your closest pals grab some friends to enjoy in the fun! It definitely helps make the night.

Go VIP: If you’re really looking for a night out celebrating your favorite city whether you’re homegrown or a transplant this night will give you a taste of everything that makes us great!  So go all out and truly enjoy the exclusive rooms, treatment, drinks and eats.

Uber: You will definitely enjoy yourself and a few adult beverages especially if you go the VIP route, so be sure to play it safe and carpool or grab an Uber to and from!

This party is truly not like any other you’ll attend throughout the year. The atmosphere is infectious especially once the music really gets going; you can even jump on the legendary stage and show off your moves! Tickets are officially on sale and the countdown to Saturday, October 15th will be here before we know it.

For more tickets & information: CLICK HERE!


DIY – Coordinates Sign

Remember our big attic renovation into our master suite?  Well the little details have still been a work in progress, as they usually are. But we are getting closer to getting the little details finished up. I am finally happy to share one of the last pieces to the gallery wall puzzle. It’s a coordinates sign that I made using old wood from our house and the renovation! IMG_4970IMG_4972I love the way it came out, the old wood is what brings this simple sign to life. The metallic silver lettering also pops on the wood grain with a nice mix of old and new. I wanted to keep it simple with the text and not do anything to fancy to really rely on the wood to pull this piece to life with the metallic accents. One of my goals for the gallery wall if you remember wayyy back to my Gallery Wall Inspiration was that I wanted to add color, textures, and different elements that represent B and I without it getting too girly.  I feel like the earthy wood grain in the coordinates sign helps balance the ‘girly’ along with pulling in the other wooden frames used on the wall.
IMG_4716IMG_4972For now the gallery wall is feeling pretty complete. There may be some additional pictures added below but for the longest time there was this awkward section where the coordinates sign ended up going, so order has been restored! And I am loving the piece of our home that we’ve been able to restore in more than one way.