DIY – Window Side Table

I am excited to share my latest project with all of you; a window table.  Once you have the materials, this project is pretty easy and low cost! It’s a win-win when it comes to creating a cool piece that’s custom to your needs, whether it be a coffee table, plant stand, or a side table the options are endless.

What You’ll Need;

  • Window (of your choice) – I used an original window from our basement, since they were pulled out when we had glass block put in. Total cost; $0
    • Don’t have any old windows laying around? Check garbage day, it’s amazing what people will put on the curb!
  • 4-Legs; length and style of your choosing. I used: Waddell Ash End Table Leg from Lowes. Total cost; $16
    • NOTE: I bought legs with pre-installed hanger bolts that allowed for a clean smooth finish without needing extra hardware to attach the legs
  • Wood Glue
  • Paint – color of your choice & paint brush
  • Drill and drill bit to predrill holes for legs
  • Blade to scrape off excess paint on windows
  • Timing; finished within a weekend

From there you can prep your window by cleaning it up and sanding if you’d like. I opted to keep the hinges and some of the other rustic elements since I was working with a 100-year old window.

Next, flip over and mark out where you’d like to place your legs – as you can see with the window I was working with the spacing and exterior width was inconsistent and not much to work with so I eyed about an inch from the edges. Once I had those marked, we pre-drilled a hole, although we didn’t go deep enough a few times so we had to go back over the holes.

Before screwing the legs in we added wood glue in the hole and around the bolt on the leg. Make sure your legs get all the way in and are secure, some of ours were wobbly, so we had to re-drill new holes and start over. But once they were in and secure you definitely knew it. The wood glue required about 12-hours to dry, so day one was finished.

After the wood glue was dried, I flipped the table over and began to paint! I opted to use a primer over the preexisting brown, and also did the legs in the same color.  I had to do 3-coats before this beauty was looking clean.

I let B do the fun stuff and scrape the paint I’d gotten on the window.  This really cleaned up the piece to give it that finished look. From there it was just giving it a good clean with some Windex and setting it up in place – we added this gem as an accent in our sun room. The light and airy of the white and windows ties into the space perfectly.IMG_4428IMG_4430IMG_4432
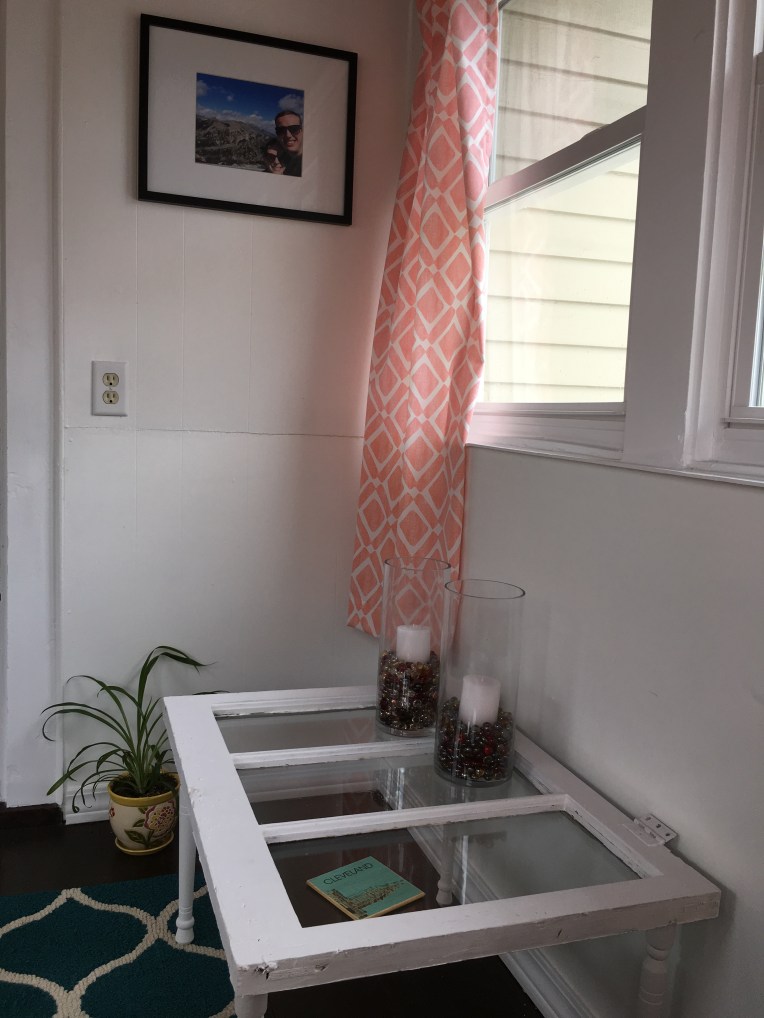
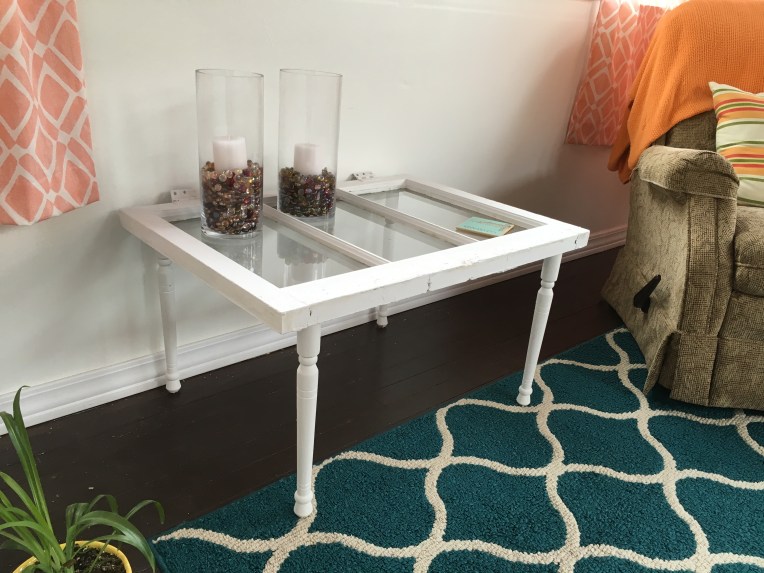
Using most of what we already had, the main expense was buying the legs for $16 – you can’t even get a coffee table for that!  I love the way it turned out, it still has a vintage and rustic flare to it. Not to mention it has multiple purposes and I am sure it will change overtime for us!

Happy DIYing!

Gift Guide – Father’s Day

It’s less than a week away from Father’s Day! Here are some ideas in case you can’t think of something different or unique this year for your dad.Dad

  1. Booze – If you’re dad is like mine, he like’s a good scotch or whiskey.  Now is the time to indulge and buy something a little more expensive for him to enjoy! If you don’t live near your dad (but will be seeing him soon) you could also plan a sampler pack of local favorites near you. My dad is particularly fond of a whiskey made in Cleveland – so he wouldn’t be sad if I bought a few for his bar!
  2. Beer/Scotch Tasting – Part 2 of gift number one would, could be to plan a weekend trip to a favorite brewery and partake in the tasting festivities. Of course, you’ll pick up the check! It’s a fun way to enjoy one of Dad’s favs and create fun memories.
  3. Golf – Plan an outing or buy Dad lessons! To make this even more personal, make a golf gift basket filled with a new outfit, a sleeve of balls, new golf gloves, a new towel to get him looking snazzy this Father’s Day while he’s hitting the links.
  4. Manual Labor – Since my dad is always helping us around our house whenever he is in town, it’s time to offer up an opposite treat and give him a weekend pass to use our services to help get some projects done around his house! I am sure this would be a welcomed treat (not to mention, would make mom happy too!)
  5. Get Crafty – Think about something that your dad has been wanting or needing; and make it! Some ideas; a custom bottle opener (perfect for my Dad’s new garage), a decorative tie rack, or a fun piece for grill accessories!

Father’s day is this upcoming Sunday, June 19th – don’t forget to get Dad a card too!

Latest Obsession: For The Home

HERE’S WHAT, I have been absolutely obsessing over especially as the summer months are approaching and the store’s are switching out their inventory to be summery!!!

Lanterns. OBSESSED. I want them everywhere, but especially for outdoor spaces like our front porch. I love them as decor for your entry way and even lightening for your seating area. I also love lanterns for decoration inside, around a fireplace or hearth area, especially the really big lanterns. Not to mention you can find them in almost any finish from silver, to gold, wooden, ceramic, or bronze to fit into your current decor or switch to something new. You can get hanging lanterns or keep them on the ground or table. Plus you can use them season round by mixing up colors and styles with different fillers for the insides… I could go on for dayzzz!  On a lantern kick like me? Check out craft stores, as a lot of them have sever price cuts on summer and outdoor decor (like 60-70%!) you can’t beat it.

Greenery. I am loving me some greens, the fake kind. I first saw some moss like letters at Michael’s and really wanted to impulsively buy them, but one didn’t know what to spell or letters to get, and two thought they would look way out of place in my house, but I can’t help but pine over them. I also really love boxwood wreaths, but refuse to spend the money online and will most likely DIY one, one of these days. And as much as I truly don’t like fake plants, because I’d rather just have a few real ones – I really like the fake greenery balls… yes I just described them as such, okay they’re technically “boxwood vase fillers” (according to Target). Anyways, I like the idea of having some greens around the house to add to the real greens, it brings some added life to your living space.

So those are my two latest obsessions right now, I’ve had my eyes on the lookout for these whenever I hit the stores.  I recently grabbed two silver lanterns for some added decoration up in our master suite, and I love how they compliment the space, we have a mixture of metals, but somehow it’s all working.

What’re your summer favorites?

Backyard Patio – DIY Project

After much deliberation and back and forth, B and I have finally figured out what we’re going to do to create a backyard-patio living space. There was a few different options discussed, but I think we’ve come up with a solution that will work for the space, long term, and won’t break the bank (hopefully).

Inspiration:

We did the measurements last night and the biggest part of adding in a completely flat patio (without a deck or floating deck) that I was having an issue is, was the weird space it would be next to the house, being low without a direct door leading out to it. But I think having larger greenery in pots surrounding the area in the corners closer to the house, will help solve that problem I was having.  I also think adding in some lights above the one patio area leading up to our sun room on the second floor will add an intimate feel. We will also have a separate dining area from the lounge area, which I think it’s crucial, since I want both spaces to feel spacious.

Our plan is to get 20×20″ square concrete pavers and river pebbles to place in between the pavers. I’m still determining all the spacing between each of the pavers, I was originally thinking 1-inch, but most of the projects I’ve seen are about 3-inch gaps are larger, so we will see where we net out with ours.

Needless to say, B and I are both itching to get this project complete, although it’s not going to be as inexpensive as I had hoped from the initial figures, but I will be sure to follow-up with the finished product and details in the next month or so!


DIY – Childhood Nightstand

I recently received my old childhood night stand from my parents house, but it was in desperate need of a little make-over, since I had last repainted it in high school to match my pink and orange room. *sigh* I still wish I had a pink and orange room…

Anyways, I digress. This was a really easy and low cost DIY because all it really needed was a new coat of paint, especially since in my dark teenage years I had written touching notes on my night stand like; “love sucks” and other cryptic messages. *smiles* So it needed a little sanding and fresh coat of white paint on the base.

Before

Next, I painted the fronts of the drawers, Naval by Sherwin Williams, it’s such a pretty color, I am trying to figure out what else I can paint with it. I was planning on replacing the knobs, but they were painted on from previous paint jobs, and I really didn’t want to deal with the hassle of trying to wrangle them off and potentially damaging the drawers, so plan B. Plan B was to spray paint the handles metallic silver, which I just so happened to have from a few other previous projects. I had to make-shift something to cover up the drawers, so some magazines and painters tape did the trick. It actually worked out pretty well and I only had to make a few touch-ups with the navy.
DSCN2140
To give this even more of an upgrade, I went ahead and added some adhesive/ contact paper ($5.99 at Target) into the drawers to make it pop!  Not to mention, over the years this little nightstand has seen some love, so it was looking a little rough. I decided to put the contact paper on the outside of the drawers as well, so that when you opened them there was an added pop. I did some simple measuring and cutting, this was even easier because the contact paper has measuring lines on the backside – this probably took me about 20-minutes to finish up.

Even though this is for a guest bedroom, I think it’s important and nice to have nightstands and all the essentials for when your guests stay over – that’s why I’ll be getting a lamp as well to finish off this look!

After

Before and After - the bee lifeI love the way it turned out, and I am sure this little night stand will have a few more makeovers in it’s lifetime.  The added detail of the contact paper on the sides of the drawers and inside, just upgrade the whole piece.  I may still try and get new knobs at some point, but for now this little $5.99 makeover will do the trick and accomplishes the task of being functional and matching within the space!  What I love the most about some DIY’s is that it doesn’t take a lot, to make a big difference – time wise or cost.

Hope you all have a great week!


5 Unique Wedding Gifts

With wedding season quickly here, I wanted to share some unique gift ideas for the bride and groom.  If you’re like me and in the wedding party, you seem to bring gifts to every occasion you go to, so coming up with fresh, unique ideas without just buying off the registry can get hard after awhile. Wedding Gift Guide - the bee lifeAlso to clarify; these gifts could be for any of the many wedding festivities from the bridal shower, bachelorette/bachelor parties, rehearsal and day of the wedding.

Make Something. Find a local shop/studios were you can create and make you’re own ceramic pieces, whether it be from scratch or painting a pre-made piece. My future MIL, owns a studio (Studio Clay) where you can create plates, bowls, dishes, ornaments, figurines… you name it, out of clay.  Visiting a place like this, not only gives you a fun experience but also allows you to create an original piece for the couple.

Remember Memories. You may need to get a little creative for this one, but this will help the couple remember all their memories, especially as they start their journey as husband and wife. You can make the couple a custom jar (decoupage), a box, or basket with instructions for the couple to fill it with love notes or memories throughout the year. Then on New Year’s Day each year, instruct the couple to take turns and read them to each other reflecting over the year. This is low cost, genuine and something the couple can use year after year.

The Honeymoon. Think about the honeymoon, especially if your in the bridal party, buy some special necessities or gear for the bride and groom. Whether it be matching swim suits, sunglasses, or even a honeymoon survival kit with sunscreen, condoms (or not!), lingerie, lip balm… you name it. Or just focus on the bride, a cute carry-on, new make-up bag or even a fun purse she can rock.  Just think of things that they couple may not be thinking of, but want/need!

Pitch-In. If you know the couple is saving up for a house, or big home renovation, find some family and friends to help pitch-in on a fund for their future projects as they start their life together. When you tie a meaning to the money, it can add that much sentiment and use for the couple. To make it a little more personal, accompany the money with a gift or trinket, like a toaster (if the couple desperately wants a new kitchen).

Photo Gifts. Here is a little plug for Shutterfly, simply because I just love them.  They’ve expanded their offerings immensely, you can customize table runners, candles, ornaments, mugs, pillows, blankets… shall I go on?  Use pictures from the couples engagement session to help customize these pieces for a unique and special gift for the Mr. + Mrs. (Not to mention there are always a few good promos going on to take advantage of!)

I think it’s easy to get lazy and just buy the couple a gift card or something off the registry (guilty), especially when you have multiple weddings to attend in one year, but going the little extra step will not only create something memorable for the bride and groom, but will also remind them of the special time you took for them.

Cheers to Wedding Season!

Gift Guide – Mother’s Day

Mother’s Day is May 8th!

If you’re like me, I have a few different “moms” in my life, of course no one takes the cake over my actual mom, Sal, but they are near and dear to my heart. So every Mother’s Day I like to try and give them something different and unique each year, but without going completely overboard – because, let’s face it, I usually do that for my mom. Oh and as much as I love these moms, it’s always usually last minute, (oops!), so hopefully we change that this year, I just looked at the calendar and said, oh crap! It’s almost a week away!
A Gift Guide to Mother's Day! - the bee life
Flowers – Don’t get me wrong I am a huge advocate of flowers, however not your traditional bouquet, I prefer to give an actual plant or tulip bulbs that can be planted after the fact and will return year after year.

Framed Photo – This can be an easy and inexpensive, but still meaningful gift. Framing a picture of you with your mom (recent or old) or even an old photo of your grandma, can be very sentimental.  You can find a number of inexpensive frames at various stores, and make a copy or have an image printed in minutes at a number of stores, like Target, for pennies and cents.

Cards Always. No matter what gift you give, ALWAYS give a card, hand making one can make it that much more personal, but ALWAYS have a card. And go stock-up now, because if you’re last minute like me, they will be picked over when you actually need one.

Treat Yo Mom – I don’t know about your mom(s), but mine rarely treats herself, and if she does it’s not the best or often.  So providing her with a spa day or certificate to use for a mani/pedi, massage, or facial will most likely be a treat for her! Last year we were able to make a trip out of it, which was that much more fun! If you do try and make a trip out of it, be sure you make that clear when scheduling appointments so they can arrange services in line with each other.

Something She Wouldn’t Buy – Similar to the Spa/Nails, I like to try and get my mom something she wouldn’t normally buy herself. A more expensive top, a decorative piece for the house, kitchen appliances, a fancy purse… you get the drift.

Handcrafted – I’ve been big into DIY’s, especially reusing old wood from our house projects (I’m sure I sound like a broken record).  So making some handcrafted, custom signs that can be put up around the house is on my list this year. Of course if you have a particular craft or DIY you’ve been dying to try, do it for this Mother’s Day! I just pinned this adorable hand painted flower pot that would be perfect to pair with some flowers.

I’ve gotten to a point in my life, that I can give gifts and show my love and thanks to these special women in my life like I would like too… in college or even younger when money was a bit tight, I had to be clever and creative to give back, I still like being creative and unique with my gifts, but now I can just think a little more outside of the box!

What’re your favorite go-to gifts for Mother’s Day?

DIY – Upgraded Built-in’s

One of my spring projects was to give a simple upgrade to our living room built-in’s that bookend our fireplace.  I planned to do this with textured wall-paper, that I have used in a few other spots around the house like our dining room built-in’s, our stair-backs on our stairs leading to our master, and even in our DIY bar that started out in our apartment. Overkill? No, surprisingly this is the most subtle upgrade you could do to these tiny spaces for a big impact. Not to mention it’s extremely affordable ($20  for 56 sq.ft.) and super easy to do.

Since we live in a century home, I like to build off the history of the home and add to it when possible, this smaller ‘tin ceiling’ patterned print is the perfect accent to give a face lift without completely giving it an overhaul and taking it into a different era. Textured Wallpaper - Lowes - the bee life

Before:

DSCN1981DSCN1982

After about 30-minutes of leisurely watching eNews (learning all about Lemonade) and measuring, cutting, soaking and putting into place, boom! Instant upgrade. All while dinner was cooking in the oven.

After:

DSCN1984DSCN1985DSCN1989
DSCN1988With the doors closed, and if the lightening is just right, you can hardly notice – but on the flip-side, if the lighting is just right, you can also see how pretty this added touch is.  Sadly, I ran out of paper and was only able to get one side done, I completely underestimated the amount I had left over from the stairs in order to complete these built-ins. But it was a good start, and like I said – easy, not very time intensive, and pretty straight forward for $20 a roll.


Weekend Recap – Girls Trip!

This past weekend was so fun and gorgeous! We finally had some beautiful sunny weather with cloudless skies.

It was super fun, because Katie and I met up for a girls day/night yesterday. We met at the cabin, which is just about half way for us – so it was a nice quick trip.  With her wedding being a month away, we’ve been trying to plan some extra girl time, and finally got it in the books!

One of the goals of our meet up was to get some of her her wedding DIY’s complete for her centerpieces so we worked on that in between candid girl talk and day drinking. It was also the perfect excuse to wear tights, a loose tee and veg out taste testing different martini’s with wine in between!

I can’t remember the last time Katie and I had that much one on one time AND a sleep over.  It was so much fun – the only thing I messed up on was forgetting my wireless speakers, so we lacked some major dance sessions and jamming to 50 cent.   We are definitely going to try and make these more of a point, or at least invite the guys next time, it’s the perfect, peaceful getaway especially for some much needed girl time. IMG_1500We wrapped up the weekend pretty early on Sunday, but it was nice getting back home and enjoying the rest of the sunshine! I’m looking forward to this upcoming week and some gorgeous weather.