DIY – French Barn Door

Our bathroom makeover was a complete revamp, and figuring out what we were going to do with the door was all over the place.  Since we had limited room we were initially planning to do a pocket door. But then we switched to something more modern with frosted windows – but the doors I found and liked were well over $300, way more than we wanted to spend, so we went back to the drawing board and tried to figure out a door we might be able to make.

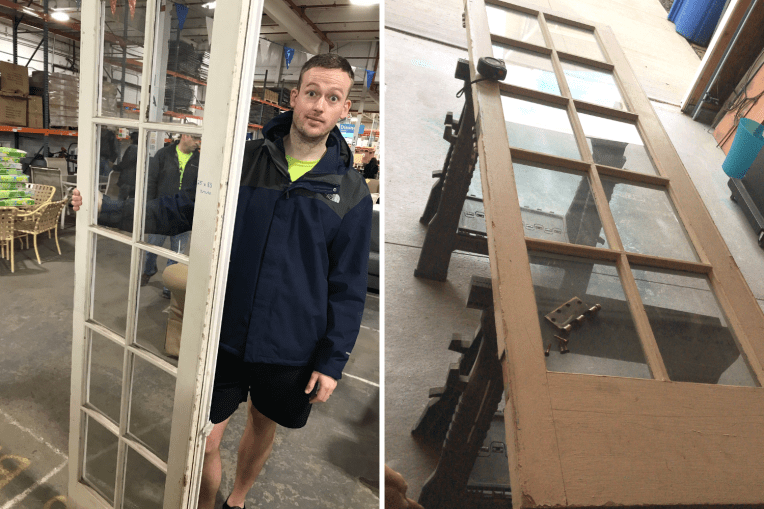
We got the idea to check out our local Habitat for Humanity Restore to see if they had any doors that might fit the bill, or even something we could turn into our own.  We really wanted something that had windows in it, like a french door, but wanted to frost the windows since it’s for a bathroom… we just needed to find an affordable french door.  And we did! It was a little skinner than we needed, but we were confident we could extend it and make it our own and DIY-ing our own barn door using black pipe.
DIY door - thebeelife
Cost Breakdown:
– French Door – $55
– Frosted Spray Paint – $5
– White Paint – $18
– (2) 2x4x8′ – $8
– Wood Glue – $15
– (2) Wheels – $7
– (2) Hooks – $6
– (1) Bar w/ base and corners – $30
Barn Door Handle – $21
Total Cost: $165

What We Did:

  1. First we sanded down the door and removed some of the extra pieces/frame that was on the door.
  2. Through trial and error we finally figured out the proper piece of wood to use to extend the width of the door which was two 2x4x8′ – this definitely took a bit longer to figure out, including securing it to the door and then using wood filler to make it look like one piece.  Again, this was the toughest part, but we finally got it into a good spot with the wood filler.
  3. Next up was painting the door, white! After a few coats on each side, we were almost in business and then sprayed the windows on the outside of the door with the frosted glass look.
  4. We then drilled in our larger circular hooks at the top, added the wheels (which we had to switch with different ones that worked better), and then put together the pipe bar for placement!
  5. With some tweaking and DW-40 we got this door sliding easily and working great in the space! Once we had the door working, we added the handle while it was standing for more accurate placement.

DIY door 4 - thebeelife
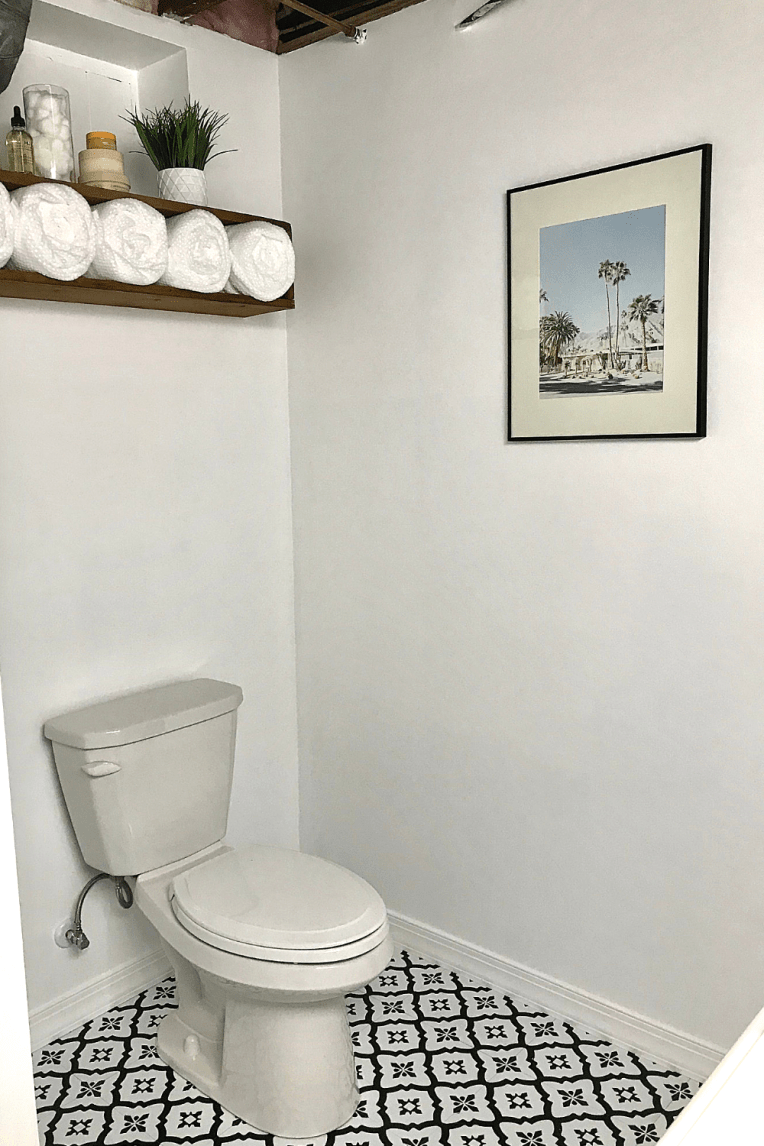
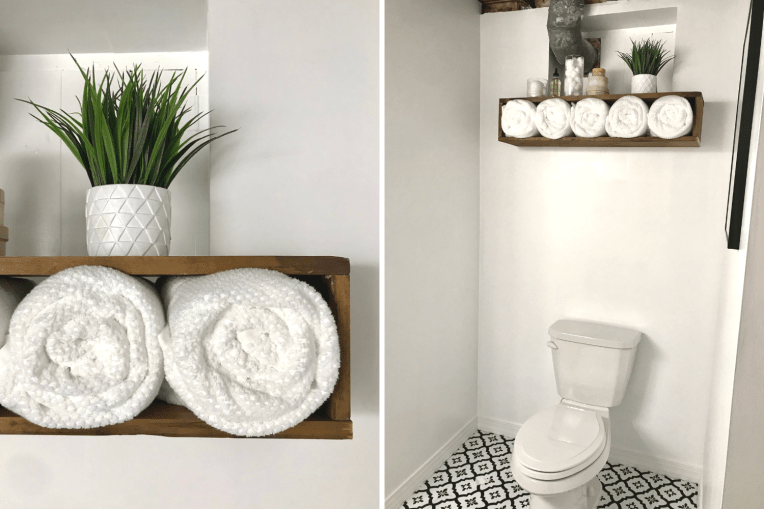
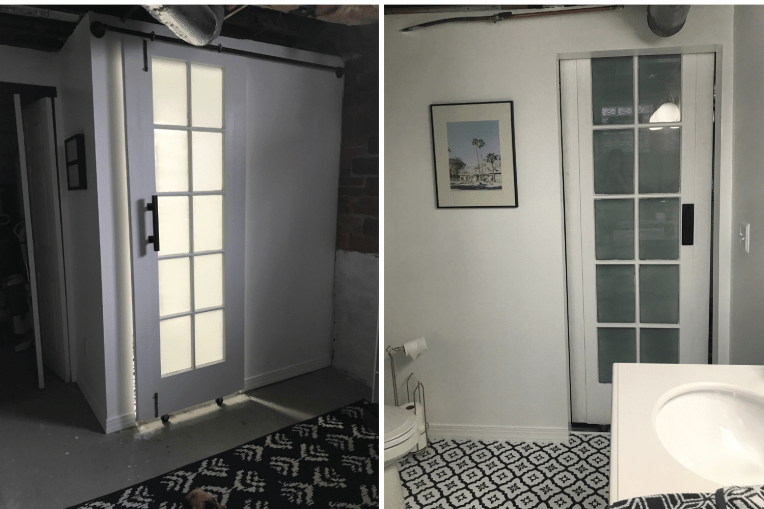
The frosted windows definitely help the bathroom space feel private, while from the outside it feels welcoming and open.  Since there are two windows in the room, we wanted the light to still be able to come through.  From the bathroom side of the door, you can see a slight difference in the additional side pieces – only because the door width with the wood pieces wasn’t an exact match – but from the outside it’s nearly perfect! 

Although this was a little extra work and challenged our problem solving skills, the end price was still WAY more affordable for the look and type of door we wanted to purchase – it was a savings of over half the price of the doors I wanted – plus we both love the way it came out!  And it’s completely custom to our space, don’t worry the full bathroom reveal is coming soon – in the meantime check out this $15 Floating Shelf, How to Install Vinyl Flooring and What We Wish We Knew before Tiling Our Shower.

bee (1)

DIY – Floating Rectangular Wall Shelves

For our bathroom project we have an ugly door above our toilet that is access to a crawl space area that we don’t use, but might need to access so we couldn’t do anything too permanent. So in addition to painting this ugly door white, we wanted to hide it a little more, I knew I wanted to put some sort of shelf in that area, but I couldn’t decide how many, what kind or finding the perfect pre-made piece that fit.
DIY - Shelf - the bee life (3)
That is when I spotted some beautiful old wood we had in our garage and I was inspired to build our own rectangular floating wall shelf to help cover it up while also bringing in some natural wood feel into the space.  Since these pieces of wood were just shy of 4-feet they would work perfectly for the space. Here is how I built our shelf – you’ll need minimum materials, especially if you have your own scrap wood lying around!

What You’ll Need:
– Wood Glue
– Miter Saw
– Nail Gun + Nails
– Wood Boards
– L brackets for hanging + Screws

Step-by-Step:
1. Measure your space & determine the size of your shelf, I wanted it to be a bit oversized the crawl space door area, but didn’t want it to be too tall. So I went with 3-feet in length and then about 8-inches high including the thickness of the main shelfs.
2. Measure and draw lines and cut your pieces of wood for your main top and bottom shelves with the miter saw.
3. Determine and measure your in-between pieces and cut appropriately with the miter saw. You should have all your pieces cut! Two long top and bottom pieces and then two smaller side pieces that will fit in between the longer pieces, connecting them!
4. Add wood glue to your in-between pieces and attach the top with your in-between with a nail gun.  You may need a helper to hold the pieces in place while one staples, be sure to staple along the length of your board. Continue this for all four corners, be sure to wipe any excess glue after stapling the pieces together.
5. Let your piece dry before moving forward with adding the L brackets and hanging. Sand any rough edges, paint or stain if necessary based on your aesthetic.
Pro-tip: Make sure the screws going into the shelf aren’t longer than the board thickness!
6.  Determine spacing based on wall studs and add the L brackets to the inside of the top of the shelf and then drill into the wall with screws (this is probably a two person job!). We will be painting the metal part touching the wall – although once filled up with towels you can’t even tell!
7. Now for the fun part – adding the finishing touches and add your finishes!
DIY - Shelf - the bee life (5)
I’m so excited to be adding in finishing touches to our bathroom space – and as you can see you’re getting a bit of sneak peak of the space, but mainly the showstopper (that floor!) We still have small finishing touches to do around the room, like the crawl space door we’re trying to hide, we still need to cover up that heating pipe entrance – plus I’m sure I’ll be getting some different accents to put on top of the shelf.

Price Breakdown:
So the obnoxious part of this (for you, not me!), is the cost of this project was $0. The wood for the shelves we got from my sister in-law’s house, because I knew I would have a good project pop up to use them with!  Everything else was around the house – but pending the wood, you can get the Wood Glue for about $3, L-brackets for about $5, and screws for anywhere from .30 – .50 cents each. Meaning you could make this shelf for about $10-15.
DIY - Shelf - the bee life (4)
Since a lot of our bathroom is white with the black pops of black in the floor, I love the addition of natural wood, we have another finishing piece to help tie into this vibe that we have yet to do as well – so the big reveal will have to be a bit delayed still.  But I’ll be sharing some of our project woes, lessons learned to help you prevent the same mistakes on your upcoming projects!

bee (1)

DIY – Homemade Valentine’s

It’s February! That mean’s a month all about L-O-V-E! And I have a really affordable DIY to share with you that is easy to make, beautiful, and completely personalized Valentines for all your favorite people.
DIY - Valentines - the bee lifeWhat You’ll Need:
– Craft/Scrapbook paper; think patterns, pinks, reds and hearts!
– Scissors, glue stick, hole-punch
– Markers
– Ribbon
– Stickers; stick to metallics, hearts and letters! (optional)
– Photos (optional)

Step 1: Gather all your goodies to create your Valentine’s; once you’ve got all your goodies and figured out who you want to make a card for – it’s time to start making!

Step 2: Pick out your papers, and determine your shape – obviously a heart is a good go-to, if you’re afraid to freehand the cut find a template online or trace on paper before. You’ll want to cut two of your papers so you can have a front and back – these can be the same or mix and match! It’s OK if it’s not perfect, because it’s handmade!! Once you’ve got your shape cut, glue the front and back together.  An optional add; is to hole punch around the perimeter of the heart and then weave ribbon in and out of the holes.

Step 3: Start to Personalize! Add your pictures; stickers and write a sweet note to your honey or bestie… and wah-la! You’ve got a personal, one of a kind Valentine for that special someone.
DIY - Valentines - the bee life (2)Since I am an avid scrapbooker, I had a lot of these supplies in-house stocked away. But scrapbook paper is usually on sale for 7 for $1; ribbon is around $3.99 a roll, stickers can add up if you buy a bunch; but finding some that can be used as accents won’t break the bank.  Not to mention you can always find a great coupon to help. If you stock up now, you’ll have a mini stockpile ready for next year, woo!

Happy Crafting!

Easy St. Pat’s Day Decor

Top of the morning, to ya! If you’re like me and wanting to spruce up your place for the next week before Easter, here are a few easy ways to add a touch of green in your home, remember – the main tip is green.  No need to go crazy with St. Patrick’s Day specific pieces, reuse existing greenery pieces you have, or do these simple DIY’s to add a touch of luck.

Front Door: This is one of my favorite spots to switch out and add a statement and pop of color! If you don’t decorate your house, the easiest way to add a touch of green to your home is with a great wreath or sign on your front door!

Banners: These banners from Ella Claire Inspired are super cute, because (1) they’re printable and free! (2) you can still make them and feel like you accomplished something without going crazy! Drape across your mantle or large opening between rooms.

Tabletop: Keep it simple with your table top, that way you’ll be able to use as a dining room centerpiece or in your living room on coffee or side table. Again an opportunity to reuse/buy something or an easy DIY with some mason jars and paint! Top off with some fresh flowers and you’ve got the perfect touch to your home.

If you haven’t already decorated for St. Patrick’s but your wanting something, remember to keep it simple.  This holiday goes just as quickly as it arrives, so unless your throwing a St. Patrick’s Day bash, there is no need to go crazy buying new decor or spending hours on DIYs! It’ll be taken down within a week.

Cheers!

Sources: Front DoorBanners | Tabletop 

DIY – Childhood Nightstand

I recently received my old childhood night stand from my parents house, but it was in desperate need of a little make-over, since I had last repainted it in high school to match my pink and orange room. *sigh* I still wish I had a pink and orange room…

Anyways, I digress. This was a really easy and low cost DIY because all it really needed was a new coat of paint, especially since in my dark teenage years I had written touching notes on my night stand like; “love sucks” and other cryptic messages. *smiles* So it needed a little sanding and fresh coat of white paint on the base.

Before

Next, I painted the fronts of the drawers, Naval by Sherwin Williams, it’s such a pretty color, I am trying to figure out what else I can paint with it. I was planning on replacing the knobs, but they were painted on from previous paint jobs, and I really didn’t want to deal with the hassle of trying to wrangle them off and potentially damaging the drawers, so plan B. Plan B was to spray paint the handles metallic silver, which I just so happened to have from a few other previous projects. I had to make-shift something to cover up the drawers, so some magazines and painters tape did the trick. It actually worked out pretty well and I only had to make a few touch-ups with the navy.
DSCN2140
To give this even more of an upgrade, I went ahead and added some adhesive/ contact paper ($5.99 at Target) into the drawers to make it pop!  Not to mention, over the years this little nightstand has seen some love, so it was looking a little rough. I decided to put the contact paper on the outside of the drawers as well, so that when you opened them there was an added pop. I did some simple measuring and cutting, this was even easier because the contact paper has measuring lines on the backside – this probably took me about 20-minutes to finish up.

Even though this is for a guest bedroom, I think it’s important and nice to have nightstands and all the essentials for when your guests stay over – that’s why I’ll be getting a lamp as well to finish off this look!

After

Before and After - the bee lifeI love the way it turned out, and I am sure this little night stand will have a few more makeovers in it’s lifetime.  The added detail of the contact paper on the sides of the drawers and inside, just upgrade the whole piece.  I may still try and get new knobs at some point, but for now this little $5.99 makeover will do the trick and accomplishes the task of being functional and matching within the space!  What I love the most about some DIY’s is that it doesn’t take a lot, to make a big difference – time wise or cost.

Hope you all have a great week!


DIY – Reading Side Table

As I have mentioned in a few previous posts, I was on a little mission to try and find some “trash treasures” on garbage day, older pieces that just needed some TLC – well I found one that I picked up back in October and finally finished this piece up. It was a side table with no drawers, a few torn spots but relatively in good shape. See for yourself. . .

I had initially wanted to spray paint it a bright color and find some baskets to go in the inside (but didn’t really have a complete game plan for the inside).  I’m glad we waited a bit for a few of the other pieces in our master suite to wrap up, because I ended up sanding this down and just re-staining it to match the tops of our night stands (plus I like staining pieces WAYY more than painting or spray painting). So I sanded this bad boy down, because we had gotten the top a little messier than we we had found it (oops!) and gave it a few coats of stain.  I found my inside solution one day at Target near the front $1 bins – I grabbed some adhesive paper for $3 a roll – and gave it a shot. Well I scored, two rolls later this baby was brought back to life.

IMG_0933IMG_0934IMG_0935The basket was a gift from Kates (filled with wine) that I happen to try in one of the openings and it worked out perfectly! We did have to buy some thin plywood that we ended up cutting and gluing on the top and bottom shelf’s to make them level, since there was a dip down. So other than the nominal cost of that, the only other expense was the $6 for the adhesive paper, since we already had the stain and poly. I love the way it came out, especially with the subtle pattern and pop of color!

Happy Friday!