Peanut Butter & Pumpkin Dog Treats Recipe

Sweet treats are for the pups too! This recipe is coming to you just in time to spoil your pup this Valentine’s Day… or any National Dog Day! My fellow dog lover and bestie, D first introduced these treats to us, since she made them for her pup and Moz’s BFF, Maybel. They’re even gluten free and have dog friendly favorite’s like pumpkin and peanut butter!  So since D and Maybel moved to the coast, Moz has been in need for some homemade, yummy treats — and what better time to spoil her than for Valentine’s Day?
DogTreats(5)
Dog Biscuit Ingredients:
– 3 cups of brown rice flour
15oz can of pure pumpkin (NOT pumpkin pie mix)
– 1/4 cup of creamy peanut butter
– 1 teaspoon of ground cinnamon
– 2 eggs

This recipe is pretty easy, the only thing that will take some time is mixing and then flattening out your dough – I also linked the pure pumpkin and brown rice flour above! It is quite messy to work with, so make sure to have extra brown rice flour on hand and readily available for multiple applications.

Pro-tip: I refrigerated the second half of the batch over night and prepped and cooked the next day and this was a bit easier to work with.
DogTreats(4)
Step-by-Step:

1. Preheat oven to 350 and get your un-greased cookie sheets ready!

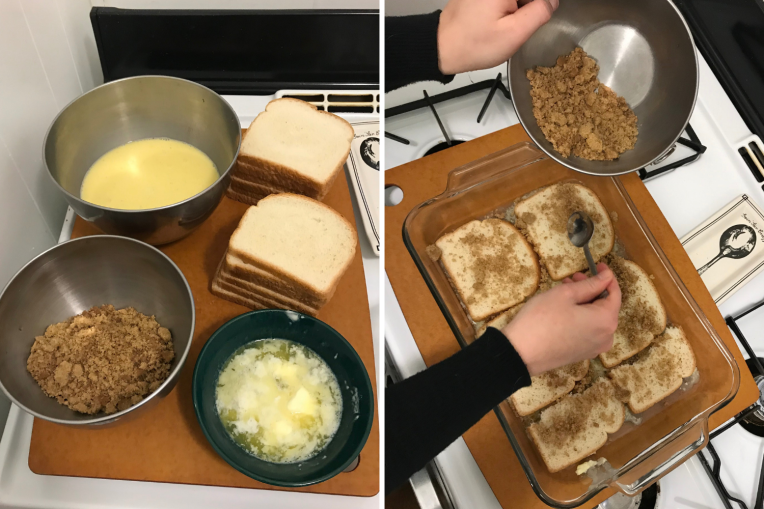
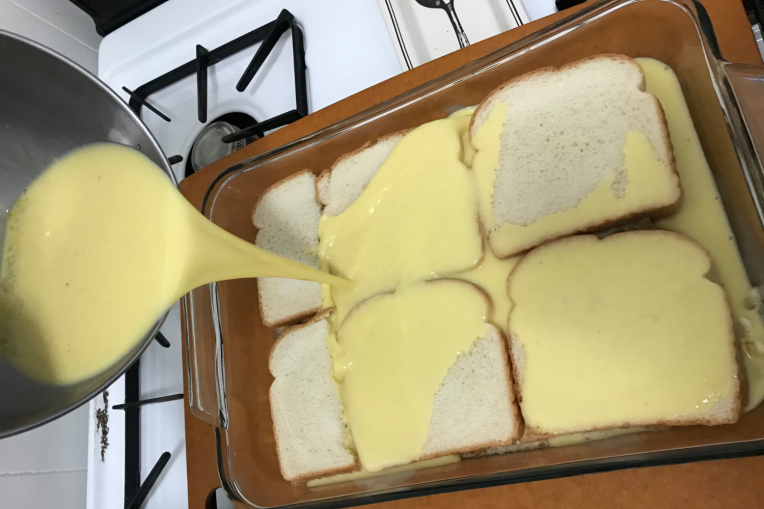
2. Mix all of the ingredients in a large bowl, I used a spoon and then just got my hands in there to mix everything together well. Optional: cover and refrigerate over night, for easier handling

3. After everything is mixed, divide the dough in half. Put brown rice flour down on your counter and heavily over your rolling pin. Then roll out half of the dough so it’s a half-inch thick. Cut with cutout shape of your choice, place an inch apart on cookie sheet.

4. Since this is a harder dough to work with, I did just roll a few balls together and pressed them down on the the sheet, while also making some cute dog bone and heart shaped treats for Moz!

5. Bake for 35 to 40 minutes. 35 minutes was enough for me to see the edges turning a golden brown. Let cool on a baking rack for 30-minutes.

6. Refrigerate or freeze baked cookies for longer storage, otherwise store in a room temperature treat jar for up to a week. When serving to your pup, feel free to add a thin layer of peanut butter on top for an extra special treat!
DogTreats(7)
DogTreats(6)
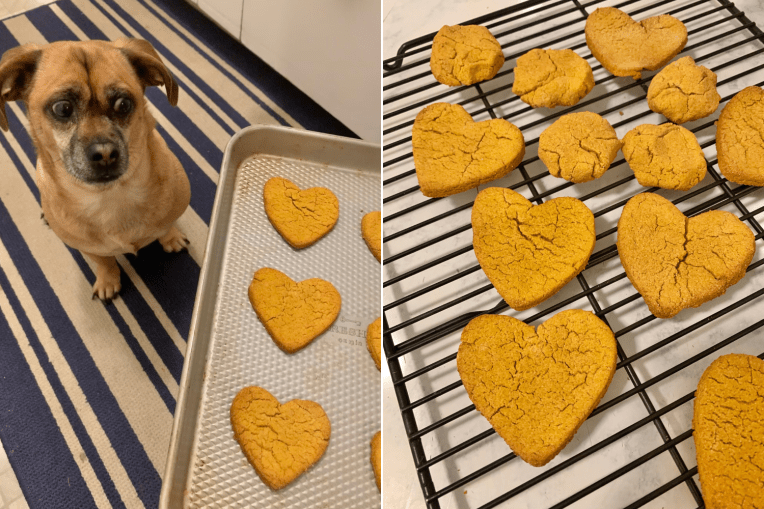
My cookies didn’t come out looking the prettiest, but they soften a bit over time after they set and cook, Moz is definitely a little cookie obsessed as I was making these!  This recipe is from Betty Crocker and is a great one to keep on hand, especially since it’s a five ingredient recipe, and your pup will love them (plus you can even try a bit yourself – they aren’t terrible!). These are definitely Moz approved ✅🐶!

bee (1)

Overnight French Toast Casserole – The Recipe

For Easter brunch this year I made a new dish, that I’ve had at my aunts but this was new to my immediate family and for me! So it was a perfect time to make it for them.  Plus, it’s an overnight casserole, so all your prep is the night before and all you have to do morning of is pop it in the oven – SO EASY! Not to mention, this is SOOOO good, especially if you love some breakfast sweets.
French Toast (1) - the bee life
Prep Time: 20-minutes
Cook Time:
45-minutes

What You’ll Need:
– 10-12 slices of white bread (I used 10)
– 5-6 eggs (I used 6)
– 1/2 cup of margarine aka 1-stick
– 1.5 cups of brown sugar
– 1-teaspoon of cinnamon
– 1.5 cups of milk (I used almond milk)
– 9×13 baking pan
– Maple Syrup for serving
French Toast (2) - the bee life
Step-by-Step:
1. Items to prep ahead: (a) Melt your stick butter (b) Beat your 6-eggs into a bowl, add your milk and stir well (c) Mix your brown sugar and cinnamon into a smaller bowl.
2. Now that you have all the main fixings prepped, take your 9×13 baking pan and pour your melted butter across the bottom – from there fill the pan with your first layer of bread.  Only 4-full pieces fit in my pan, so I cut one in half to fill in the little spot left.
3. Sprinkle about half of your cinnamon and brown sugar mix overtop the first layer.
4. Add your second layer of bread, I adjusted where my smaller pieces were from the bottom, just because!
5. Pour your egg and milk mixture over all of the bread.
6. Sprinkle the rest of your cinnamon and brown sugar mixture overtop.
7. Cover and refrigerate over night!
8. Good morning! Pre-heat your oven to 350 and bake covered for 30-minutes.
9. After 30-minutes, uncover and bake for 15-minutes or until set and toppings are browned.
10. Serve with maple syrup & enjoy! French Toast (6) - the bee life
The next time I make this dish, I have a few other ideas on how to step this up to the next level, adding in apples in between the layers for an apple french toast, or even having a strawberry drizzle to put on top before serving and eating. Doesn’t that sound even more delish?!  But seriously, if you love a good sweet in the morning – this is so easy and so delicious!

bee (1)

Hot Whiskey Sours – The Recipe

Towards the end of the summer I shared my Granny’s famous Whiskey Sour recipe – that I mentioned my family is game to drink cold anytime of the year, it shows up at Thanksgiving and at summer parties.  But I thought it would be delicious to try this family famous recipe out with a twist as the colder days start creeping in and make it a hot drink for fall parties and winter gatherings!
IMG_2584
What You’ll Need:
– Ten High Whiskey
– (2) Frozen Lemonade Mixes
– Water
– Maraschino cherries for garnish
– Lemon slices for garnish

Step-by-Step:
1. Dump your frozen lemonade mixes into the pot on the stove.  Fill up empty lemonade canister with water and pour over top – repeat this one-to-one for each frozen lemonade mix being used.
2. Stir lemonade mix and water together and bring to a boil on the stove top, once to a boil, let it simmer and eventually turn off heat.
3.  Pour your whiskey into your glass first, a large shot or a 1/4 of the glass – then pour your water/lemonade mix over top.
4.  Garnish with cherry juice, a couple cherries and a slice of lemon and enjoy!

It was a delicious twist on a great refreshing drink and definitely helped warm us up handing out candy on Halloween!  I’ll always love the cold version, but mixing in this new, super easy hot cocktail will definitely be making a few appearances at our house – plus B really liked it.  Looking for other festive cocktails – get some inspiration with these.

bee (1)

Dairy Free Queso – The Recipe

A little while back I shared a few recipes for my fellow dairy-free eaters that want to enjoy taco night!  Coming to terms with my dietary restrictions and not being able to enjoy some of the staples of taco night (sour cream… queso…) has been an ongoing process, but within the last year and a half, I’ve finally mastered saying no and working to find healthier alternatives that work with my diet! Enter; dairy free queso.
Dairy Free Queso - The Recipe - bee life blog
What You’ll Need:
– Cashews (2-cups)
– Nutritional Yeast (1/3 cup)
– Almond Milk (1/2 cup)
– Corse Sea Salt (2 teaspoons)
– Lime Juice (1 tablespoon)
– Chili Powder (1/2 teaspoon)
– Fresh Cilantro, chopped (1/4 cup)
– Rotel Tomatoes w/ chile peppers  (10oz can)

Step-by-Step:
1. Soak your cashews over night in water (5-hours minimum)
2. Drain cashews and mix with all ingredients except the Rotel Tomatoes.  Using a food processor blend ingredients on high until smooth.  I opted to try and use our Vitamix for this portion, I wish I would’ve pulled out the food processor – the consistency wasn’t as smooth as it should’ve been.
3.  Once the ingredients are blended, put mixture into skillet on stove top and mix in Rotel Tomatoes.  On medium/low heat stir as needed to warm and mix everything together.
4. Garnish and serve with chips and salsa!

This recipe was surprisingly easy to make and not time intensive – which is nice for a change when it comes to a dairy-free recipe!  I will definitely be giving this recipe a go with round two, this time using the food processor and probably a little more nutritional yeast to help with that cheesy flavor.  The recipe above was adapted from The Cookie Rookie – but will probably try a few others and adapt together. Do you have a dairy free queso recipe? Tips? Leave a comment, below!

bee (1)


Blueberry Mint Mixer – The Recipe

Summer may feel like it’s coming to an end – but let’s hang onto it just a little longer… I have an easy and tasty cocktail to help fill those hot summer days and long weekends!
Blueberry Mixer Recipe - the bee life
What You’ll Need:
– Vodka of your choosing, I used Tito’s
– Tonic water
– Frozen blueberries
– Mint leaf ice cubes

Step-by-Step:
1. Prep! The night before, get some fresh mint and make some ice cubes with mint in them! Rip off mint leaves and place into the cube tray and then pour ice over, have it sit overnight and you’ll have some fancy and tasty ice ready for your drink!
2. Okay, time to make the drinks! Place your mint ice cubes into the glasses and sprinkle a spoon or two of frozen blueberries over the ice cubes.
3. Use a shot glass and pour your vodka in, this is totally on preference, but I usually keep my drinks 1-to-1 with alcohol and the mixer. Once you’ve added your vodka, top off with your tonic.
4. Give it a stir, cheers with your boo and enjoy!
the bee life.pmg
This one is easy to have all the ingredients stocked around the kitchen and has hints of summer written all over it with the light flavors from the mint and blueberries.  The pinkish-purple coloring really make this a fun drink – not to mention the pretty mint garnishes from the ice cubes!

bee (1)

Chocolate Covered Bananas – The Recipe

I shared this recipe back with a few other dairy free desserts, and I finally got around to creating this delicious treat and it was SO EASY! Not only was it easy (took 10-minutes for prep and assembly) but it was affordable with a ballpark total of $10. You can really wow guests or impress your sig-o with this delicious yet healthy treat, plus it looks like it would be super time intensive.  Ok, now on to the good stuff…
Choc Covered Bananas - the recipe - the bee life
What You’ll Need:
– Banana’s (however many you’d like) – you don’t want them too ripe
– Baker’s Dark Chocolate (one pack covered 3-bananas for me)
– Pistachios; I bought pre-pealed for convenience!
– Sea Salt
– Tooth picks, foil and cookie tray
Choc Covered Bananas steps - the bee life
Step-by-Step:
1. Prep! Cover a cookie tray with foil, un-peel and stick the ends of bananas like corn on the cob with the tooth picks, this makes it easier to grab for chocolate covering. (I had used kabob sticks and put them a bit too far into the banana, it wasn’t ideal for serving!) Next, prep your pistachios by crushing them with a rolling pin in a zip lock baggy, you probably only need a handful or two.  Finally, follow the instructions on the chocolate to heat up in the microwave until it’s nice and melted.
2. Once your chocolate is melted, start pouring chocolate with a spoon your bananas on the foil tray, make sure they’re nice & covered!
3. Top off with crushed pistachios and sprinkle with sea salt.
4. Throw in freezer for an hour or so. Make sure you thaw a bit before serving, slice up and enjoy!

This is the perfect summer treat with the right mix of salty and sweet!  It’s easy enough to whip up for those last minute gatherings or just to satisfy a mid-week sweet tooth!

Mom’s Tuna Noodle Casserole – The Recipe

For any fellow Lenter’s out there – tis the season of meatless Friday’s and fasting.  And it’s the season of Mom’s delicious homemade comfort food dishes, so I wanted to share one of our favorites, her Tuna Noodle Casserole! Also great for any full-time vegetarians out there to have a nice easy casserole prepped for a winter weekend.
Tuna Noodle - Recipe - the bee lifee
What You’ll Need:
– 1-package of medium egg noodles, Cooked
– 1-can of tuna, white albacore in water
– 1-can of cream of celery
– 1/2 cup shredded cheddar cheese (or more!)
– Third of a bag of frozen peas
– Mayo – 2-large spoon fulls
– 3-tablespoons of melted butter
– 1-cup seasoned bread crumbs

Step-by-Step:
1. Follow the instructions on the package of noodles to cook.  While the noodles are cooking cook a third of the frozen peas in the microwave, follow instructions on bag.  Preheat your oven to 350-degrees
2. Strain the water from the tuna and mix the tuna, cream of celery, cheddar cheese and mayo into a large bowl.
3. Add the cooked peas and cooked noodles (drained from hot water) to your tuna mixture, mix together well and then evenly spread mixture into cookie dish *ADD SIZE.
4. Melt your butter and combine with bread crumbs with a fork – distribute evenly across the top of your casserole, add as much or as little as you may want. Bake in the oven for 15-20 minutes, until the topping is browned.
5. Serve up with some garlic bread and enjoy!

This is such an easy, quick meal to pull together on a Friday night and will last you through the weekend with leftovers!

Homechef – French Onion Chicken

As I mentioned in my Latest Obsessions – we’ve been loving our Homechef weekly delivered meals.  I admittedly haven’t made all of the recipes we’ve received, because B is awesome! But one meal I have made was the French Onion Chicken.  I followed all the instructions, set off the smoke detector, but it still came out delicious, not to mention it was super easy following the step-by-step directions!
Homechef - French Onion Chicken
The French Onion Chicken has a reasonable prep and cook time of 25-35 minutes, and was easy to accomplish on a week night after a full day of work.  One of the main reasons we love Homechef so much is the additional ingredients provided that bring the flavor level up a notch. This was accomplished with the caramelizing of the onions using thyme and sherry wine in the process, such a game changer!  These added flavor ingredients, are also portioned perfectly so there is no waste or left over thyme/greens to sit in the fridge.  How many times have we bought a whole container of basil or cilantro when we only need a quarter of the pack?!

Get the full recipe here: Homechef – French Onion Chicken

Every time we bite into a new Homechef meal, we groan a little and rave just how delicious it is! We haven’t had a bad meal yet, and love the convenience of having meals delivered straight to our door, allowing us to plan ahead for the week!  Do you use a home delivery meal service? Leave a comment below and share what you absolutely love about it!!

Champagne Cocktails for NYE

We are in the final countdown of days for 2016 so that means it’s time to start planning for your last night of the year.  And in my opinion, every occasion is an occasion for champagne, although some occasions call for a little more expensive champagne than others.  But there is always one occasion that demands champagne and that is New Year’s Eve!  I love champagne straight, all day long, but found some fun, easy cocktails to try for your NYE celebration for those who might want a little more “umph” to get the party started.
Champagne Cocktails - NYE - the bee life

Pomegranate Cranberry Champagne Punch – This cocktail will be tasty for everyone, and requires minimal ingredients beyond what you may already have stocked on your bar. Garnish this with some cranberries and mint leaves and you’ve got a fun drink to be enjoyed by all!

Champagne Punch – I love this punch because it has a bit more flavor paired with rum and pineapple juice for a little more exotic flair to kick off your evening of celebrating. Not to mention the recipe allows for a larger portion, perfect for the family party or night with friends.

Raspberry & Ginger Beer Champagne Cocktail – This cocktail is something even your honey won’t mind drinking… well maybe besides the pink color.  Mixing a taste of raspberry with ginger beer and champagne this cocktail is sure to be refreshing and light and perfect to enjoy the whole night!

If your like me and have a love for champagne, these are fun ways for other guests and friends to enjoy some bubbles as well – or even more simple buy some garnishes to throw in your bubbles – frozen cranberries, raspberries, blue berries, or even a strawberry garnish and some greenery to give your champagne a sophisticated look for your NYE party! And don’t forget to WOO when you pop that bottle!!

Cheers!


Photo sources linked above.