The Ultimate Christmas in July Party

For as long as I can remember I’ve wanted to throw a Christmas in July Party. Since we became homeowners, an annual Christmas, holiday party became a tradition and something our friends always asked and were excited about — since our annual parties have been canceled, it felt like the perfect year to finally throw a Christmas in July party. Here is how you can plan your own Christmas in July Party; first things first, get a date set in advance if you have super busy friends!

Pro-Tip: Pin this post for your party planning next Summer!

Pick Your Theme🎄

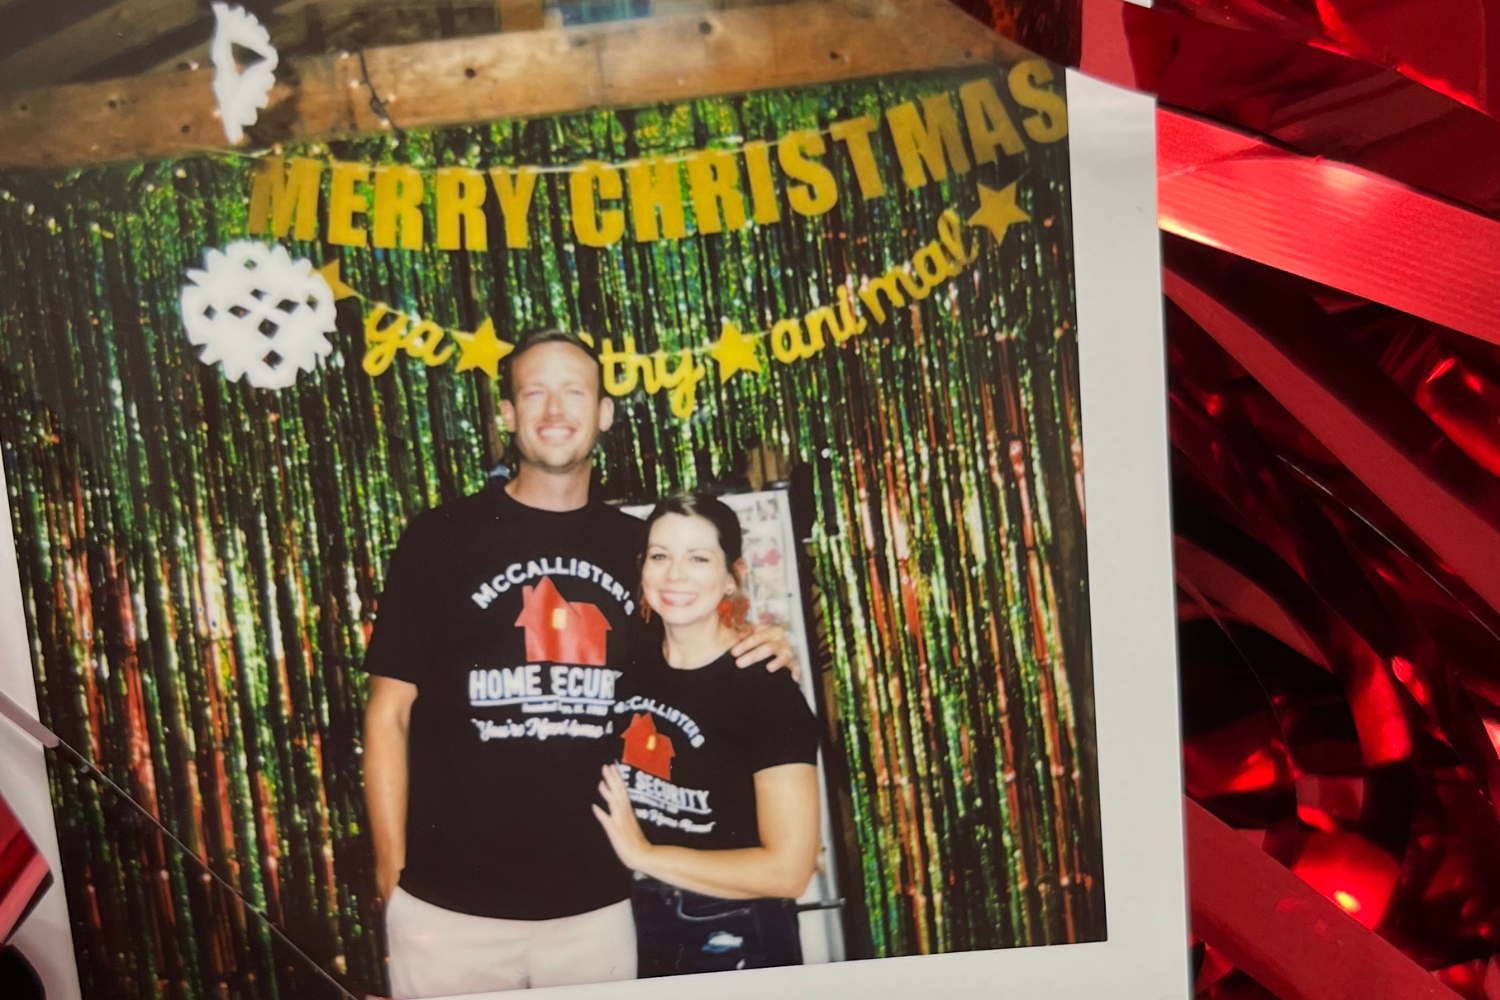
This might be harder than you think, at least it was for me! I was thinking Red, White & Blue Christmas theme (cause you know, 4th of July) – then I was thinking Hawaiian-esq, flamingos, pool Christmas (think Mele Kalikimaka as your inspo). But then, I was thinking just straight up Christmas in July, faux Christmas tree, red, green, plaid, snowflakes, traditional dishware – so that was the direction I went with a touch of our favorite Christmas movies as added inspiration for decor and food: Home Alone and Elf.
– Home Alone inspired decor/food: Cheese pizza, candy/ice cream sundae bar, framed picture of Buzz’s girlfriend, Pepsi, Little Nino’s Pizza.
– Elf inspired decor/food: Candy, snowflakes, candy cane swirl,

Food & Bevies 🎅

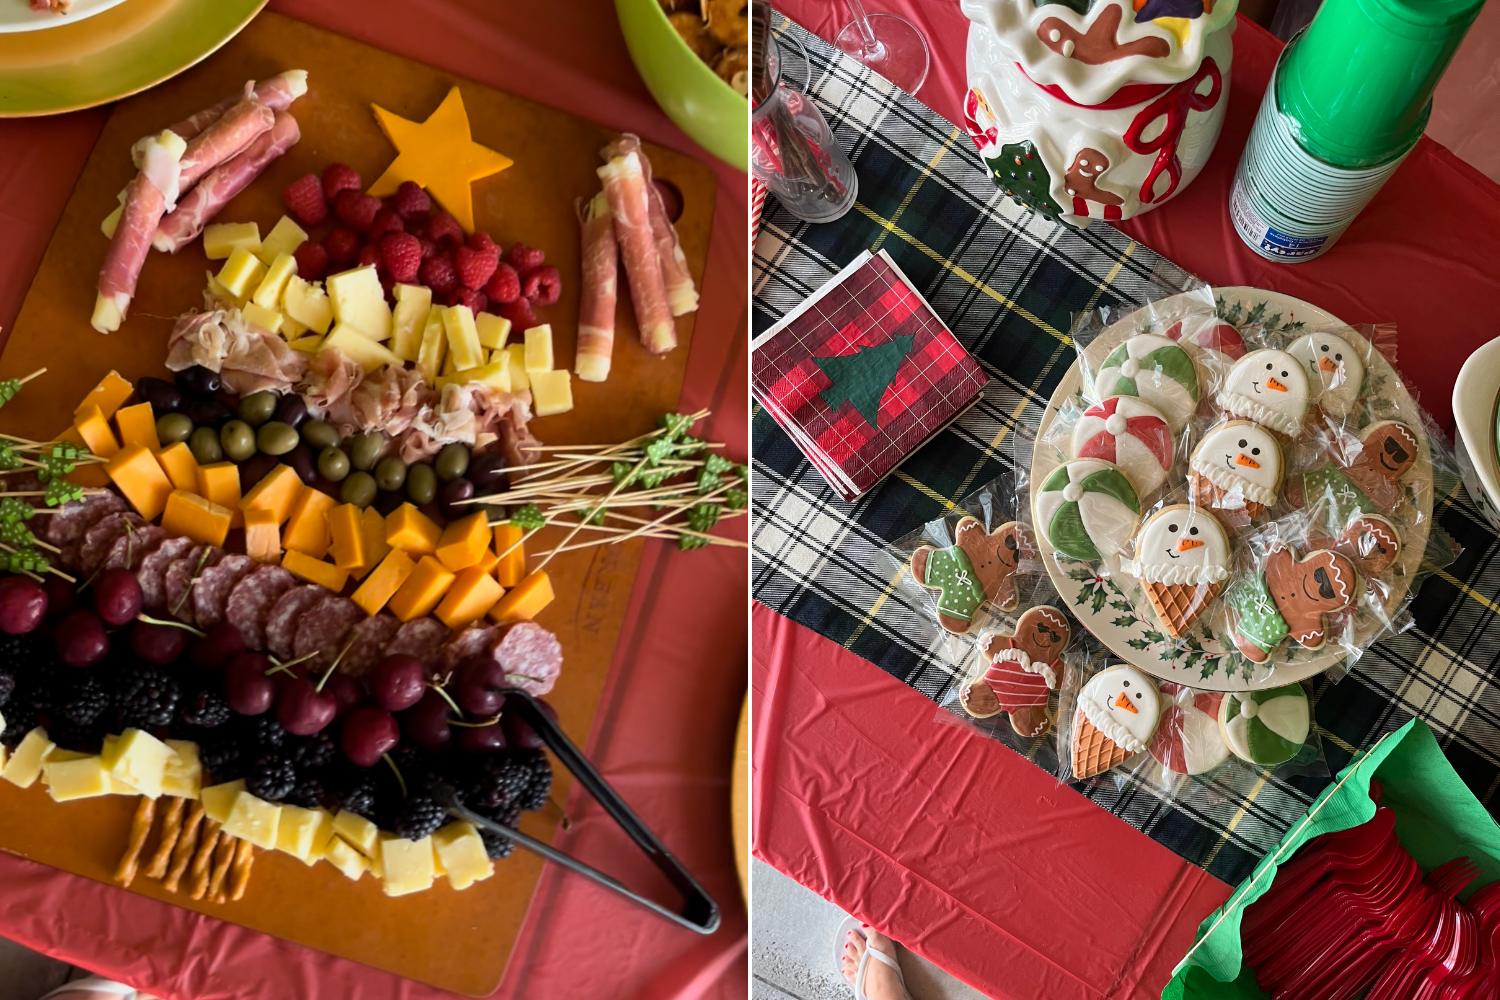
Once you have a theme, figuring out your food and beverages is a bit easier! We also hosted a smaller crowd, so I wanted to keep it simpler and easy so we weren’t doing too much work. We ordered pizza’s, made some pigs in a blanket, a Christmas-tree shaped charcuterie board and then your standard snacky foodies with a candy bar, ice cream treats and Christmas in July themed sugar cookies by the talented Sweet Geebs.

We of course had a fridge stocked with all sorts of bevies from local beers to seltzers – but we also made a handcrafted cocktail that I knew our guest list would be all over (and they were!) which was a Spicy Jalapeño and Lime Tequila cocktail that B has perfected this summer.

Decor & More ❄️

This might be my favorite part of parties – creating a moment, evoking a feeling and overall vibe for the party. My biggest issue was trying not to spend too much money – but also trying to keep it easy. I ended up compromising and ended up DIY-ing more than I planned, headed to the Dollar Store and bought a few high-impact pieces. Another tough part about a Christmas in July Party is you’re starting basically from scratch – Christmas parties in December are easy because the decor is already taken care of! I wanted to transform our garage into Christmas so I focused on a green and red backdrop with hand-cut coffee filter snowflakes with clear string I already had. Making and hanging these was a pain in the butt, but very fun. We also had lights strung in the garage which helped add a little extra twinkle.

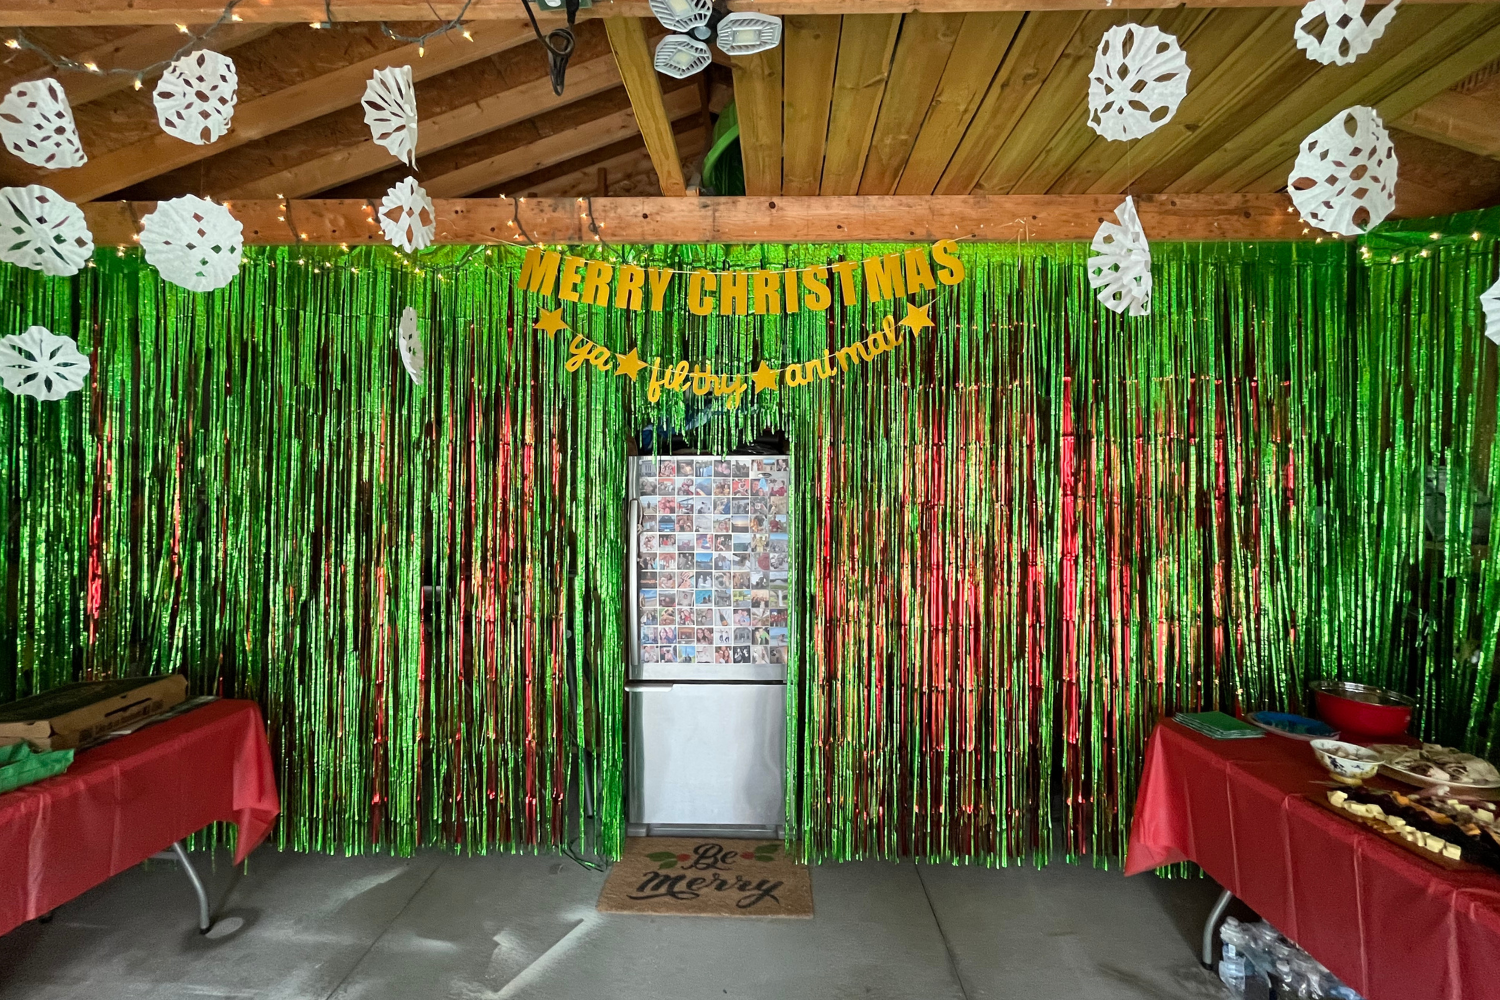
Don’t forget to encourage your guests to dress festive! B and I got matching McAllister Home Security shirts and I pulled out some big red bow-beaded earrings for an easy look! We also had a blistering hot day, luckily it was overcast so a pool would’ve been a great addition to our Christmas in July party… but alas we don’t have one! Finally, just remember to have fun and Merry Christmas in July ya filthy animal! 🎅🎄❄️


Shop my Decor: Green & Red Foil Curtains and Merry Christmas Ya Filthy Animal Banner

DIY – Nutcracker Napkin Rings

Oversized nutcrackers are definitely all the rage this holiday season if you follow any home DIYers on the gram. I’ve always loved nutcrackers since I was a little girl, and pulling out our nutcrackers each year to decorate was always something I looked forward to doing with my mom. So when I saw these little 2-packs of plain wooden nutcrackers in the Dollar Spot at Target over the fall, I snatched them up and brainstormed fun, easy, and affordable DIY, napkin rings!

The best part of this project is that it maybe cost me $17 to make — if you’re starting from scratch estimated $34 which comes to a little over $4 per table setting, as this makes enough napkin rings for 8 place settings. Which is well under the non-sale price of these similar Crate & Barrel nutrcracker napkin rings that start at $6.95 each.

I had old shower curtains that I utilized and then only ended up buying the blush chalk paint, utilizing other spray paint and colors I had, that would fit into my Christmas decor color scheme.

DIY Shopping List:
– Mini Wooden Nutcrackers | $3 ea.
— This 5 count at Michael’s is a good substitute | $4 ea.
Metal Circular Shower Rings | $10 – $12
– Hot Glue or E6000 Glue
– Spray Paint – Color(s) of your choice
Blush Pink Chalk Spray Paint | $8-10
Metallic Gold Spray Paint | $10
Olive Grove Chalk Paint | $36 (don’t recommend buying just for this project!)

Once you have everything from there, this DIY project can be pretty simple. You can paint your nutcrackers all the same color, get more intricate and paint faces and detail out their outfits, or you can do a color scheme like I did mixing in your holiday colors. Mine are green, blush, and gold! One thing to make sure you do is to paint the bottoms of your nutcrackers, as that will definitely be a focal point to guests at the table.

Once all your rings and nutcrackers are painted, you’ll want to glue your rings to the back, bottom of the nutcrackers. I utilized hot glue, but recommend E6000 for a better hold that is a bit more durable. Wah-la!

Now you’re hosting holiday ready! The best part about this project is that you can always repaint these in a few years to mix up or adapt to your changing holiday decor and style. I also like these, because they’re smaller to store in your decor.


Check out my snow globe Pottery Barn place setting dupe.

DIY – Holiday Snow Globe Place Settings

Spoiler! I love decorating and hosting get togethers and I especially love transforming our house into a Christmas wonderland.  Included in that Christmas wonderland is playing around with our dining room decor and making a statement with our tablescape. I love shopping on Pottery Barn, we registered for our wedding there and I always find a few gems, especially seasonal ones that I grab when they’re on sale or occasionally splurge on. So long story short, I saw these Village Snow Globe Place Card Holders and was about to splurge — until I was like, wait it would be super fun to make those!
SnowGlobeDIY-beelife(6)
What You’ll Need:

Plastic ornaments
– Mini wire brush trees, animals or houses – shop Christmas Village decor at Michaels. I bought (2) mini white trees and (2) green tree set
12×12 Glitter scrapbook paper/card stock, silver glitter and glue
Craft sparkle pipe cleaners, same color as glitter/paper, I used silver
– Cotton balls
– Uline knife
– Hot glue and mod podge

Estimated total project cost: $25

Step-by-Step:
1. First things first, you’ll need to cut a opening in the bottom of your plastic ornaments. This was a bit tricky to figure out, and should be done very carefully!  I used a sharp mini philips head to poke a hole in the bottom. Once I had a hole, I used a Uline knife to cut a smaller circle for the opening, go slow and wear gloves to protect your hands. Repeat based on the number of place settings you’re making – this is the least fun part of the whole project!
SnowGlobeDIY-beelife(1)
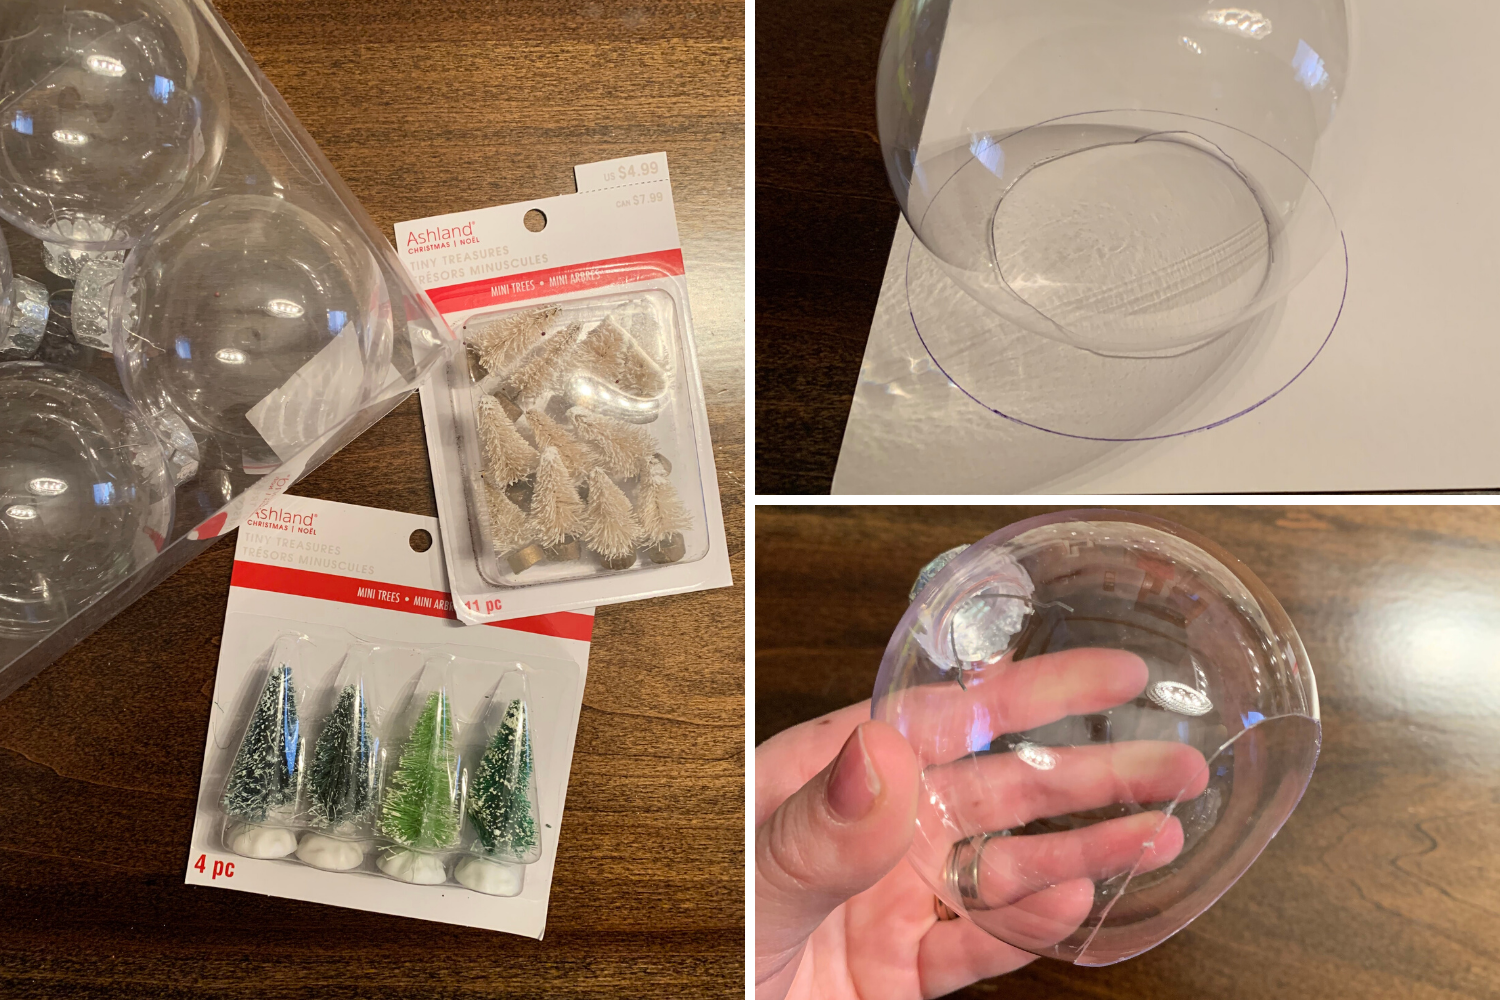
2. Woo! We have our openings, so now it’s time to cut our our bases and start planning our wintry scene. I used thicker card stock, that I ended up painting and putting glitter on — I would highly recommend buying scrapbook 12×12 glitter paper. This would’ve saved time and a mess. *smiles*  So using your thicker paper, trace a circle using a drinking glass that is rounder than your ornament, trace and repeat to cut the same number of circles as you have ornaments. These are your bases!

3. Working from the center of your circular base play around with your mini trees/houses or animals. Once you have your scene figured out it’s time to glue in place! I started with my larger wire brush tree in the center, and flanked either side with smaller ones. Pull a cotton ball apart and shape around the base of the trees and glue into place. Wah-la, snow! Repeat, or switch up to have different variations.

Pro-tip: Don’t go to far from the center, so that you’re ornament can fit around your wintry scene especially the cotton ball snow

4. Once you have your bases decorated, glued and secured — place ornaments overtop, making sure everything is fitting within the ornament.  Glue and secure the base of the ornament with hot glue!
SnowGlobeDIY-beelife(2)
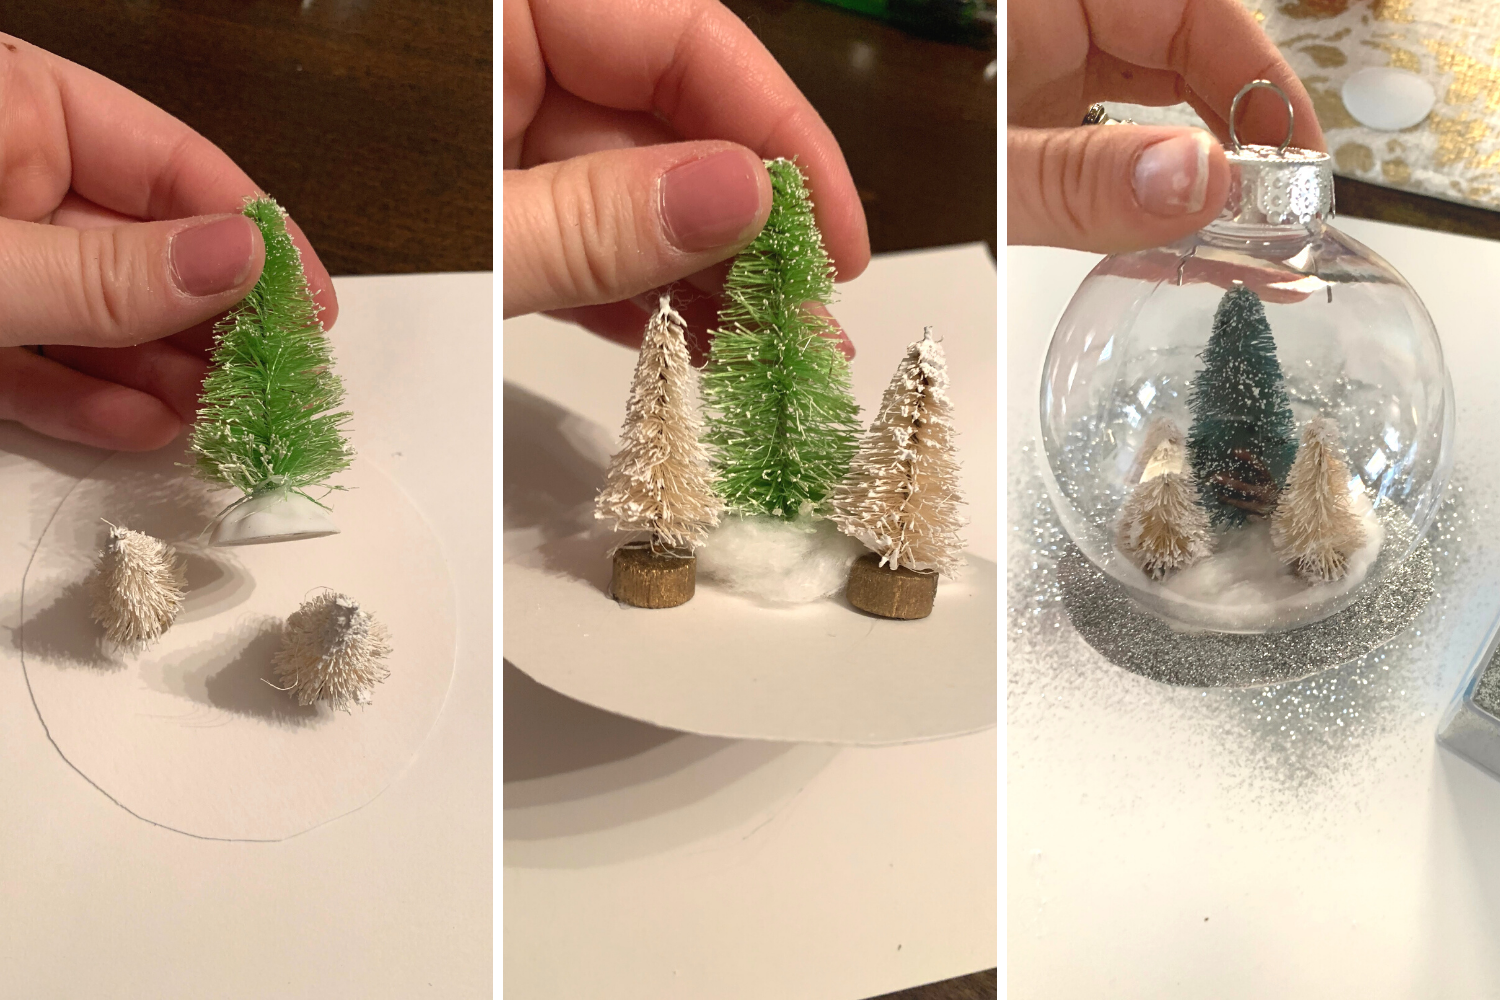
5. Now, depending on if you bought glitter paper or not, this step may not be needed.  Using mod podge glue I painted the top of the white paper bases and then covered in silver glitter over a paper plate to catch the excess. I had to touch up a few spots once the glue dried and I dumped the remaining glitter off to see emptier spots.  If you bought glitter paper, you are 10-steps ahead of me!

6. Time for finishing touches! Get that hot glue back out and glue the pipe cleaners around the base where your ornament meets the base. You’ll most likely need to trim for an even meet at the back.  I then used the left over scraps of the pipe cleaner to create a circle to loop into the top of the ornament to hold place cards for guests! I used old place cards that we didn’t use from our wedding, but you can cut and customize as you want or not include!

7. Once your mini snow globes are created, it’s time to set the table and get ready to host a delicious meal with close friends and family!

This was such a fun DIY and I love how they turned out. For $25 I created 8-mini place setting snow globes compared to spending nearly $60 at Pottery Barn — plus I made them! I must admit figuring out how I was going to cut and create this using ornaments had be puzzled for a while, and it took a few trial and errors before I figured out how to cut the hole in the bottom. And I really wanted to use ornaments vs. mason jars or other types of glass cylinders I saw online.  So once I figured it out and put it all together I was so excited! The best part is you can keep and use year after year or send home with guests as a little keepsake <3.

Happy Holiday Hosting!

bee (1)