Basement Makeover – Check-In

Over the summer I shared our Basement Makeover Game Plan – which I admittedly had some ulterior motives to have some extra space ready for B’s surprise party back before the holidays (but he didn’t know that *smiles*)! We were able to knock through a lot of the to-do’s and really transformed this space. Here are a few of the first items we knocked through with some photo updates too!

P.S. Before you keep reading – be sure to check out our Basement Makeover Game Plan to see the hideous before pictures, and to truly appreciate the afters!

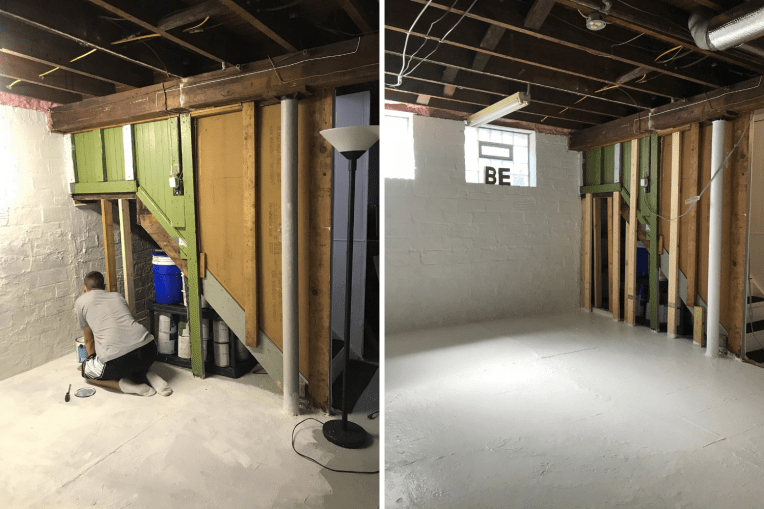
Created a Dedicated Space: We had to move all of our storage shelves, while also buying new plastic black shelves and containers to get things organized and contained – we moved all of this either under the steps where we have a decent amount of storage and then also created a “storage room.” Also to help make this storage room and create our “living space” – we had a plan to put up a faux wall with a painters drop cloth as a large curtain, curtain clips and a gas pipe for it to hang from. Basement Makeover - Checkin - the bee life (4)
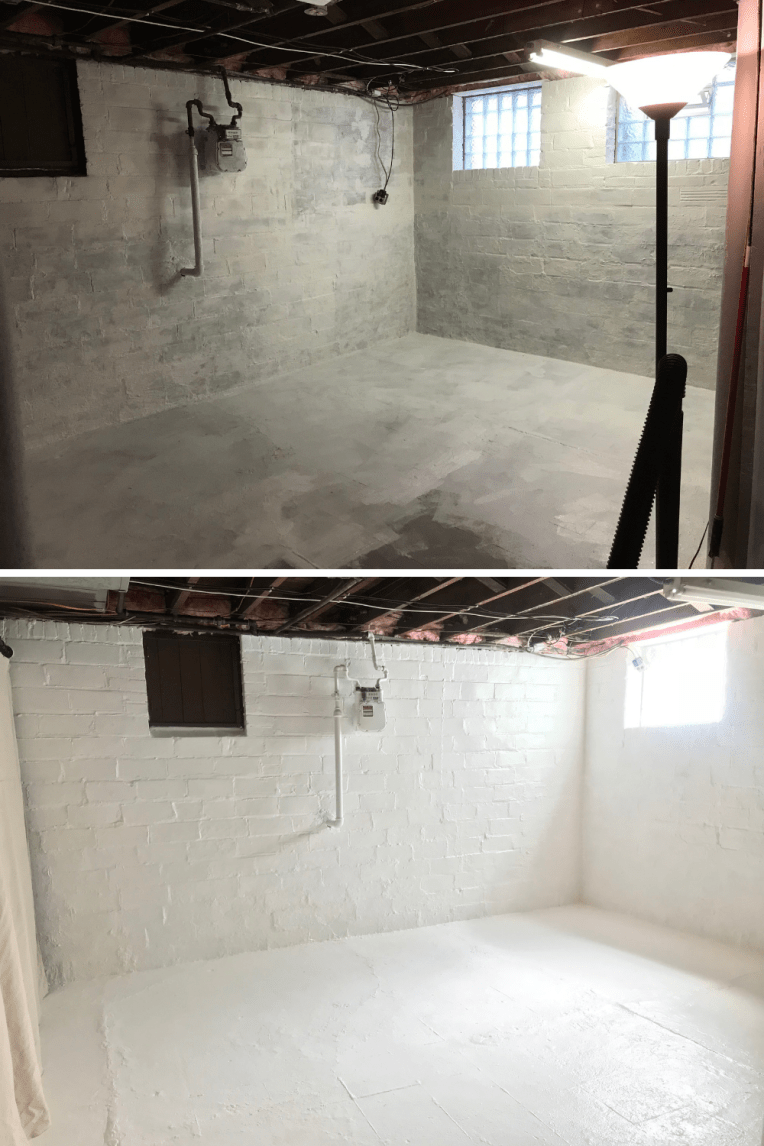
Painting & Waterproofing: This was super fun, not! *tongue out face* … in order to properly prep the space we had to do a lot of scrapping, sanding and getting the exterior walls ready for the waterproofing paint.  This was dusty, tiring and time intensive – but we wanted to make sure we were doing this right! Once the wall was prepped – we started painting with the thick waterproofing paint – I think we ended up doing at least 2-coats, and then painted with normal paint overtop the waterproofing paint.  We even painted the floor! So we had a completely white space – the paint alone made our basement look 10x bigger!

Accent Wall: We ended up creating an accent wall with shiplap wall – you can see our full DIY and How-to here for $60.  I’m so glad we did this – it helped pull in the industrial feel I was going for with the whole finished-unfinished look.  Not to mention, this was pretty effortless compared to drywall or something else and cost effective!
Basement Makeover - Checkin - the bee life (1)
As we continued working through these and saw how the space was really coming together – which was a bit beyond what we both expected, our plans for furniture and a few other finishes started to change.  I was initially just planning on using our patio furniture down here in the off season, butttt that changed and we ended up finding some awesome furniture that we pulled the trigger on.  Even finding the perfect rugs to layer started pulling the whole vision together while using string patio lights from the ceiling to help light the space! Basement Makeover - Checkin - the bee life (3)Basement Makeover - Checkin - the bee life (2)
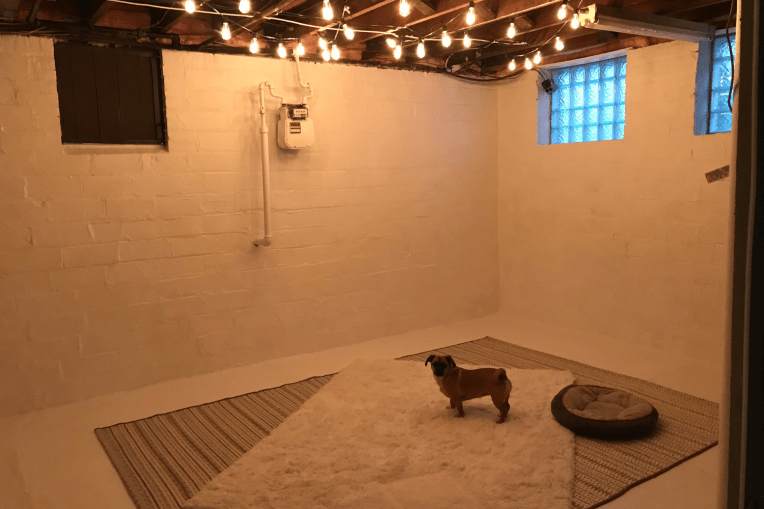
I can’t wait to show the finished space with you soon – with custom art and other DIYs like the old vintage trunk I upcycled for $50, it’s been really great to have a secondary living space as an option, hangout and the perfect spot to watch movies at during the weekends!

bee (1)

How to: Upgrade an Old Dresser

Almost four years ago, I updated our bedroom dressers to better fit the aesthetic of our bedroom.  The dressers were originally B’s – and they were a glossy black with old gold handles – they were just dated and super dark!  So in order to do a quick update we had sanded and spray painted the dressers and the knobs, in order to save some money by NOT replacing the knobs.  It was an easy half a day project with a huge upgrade, you can see the original before and after here.

…. Well it was time for another easy upgrade – this time a color upgrade AND hardware upgrade.  I found a 25-pack of knobs for $32 on Amazon – when you’re updating knobs, be sure to check how many holes your current knobs use (one or two), if there are two holes you’ll want to measure the space between and find knobs appropriately! Of course you can fill holes and drill new ones – but that is a whole other ball game. 🙂
Dresser Makeover - the bee life (2)
As I mentioned above, when I first made over these dressers, I went with the spray paint route – which I do love the magic of spray paint. But this time around I wanted to use paint for ease of application and clean-up!

Upgrade Step-by-Step:
(1) Buy your supplies: paint, sand paper, roller, brush, new knobs, paint tray, hand-held screwdriver
(2) Remove your old knobs
(3) Sand all the surfaces you’re planning on painting – just a light sand to rough up the surfaces works.  Knowing I had dark black under my light grey – I didn’t want to have to do 50-coats of white by revealing too much of the original color.
(4) Be sure to wipe down your surfaces after sanding to get rid of any access dust before you paint!
(5) Start painting!! You’ll want to do at least 2-3 coats depending on the original color you’re covering up – make sure your surfaces are dry between coats and use a brush to get are the roll places for every covered.
Pro-tip: You might want to add an additional coat onto the top of your dresser surface since this will be getting a bit more wear and tear. 
(6) Once you’ve painted and everything is dry and covered it’s time to get our dresser back into place and had your hardware with a handheld screwdriver!
(7) Stuff with clothes & decorate!
Dresser Makeover - the bee life (3)
For the color, white was a no brainer and the gold knobs were an easy way to modernize the dresser with an elevated touch.  I was able to get these dressers updated within a few hours – the weather helped being so nice that the layers of paint dried pretty quick, so I was able to keep it going with little breaks in between!

Since these aren’t in our bedroom anymore, this was just another way to update one of our spare rooms – and these are the dressers B uses everyday so they definitely get used and needed more sprucing. I’m pretty happy with how this turned out although I do wish the knobs were a little more centered on the drawer, but I was using the existing holes so I’m ok with it! Dresser Makeover - the bee life (4)
After it was all said and done, this dresser upgrade only cost $32 and some change between the new hardware and a paint tray – I used white paint I already had around! The upgrade with the white helps brighten the room and the knobs get rid of that dated feel and make these dressers feel new and modern!

bee (1)

Accessorizing a Black & White Bathroom

As we continue to work through our bathroom remodel and have made decisions on a lot of the major, more permeant pieces, I’ve started to explore the fun accessories to include in the space to really finish it off! Since our floor tiles are a pretty bold black and white pattern, I’m going to be keeping most of the finishes white – but want to incorporate a little color in to the space without competing with the tiles and letting them be the true statement of the room.
Bathroom Accessories - the bee life (1)
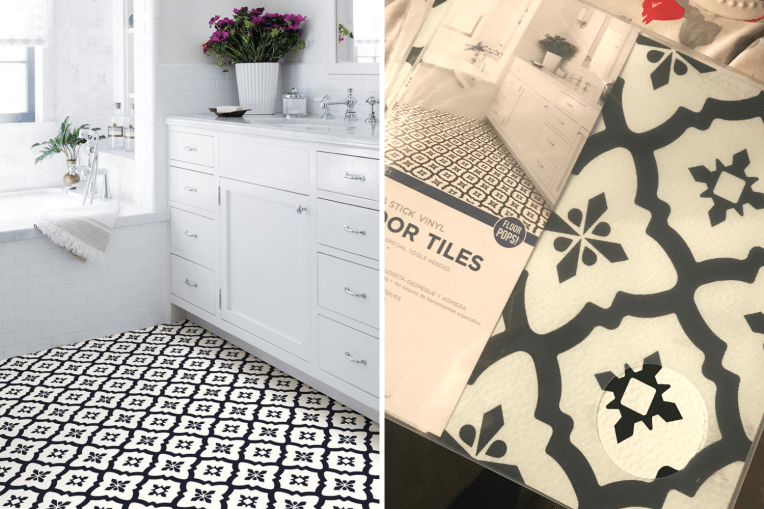
Since our floor is going to be our statement, in addition to our shower – we really want to compliment the space, while enhancing the neutral colors and adding a little umph the space.  Since we have gold faucets, hardware and overhead vanity light, the look and feel that we’re going for, for this space is classic with a little bit of vintage glam.

Option 1: To help keep the classic, vintage glam feel – one color accessory option would be incorporating shades of blush pink and more white with towels, baskets and rugs.  If we go the pink/white route, it would still be really subtle and I would continue to work in some gold accents with the toilet paper roll, hand towel bar and maybe even a soap dish for the vanity!
Bathroom Accessories - the bee life (3)
Option 2: As much as I love the pink route – there is also a part of me that imagines adding in big pops of color, like a deep mustard towels, accents of a dusky green or blues into the space.  Of course, I wouldn’t have all these colors in the space – just a few deep pops to play off our black and white canvas.  With a big pop of color, there would still need to be other supporting accessories of blacks and whites – like the the Jute Storage Basket (also comes in a Laundry Basket size) from H&M comes in this fabulous natural white – but also comes in a dusty rose that could be perfect for option 1!
Bathroom Accessories - the bee life (2) 
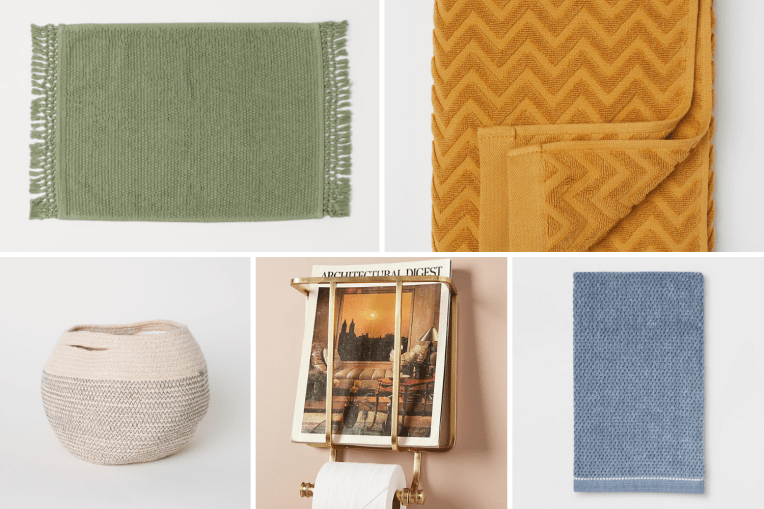
Shop the bathroom accessories:  Tuft Spa Bath Rug from Target | Gold Etched Metal Soap Dish from Target | Woven Pattern Washcloth Peach | Blocked Border Bathroom Towels, Set of 6 from Anthropologie | Brass Medallion Bathroom Hardware Set by Anthropologie |Textured-weave Bath Mat from H&M | Dark Mustard Yellow Jacquard-patterned Bath Towel from H&MSolid Bath Towels Blue from TargetMagazine And Toilet Paper Holder from Anthropologie | Jute Storage Basket from H&M

What do you guys think, Option 1 or Option 2?  I have to say I think I know which direction we’ll go down to help pull together the space.  But I also can’t wait to incorporate an old vintage mirror that was left at our house, maybe a plant or two and some other functional shelving or decor for the space.

Planning a bathroom makeover soon? I’ll be sharing a DIY checklist on an upcoming blog post!

bee (1)

5 Keepsakes to Incorporate Into Your Home Decor

When I decorate our home, I really try to incorporate personalized touches to each room vs. stock art or random pieces.  Now don’t get me wrong, I love some good stock canvas from Marshall’s but they have their time and place! So if you’re working to figure out ways to incorporate some personal touches and sentimental pieces into your home, here are a few of my go-to pieces I like to decorate with.

1. A Love Letter.  B purposed to be with a long two-page love letter – it was so thoughtful and special, I didn’t want to shove it into a box and find it years later.  So I found these two great matted frames from Marshall’s and framed the love letter – it hangs next to our bed and is one of my favorite parts of our master.

2. Vintage Family Photos.  We have these all around our house! From our gallery wall in our living room, to our built-in’s, dining room and even bedrooms, family photos are a great way to remember loved one’s past and hold onto family legacies’.  I borrowed family albums and made my own copies so I could have my own keepsakes – it was quite the process, but so worth it! Keepsakes - the bee life (1)
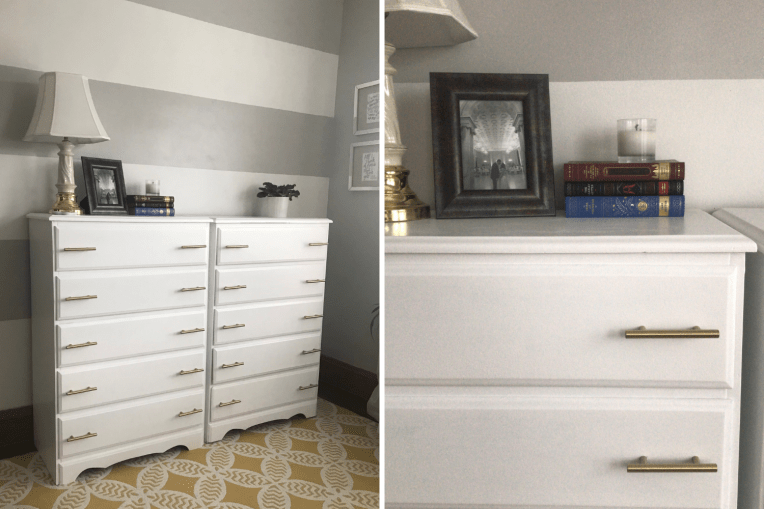
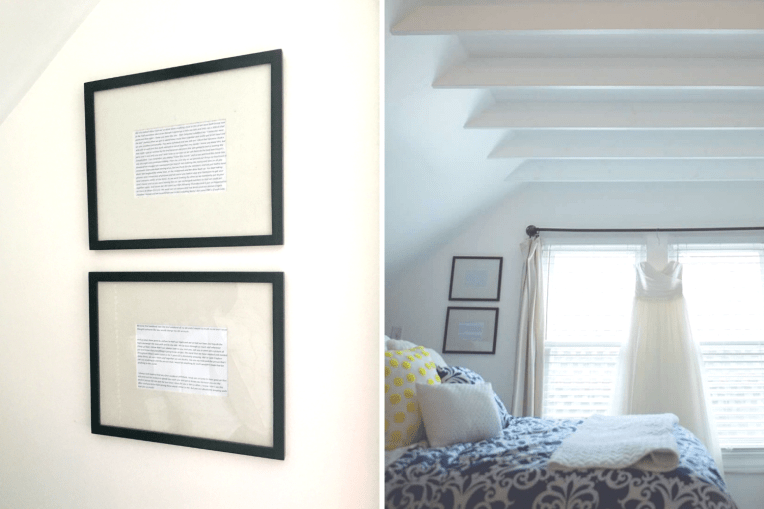
3. Wedding Invitation or Keepsake.  We had a special map made that we put in our hotel welcome bags for all of our guests – this was one of my favorite pieces so again, I didn’t want to put this in a box and forget about it.  We have this framed in our bedroom as a fun keepsake – this would also be a fun idea for your wedding invites, save the date or other important announcements that are  a little extra special!
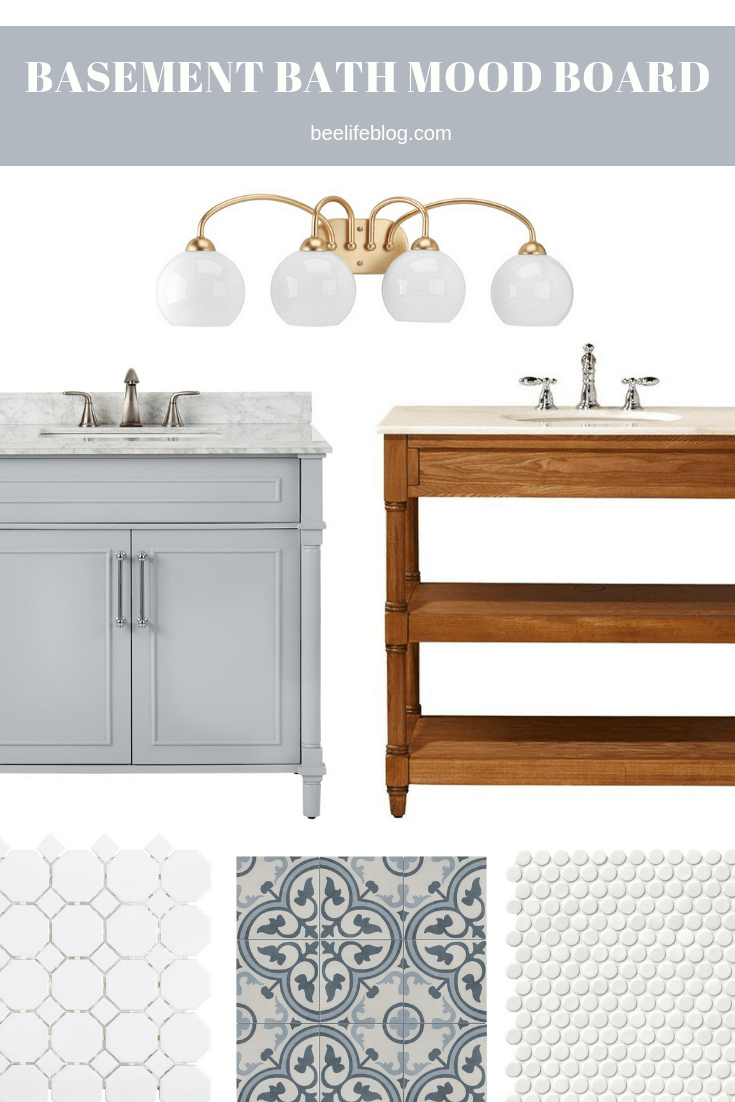
4. Old House Numbers.  Our house had ceramic house numbers that probably had some years with them, being our house is over a hundred years old.  I loved the ceramic numbers, but they were small and hard to read from the road – wanting to keep this momentum around I did a DIY with some frames that were left at the house by spray painting the frame, used some scrapbook paper as a background and framed the numbers.  This hangs in our entrance and I love it!

5. Vacation Photos.  I love picking one or two of my favorite photos from a recent trip and working to incorporate those into the house in various spaces or switching out the previous trip picture.  That way the memories are current, and when you go to switch out your picture you’ll see all the previous memories stacked (that’s one of my favorite parts!)  Keepsakes - the bee life (2)
Since our house has a lot of character and charm, I like to add modern pieces while complimenting the modern touches with a little added complimentary charm by incorporating these more personalized pieces that happen to be keepsakes from our family and the history of our home.  Depending on what keepsake you’re incorporating into your home, going the custom framing route is another way to really make this a show stopper and unique piece for your home!

bee (1)


Mood Board – Basement Bath

Remember when I mentioned we were working through a mini basement remodel for additional living space? Yeah, I know it’s been a minute – don’t worry the reveal is going to be shared in the coming weeks!  Well, part two of this project is working on expanding and updating a bathroom to continue making more of our house livable!

Nailing down the style for this space was key and I did this with a mix of online shopping, Pinterest browsing while working through the function and flow of the room.  I landed on vintage and classic while the plan of resting on classic pieces like penny or octagon patterned tiles as the foundation with the floor, walls and shower.  From there it’ll be reinforcing this style through the color pallet, light fixtures and a classic yet modern vanity.
basement bath mood board - the bee life Shop My Mood Board: Vintage Gold Bath Light | Aberdeen 36″ Vanity in Dove Grey  | Montaigne Weathered Oak Vanity | Retro Octagon Mosaic Porcelain Tile | White Glossy Porcelain Penny Tile | Amberes Azul Ceramic Floor Tile 

Honestly – the vanity has been the toughest part to find, as we’re trying to stick within a reasonable budget yet not something that is completely generic or stock.  But I can’t seem to find a good happy medium, although Home Depot is the leader in variety of style for decent price.

White tile will be a must.  Although I’m tempted to figure out a fun, yet stylish way to incorporate a bold statement tile into the space either a backsplash or statement wall – but I think that is still TBD. I’m also tempted to work in some natural wood with shelving and/or the vanity – since it would be nice to pull in natural finishes like we did with our statement shiplap wall in the living space of our basement.
basement bath mood board - the bee life (2)
Image Sources:  Left image | Right image

How do you plan your home projects?  I like to map out a direction, do my research and usually end up sticking to something pretty classic! We’re excited for this next project and will share the latest DIY’s and How-To’s along the way, all leading up to the grand reveal!

bee (1)

Trend Spotlight – Opalhouse Spring 2019

Opalhouse joined the Target home decor collections last spring – which I was a tad obsessed with, as they introduced bold colors with fun patterns and a unique offering of styles for everyone to love.  Low and behold, I was happy to see Opalhouse stay through the holiday season with it’s own offering of stunning pieces like this gold leaf & berry (which can still be purchased for a steal of $6.49!) or simplistic red polka pillow with it’s accompanying fa la la pieces — so I had a feeling some more beautiful things were on the horizon!

Thus, the Opalhouse Spring collection (as I’m calling it) is starting to creep it’s way onto shelves and into the cyber shopping charts – with vintage floral patterns, stunning gold terrariums, natural woven baskets with a hint of fringe and woven pillows with bright colors – I’m swooning again!  The floral patterns give me a tingle of a reminder back to some of my grandma’s old dishes/home decor – especially the Apple Woven blanket below! I’ve also noticed they have a ton of new outdoor/patio decor available for shopping too… oh patio season, where are you?
opalhouse 2019 - the bee life
opalhouse 2019 - the bee life (2)
Shop the pieces:  36″ x 10″ Brass & Glass Parasol Terrarium | 10″ x 6.4″ Brass & Glass Parasol TerrariumLumbar Chunky Woven Outdoor Pillow | Floral Doormat Natural Green | Blush Table Runner by Opalhouse | Apple Woven Throw Blanket Gold |Water Hyacinth Fringe Oval Basket Natural |Multi Floral Print Reverse to Velvet Oversize Square Throw Pillow 

So with this small tease, I can’t wait to see what other pieces drop into the Opalhouse collection.  I’m wanting more outdoor dining pieces, like new patterned plates and some new peel and stick wallpaper options, too!  You’ll be seeing plenty more of the Opalhouse collection on the bee life this year.

Happy Shopping!

bee (1)

House Tour: Our Green Christmas

This year it seemed like we were super late to the game getting our Christmas decor up compared to everyone else – although we do like to wait until after the Thanksgiving holiday.  With B’s surprise party this past weekend, I was extra motivated to have the house Christmas ready!

A few of our new pieces that helped put the finishing touches on our Christmas decor were our pillow cases from H&M, the mini brush trees for our dining room centerpiece and a new tree skirt!  …Speaking of tree’s can I gush over our tree for a minute?  We always get a real tree and this year decided to go a bit bigger in height – than we normally do.  We both laid eyes on our tree and decided to pull the trigger, we were joking about having an elf moment when we put it up in the house, but it fit! A bigger tree called for more lights – but she is a looker.

Besides being in love with our big tree, every year I always have fun putting up our alpine tree in our dining room – this is where I layer on all of our ornaments – and what I love even more than this is opening up all of our ornaments and all the fond memories that come with them, and the ornaments that I forget about!  We also put up a smaller alpine tree in our bay window stairwell, that has all of my childhood Hallmark Barbie ornaments and a few other ones!

Our house has been transformed into a little Christmas wonderland, and I just love our little Christmas snow globe that we get to enjoy for the next few weeks.  Now that the house is all ready, we can start getting ready for the big day through visiting with friends, holiday crafts and shopping for presents!

Shop my pieces: H&M Reindeer pillowcase, Velvet dark green pillowcaseLarge bottle brush Christmas tree, Pom Pom tree skirt from Target

bee (1)

House Tour – Fall Front Porch

Are you loving fall this year as much as I am? Our front porch is lined with glorious pumpkins, gourds and mums, and is the perfect welcome to our friends and family as they come visit us over the course of the next few weeks.  What I love about this time of the year is when you decorate for fall vs. Halloween, the decor can carry through from October into November, right up until we’re ready to hang Christmas wreaths, plaid ribbon and more holiday magic!  Here is a little tour of our fall front porch…
Fall Front Porch - bee life blog (6)

We bought nearly 70-pounds of pumpkins when we were visiting family, whoops! We dragged all these beauties back to frame our entry and line the steps.  From there all I needed was a few more filler pumpkins, gourds and of course, the beautiful mums! Since our back patio is coming to a close, I moved the lanterns up to the front for added depth and help fill in the space.  I love how it all turned out and our house feels a bit more completed for a warm fall welcome.

bee (1)


How To: $60 Shiplap Wall

One of our side projects for our Basement Renovation was a statement wall that we decided to finish with shiplap.  If you read my post about Shiplap Wall Inspiration, you saw there are a lot of options and considerations for a shiplap wall! Well, B and I weighed our options and since our basement look is more of a unfinished-finished look, we didn’t want to drop too much money into this and opted for a more natural wood look vs. painted.  And I’d say we were successful with the whole statement wall because it is definitely a statement and looks more than just stained plywood.

We also decided to do long singular unison pieces, since we were working with a smaller wall vs. doing alternating pieces.  Our wall was also not level – being a century home and in the basement so we had to get a little creative once we started placing the actual boards.

What You’ll Need:

  • Measure your space & determine your measurements; we bought (2) 4×8′ maple plywood boards from Lowe’s ($25 ea.)
  • Table Saw – this will ensure even and straight cuts for your panels, we cut our panels to be 8″ wide (my dad helped us with this one!)
  • Stain of your choosing, we used Minwax – light Walnut ($9)
  • Nail Gun w/ compressor and finishing nails
  • A couple of popsicle sticks

Step by Step:

  1. Before you get your wood, you’ll want to prep your area, we removed some walls/studs and had to put up new studs since we were working with some odd configurations – we also made sure that all of our water proofing paint was taken care of on the wall, floor and the pole in that area.
  2. Upon determining your measurements and purchasing the wood, you’ll want to measure and cut your boards to create your panels – as I said we decided on 8″ for our panel width. A table saw will be super helpful in this case to make sure your panels are straight all the way across! Be sure to use the proper safety precautions when cutting.
  3. After we had our boards cut, we picked out a stain – light walnut to be exact. We applied two coats of stain over the course of 2-days.  I used a foam brush for easy application.  I wasn’t too careful about the thickness of the stain for the first coat since I knew it would soak into the wood, which it did. After the second coat the color was the dark hue I was looking for, we were ready to hang!  If you’re using this in a more finished space, you might want to consider putting a poly over top to keep it a bit more polished and shiny.
  4. Thanks to our handy friend C – we were able to borrow his compressor and nail gun, which allowed putting up the boards quick and easy.  We measured each board and made final length cuts on the site before securing into place, because we were butting these up against an uneven wall.  You may be wondering about the popsicle sticks, well we used these in between each panel to have even space, we put these in tight and removed once we had our next panel up.
  5. Beyond the minor cutting of the ends of the boards, we only had to cut around one outlet and had to do a smaller skinner piece across the top that took some measuring twice and cutting three times. *smiles*  We were able to get all the boards up in one night, although it was a little late by the time we finished!

The nail gun was crucial to getting this wall up and making the boards look almost like they’re glued up and hole free! It was a dream to finally get to use one, they’ve always looked like fun and I have to say it was awesome and efficient.  I am trying to think of other projects and excuses to borrow it again…. but I digress. With our Shiplap statement wall complete we were one step closer to wrapping up this makeover and adding the finishing touches!

For $60 we made a huge impact and it was super easy to pull together, the natural wood and color pull into the ceiling of the original beams and makes this unfinished finished basement feel cohesive and complete.  B was pretty impressed and happy with the way these turned out, it was an all around win!

bee (1)