Latest Obsession: For The Home

HERE’S WHAT, I have been absolutely obsessing over especially as the summer months are approaching and the store’s are switching out their inventory to be summery!!!

Lanterns. OBSESSED. I want them everywhere, but especially for outdoor spaces like our front porch. I love them as decor for your entry way and even lightening for your seating area. I also love lanterns for decoration inside, around a fireplace or hearth area, especially the really big lanterns. Not to mention you can find them in almost any finish from silver, to gold, wooden, ceramic, or bronze to fit into your current decor or switch to something new. You can get hanging lanterns or keep them on the ground or table. Plus you can use them season round by mixing up colors and styles with different fillers for the insides… I could go on for dayzzz!  On a lantern kick like me? Check out craft stores, as a lot of them have sever price cuts on summer and outdoor decor (like 60-70%!) you can’t beat it.

Greenery. I am loving me some greens, the fake kind. I first saw some moss like letters at Michael’s and really wanted to impulsively buy them, but one didn’t know what to spell or letters to get, and two thought they would look way out of place in my house, but I can’t help but pine over them. I also really love boxwood wreaths, but refuse to spend the money online and will most likely DIY one, one of these days. And as much as I truly don’t like fake plants, because I’d rather just have a few real ones – I really like the fake greenery balls… yes I just described them as such, okay they’re technically “boxwood vase fillers” (according to Target). Anyways, I like the idea of having some greens around the house to add to the real greens, it brings some added life to your living space.

So those are my two latest obsessions right now, I’ve had my eyes on the lookout for these whenever I hit the stores.  I recently grabbed two silver lanterns for some added decoration up in our master suite, and I love how they compliment the space, we have a mixture of metals, but somehow it’s all working.

What’re your summer favorites?

DIY – Childhood Nightstand

I recently received my old childhood night stand from my parents house, but it was in desperate need of a little make-over, since I had last repainted it in high school to match my pink and orange room. *sigh* I still wish I had a pink and orange room…

Anyways, I digress. This was a really easy and low cost DIY because all it really needed was a new coat of paint, especially since in my dark teenage years I had written touching notes on my night stand like; “love sucks” and other cryptic messages. *smiles* So it needed a little sanding and fresh coat of white paint on the base.

Before

Next, I painted the fronts of the drawers, Naval by Sherwin Williams, it’s such a pretty color, I am trying to figure out what else I can paint with it. I was planning on replacing the knobs, but they were painted on from previous paint jobs, and I really didn’t want to deal with the hassle of trying to wrangle them off and potentially damaging the drawers, so plan B. Plan B was to spray paint the handles metallic silver, which I just so happened to have from a few other previous projects. I had to make-shift something to cover up the drawers, so some magazines and painters tape did the trick. It actually worked out pretty well and I only had to make a few touch-ups with the navy.
DSCN2140
To give this even more of an upgrade, I went ahead and added some adhesive/ contact paper ($5.99 at Target) into the drawers to make it pop!  Not to mention, over the years this little nightstand has seen some love, so it was looking a little rough. I decided to put the contact paper on the outside of the drawers as well, so that when you opened them there was an added pop. I did some simple measuring and cutting, this was even easier because the contact paper has measuring lines on the backside – this probably took me about 20-minutes to finish up.

Even though this is for a guest bedroom, I think it’s important and nice to have nightstands and all the essentials for when your guests stay over – that’s why I’ll be getting a lamp as well to finish off this look!

After

Before and After - the bee lifeI love the way it turned out, and I am sure this little night stand will have a few more makeovers in it’s lifetime.  The added detail of the contact paper on the sides of the drawers and inside, just upgrade the whole piece.  I may still try and get new knobs at some point, but for now this little $5.99 makeover will do the trick and accomplishes the task of being functional and matching within the space!  What I love the most about some DIY’s is that it doesn’t take a lot, to make a big difference – time wise or cost.

Hope you all have a great week!


DIY – Upgraded Built-in’s

One of my spring projects was to give a simple upgrade to our living room built-in’s that bookend our fireplace.  I planned to do this with textured wall-paper, that I have used in a few other spots around the house like our dining room built-in’s, our stair-backs on our stairs leading to our master, and even in our DIY bar that started out in our apartment. Overkill? No, surprisingly this is the most subtle upgrade you could do to these tiny spaces for a big impact. Not to mention it’s extremely affordable ($20  for 56 sq.ft.) and super easy to do.

Since we live in a century home, I like to build off the history of the home and add to it when possible, this smaller ‘tin ceiling’ patterned print is the perfect accent to give a face lift without completely giving it an overhaul and taking it into a different era. Textured Wallpaper - Lowes - the bee life

Before:

DSCN1981DSCN1982

After about 30-minutes of leisurely watching eNews (learning all about Lemonade) and measuring, cutting, soaking and putting into place, boom! Instant upgrade. All while dinner was cooking in the oven.

After:

DSCN1984DSCN1985DSCN1989
DSCN1988
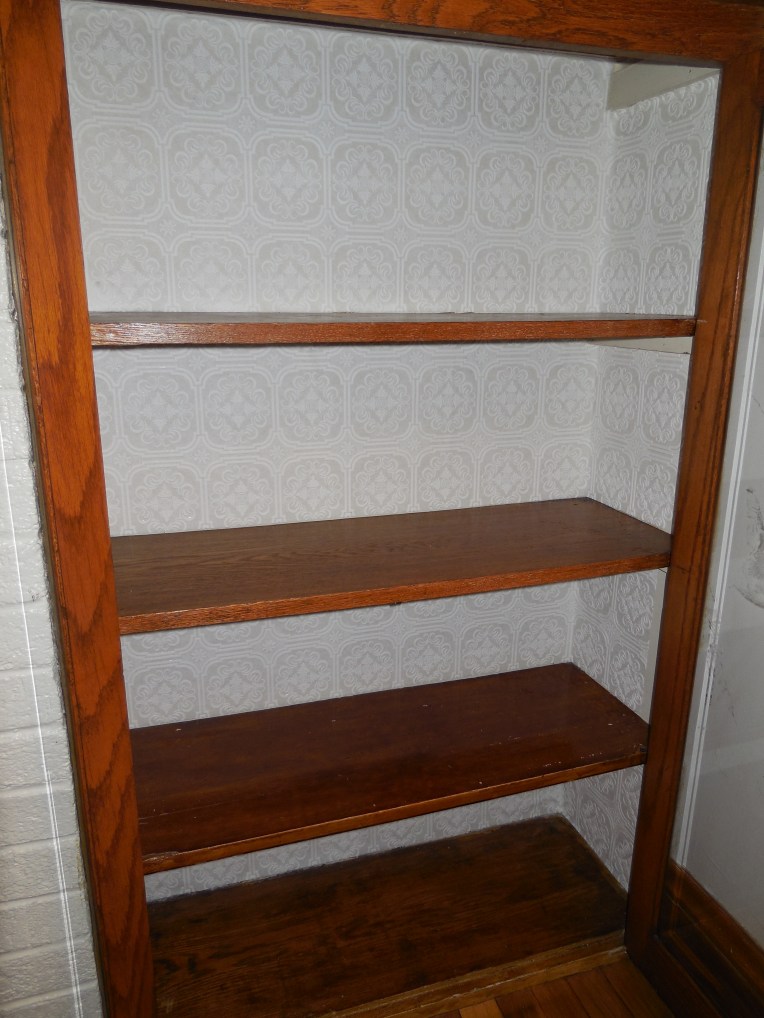
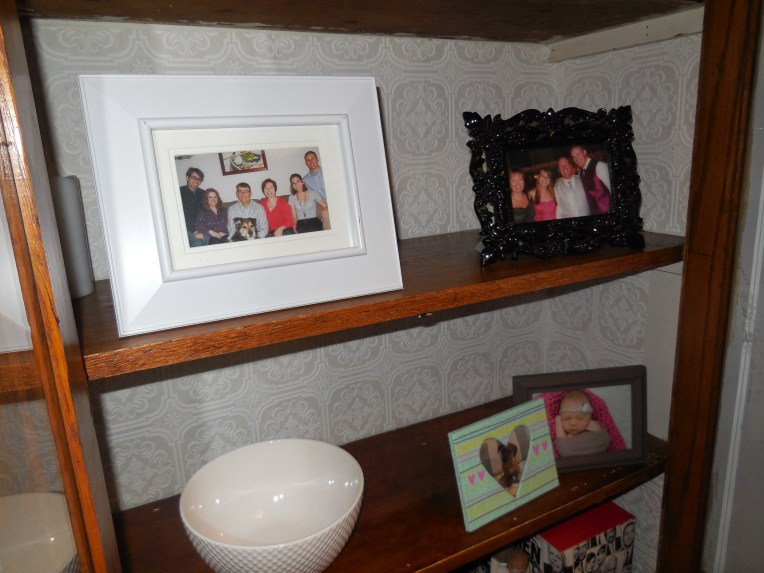
With the doors closed, and if the lightening is just right, you can hardly notice – but on the flip-side, if the lighting is just right, you can also see how pretty this added touch is.  Sadly, I ran out of paper and was only able to get one side done, I completely underestimated the amount I had left over from the stairs in order to complete these built-ins. But it was a good start, and like I said – easy, not very time intensive, and pretty straight forward for $20 a roll.


Latest Obsessions: For the Home 

HERE’S WHAT I have been obsessed with in and around the home, especially since our master is nearly completed.  These are the things I am constantly looking for whether it be in the store or buried in a photo album.

Old Photos: Since the inception of the gallery wall in our living room, and the idea of using old, black and white photographs, (from years long before I was ever born) I can’t help but want to find more! There are so many hidden gems stored away that I know I haven’t found yet.  The last time I was home I insisted my parents dig out their old photos… And there is was, these beautiful wedding pictures of my grandma B, pictures I’d never seen before, pictures that took my breathe away (one pictured below). I also need to dig around in B’s grandma Dee’s pictures. I love making copies and filling my frames with family and memories that make up our history.

Table Top Clocks: I am over the wall clock, practical and useful in some rooms (like the kitchen) but not so much in other rooms. I LOVE table top clocks, vintage or modern, gold or silver, I’m probably going to start hoarding them and put one in every room! I just stumbled upon these gems at Target, $9.99 each, I’ll take one of each, please!
Clocks
01 | 02 | 03

Wooden Accents: With recent DIY projects, I find myself drawn more and more to custom wooden signs with hand crafted letters. I also love wooden frames that elevate the look and feel while tying in a natural element to the room and adding warmth. I have a specific DIY in mind to help finish off the gallery wall in our master, something similar below, only incorporating B and I’s initials or a special date or longitude/latitude.  There are also plenty of pieces like this found in stores, that have a custom, hand-drawn look for the not so crafty people!


What are you obsessing about lately when it comes to pieces in and around your home?

Master Bedroom Inspiration

Oh how things can change within a year! Almost a year to the date, I posted this Bedroom Retreat – which while all in good fun, the idea’s have transformed immensely!  Here are a few of the items on the must-have punch list and some inspirational pictures for elements that I want to pull from.

  1. Wing-back Upholstered Headboard
  2. Matching nightstands with table lamps
  3. Pop of color in curtains, pillows, accessories
  4. Accent Wall – Herringbone Pattern
  5. Cozy and comfy seating area w/ fireplace
  6. Thick baseboard trim
  7. Open concept railing
  8. Classic chandelier (DIY Project)

diy-wingback-headboard-tutorial-king-size: Master Bedroom Makeoverschairs- overstock, curtains, world market, tiny ottoman in tween for sitting area:

Our attic is slowly but surely coming to life and as much as I hate painting, I can’t wait to paint the room and do the finishing touches like the trim and our open concept railing. I am really wanting to have pops of navy, yellow and pink around the room, but still creating something that B will like and isn’t too girly. We are getting so close to the finishing touches it’s hard not to get excited!