DIY Dresser Makeover Inspiration

It seems like my DIY project list keeps growing, but I haven’t gotten started on any of it yet! To help get inspired – I wanted to pull some looks for a project that should be easy to check off the list, refinishing two dressers in one of our spare bedrooms.  These guys already had a face lift, which was a huge improvement, but the room has a lot of different shades of gray and I want to event that out – and these guys will be a good starting point.
DIY - Dresser Inspo - the bee life
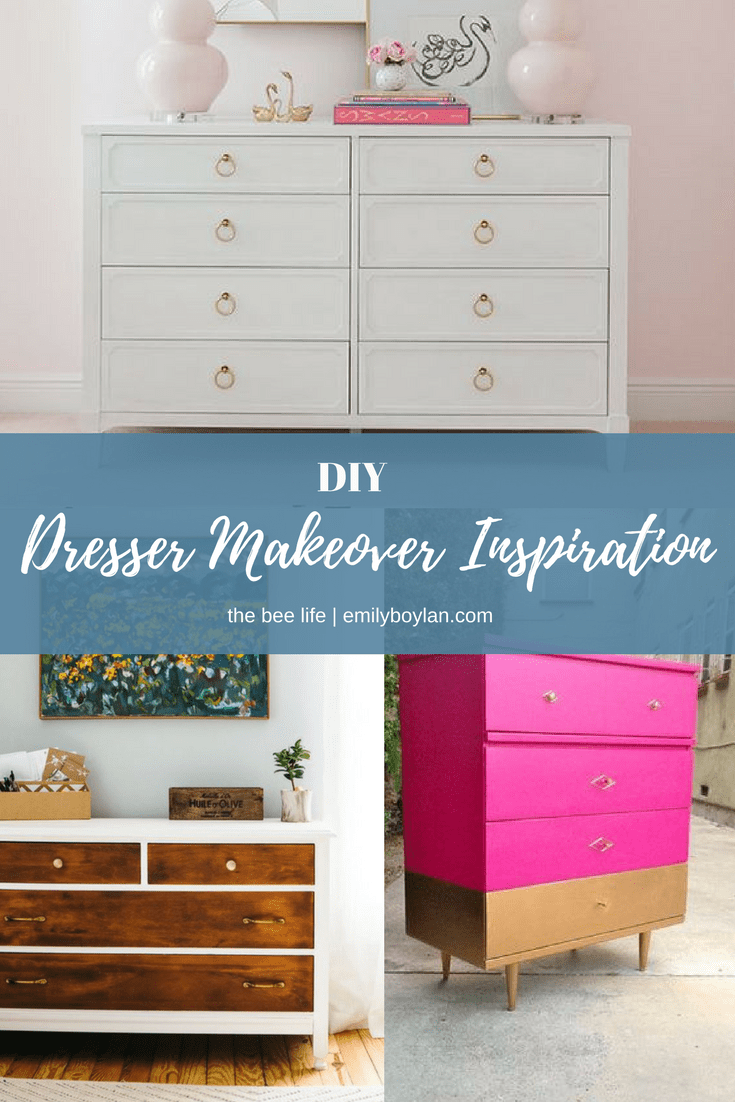
We originally kept the handles to save on costs, but this time we will be switching out those dated handles for something a bit more sleek and modern.  I’ve got my eyes on something like these gold handles after some shopping around since hardware adds up quick, and we need 20 of these!

So now that the hardware is somewhat figured out, what color? My first inclination is to paint these white. All white everything ❤ but upon searching for some inspiration I love the subtle pops of color with the white or the mix of natural wood and white.  The room has a fun statement wall of horizontal stripes, and the headboard inspiration is also on the DIY docket to-do list, so working to keep everything consistent and complimentary is key when updating these.

Next steps are to order those knobs, then finalize the color and get to work! They’re going to need a good sanding across the board but once that is all set these will be a nice and easy makeover for this guest room – I just need it to warm up a little so I can work in our garage!


Image Sources: Top Image | Left Bottom Image | Right Bottom Image

Easter Table Decor Inspiration

With Easter being only a few weeks away, I am in need of some inspiration for an Easter ready dining room.  With last year’s table decor being full of pastels and pink, I was hoping to switch it up a bit this year!
Easter Table Decor Inspo - the bee life
What I love about these options is that they’re simple, yet colorful and classic.  They’re also low cost while still make a statement for guests without completely overpowering the entire table.

Florals. I love the idea of incorporating a single flower directly at the place setting – I think adding a small vase with water for each guest to put their flower in once they’re seated would be a fun finishing touch for this look!

Bunny Cutout. What I love most about this idea, in addition to the layering, mix of prints and colors is the simplicity of the bunny name tag. This could be easily accomplished with tracing or free hand – I even saw felt shapes at Target in Easter shapes like a bunny and egg! Perfect for this year and stocking away for next. The finishing touch of the ribbon is fun too!

Name Tag & Greenery. Another simple, low cost idea that makes a great statement is the inspiration from the stripes ‘Emma’ tag. A bundle of these tags or something similar are easily found at a number of stores, low cost and in bulk. Adding the greenery is a nice touch to make it standout and make it more that just a tag!

As I’ve said before, our dining room is one of my favorite spaces to update as the seasons change and as the holidays come and go. Although we aren’t hosting Easter this year, I like having our table set and looking great all the time – and always love new ideas and inspiration to adapt and turn into my own!

Happy Tablescaping!


Image Sources: Tulip | Bunny Tag | Stripes + Greens


Bee’s Tips for Organizing

With the start of 2018 being pretty chilly, there hasn’t been much I’ve wanted to do besides hit the gym, dream of running outside and slowly work through parts of the house for a deep clean! From the pantry, to the freezer, to closets and the basement this year has started with a lot of organizing and purging and it is SO rewarding.  And as much as we are clean/organized people, and have places for everything – it’s amazing when you actually go through things how much crap we really hoard away!
Bee Tips for Organizing - the bee life
So if you are like me and have been purging or have been thinking about it, but just don’t know where to start – here are a few tips and pointers to help.

Start Small. If you’re just jumping in, and not one for cleaning or organizing, start small like tackling your refrigerator or freezer.  Cleaning out condiments especially can really work wonders especially once you start checking dates.

Pro Tip: Plan this around garbage day!

Downsize. If you have containers or organizers that are too big, downsize. For example we had a nice paper organize on our desk in the office – I thought it would be perfect. Well I only ended up piling more papers in each of the slots, never looking at them again. So I downsized, I got a simple 3-section mail holder to replace – much more streamlined plus it makes me be more selective with what I put in it.

Buy Tubs/Containers. If you’re working on a bigger space – like a closet, and are organizing clothes, keep sakes, crafts, gift wrap, all of the things – make a list of containers you need and go make the commitment.

Pro Tip: Label containers on the tops and sides for easy reading 

Make Pile’s.  The best way to get started with any project is creating 3-piles: Keep, Donate, Trash. Establishing these piles, will help you when it comes time to finalizing everything – what you still need space for, what you can throw away immediately, and what you can pass along to those in need.

Getting organized can be a bear, but it’s staying organized that is the real trick – so the key is to set yourself for staying organized, while you get organized. Labeling, color coding, and even just shifting were you keep things can help make a closet a little cleaner or the pantry fuller.

Happy organizing!


Image Sources: Right Image | Left Image 

Spare Bedroom – Makeover

I must admit, I’ve had some major writers block on top of feeling uninspired.  Then I realized I should share my latest obsession aka inspiration – our impromptu spare bedroom makeover! It started this past Friday, after a crazy week back to work, a stiff drink, and a few scrolls through Pinterest, I thought out loud to B; “Let’s paint the yellow room.” And B’s response was; “pick a color” – gosh I love him.

Of course, I had a color in mind, so we went to Lowe’s on Saturday, found the color, bought the paint, oh and another can for a different impromptu project and got right to work once we got home. This of course has spiraled into a full room makeover, remodeling some old and buying some new.  *grins*

I’m going for something chic, classic and colorful. My goal is not to rush this and look for solid pieces and see what works in the space as I add in curtains, bedding and DIY’d furniture.

Can’t wait to share our first house project of 2017!

Inspiration sources can be found here

House Tour – Our Living Room

Hi friends! I wanted to invite you inside our home and give you a little tour of our living room!  It’s one of the rooms where we spend most of our time besides our master… yes I know… I still owe you all the official master tour, it’s coming, I promise! Anyways, back to the living room, since it’s one of the rooms we spend most of our time in, it’s one of the more finished spaces.  It’s also one of the spaces that I like to update and switch things around on the mantle, coffee table and even the picture frames. So here is the space just Plain Jane, no holiday decor – just normal life.
Living Room (2)Living Room (3)Living Room (1)
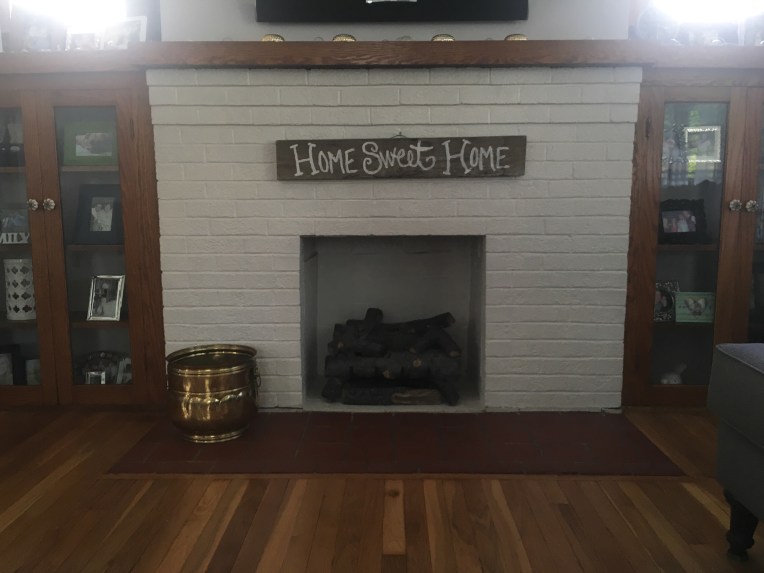
One of my favorite parts of our living room is all of our old photos that we’ve incorporated into the gallery wall or through the mantle and built-in’s.  They’re pieces of our past and what make up our families and who we’ve been shaped to be.  Family is very important to both of us, so it’s nice to be surrounded by our loved ones, past and present.

It’s the little details we’ve been able to focus on and update (like the knobs on the built-in’s) still giving it an appropriate feel for the period of the house but giving it an updated feel. 

Hope you’ve enjoyed one of our most loved spaces!