House Hunters – Sun room

Since the weather is finally starting to perk up, there has been one room in the house that has been completely neglected – our sun room. This room is strictly a 2-season use room (for now) since it’s all windows and horribly insulated, thank you 100-year old home. So knowing this; I don’t want to put too much time or money into it, but I still want it to be a warm, inviting space that will be used on weekend mornings, rainy nights or afternoons.

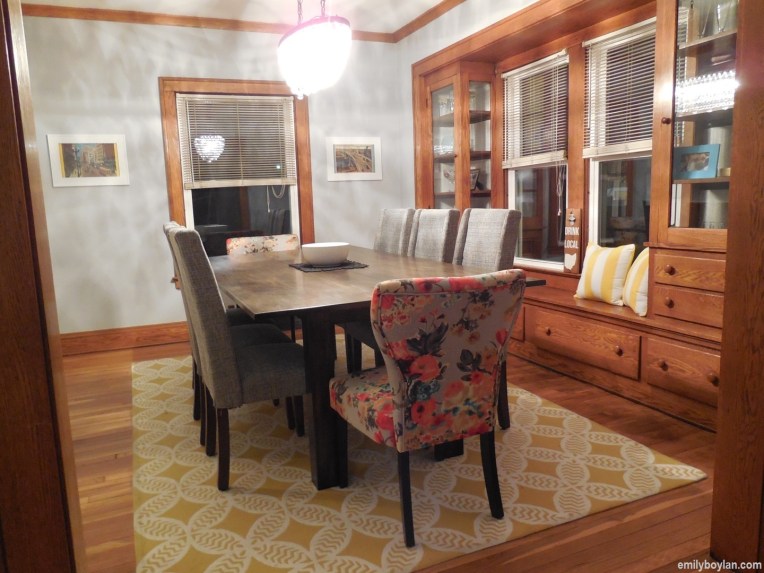
Here’s the space we’re working with;

It’s basically a square with windows on three-walls and a door with two smaller walls from the camera perspective. First things first; it will need a coat of paint (the only room in the house that hasn’t been painted) – that dull yellow is going to turn into a crisp white. The ceiling and floors are a dark color, I am considering painting the ceiling white and maybe doing some antique texturing. A new area rug is also needed to add that cozy feel.

Inspiration:

01 / 02 / 03 / 04 / 05

These pieces might be a little big for this space, but I like the idea of it just being a room with a couch so all you can do is relax and enjoy the weather without actually being outside. We plan to go furniture shopping soon for our living room, so maybe we will throw in a piece or two for the sun room! First thing’s first; PAINT!

Transformation Tuesday no. 5

Another Tuesday, another Transformation.  Our bathroom has come a long way since it was initially revealed in TT no. 2.  Small fixes along they way have been made like a new faucet, a new mirror and finally our open closet shelving.  The closet in the bathroom was sort of an odd ball, but had so much potential.  We opted to keep it without a door but wanted to spruce it up by adding some open-concept shelving.

Before
It was just an open space with a few hooks, and horrible pastel blue color, just wasted space.

After
A pop of color was needed to add some contrast with the white shelving and accents. My glass holders are recycled from Bath and Body Works candles, a little soaking and scrubbing and they’re perfect for cotton swabs, Q-tips, and other necessities! Baskets were newly purchased from Target, to continue with the clean white accents, a few more are needed for various things and new white towels will be a future purchase too! I love that everything is in one place, a one-stop shop and organized – it’s perfect for me and B, and guests!

Our next project in the bathroom will be getting rid of the horrid flooring and tile on the walls! I need some white subway tile in my life.

House Hunters – Centerpieces

One small decorating detail that I have been rambling my brain on is a centerpiece arrangement for our massive dining room table.  Ideally I would like it to be usable year-round, but allow the possibility to add holiday touches.  Surprisingly, Pinterest has not been much help.  I like portions of centerpieces I’ve seen, but not the whole thing, so I am just going to have to get creative!

Wishlist:

  • Something that is classic and clean
  • Fresh flowers (everyday)… but highly unrealistic – fake flowers are not an option
  • Year-round
  • Airy and light

At this point I am leaning towards different size glass vases/cylinders that would house candles.  I also like the idea of candlesticks, but I want to potentially do this for our fireplace mantle, which is also a constant thought and struggle – everything I see is holiday related!

Pinspiration:

My search for that first piece to drive the inspiration is ongoing, even window shopping in multiple stores looking for that one piece has been unsuccessful, but I am determined! I can’t wait to share the end result, hopefully sooner rather than later. Until then any advice, pictures or tricks you did would be awesome!

Transformation Tuesday no. 3

Remember that post when I “designed” our future dining room? (In case you missed it see here: House Hunters – Dining Room Design)… I also mentioned that we were having a custom table built, well table is complete, and dining room is complete!  We ended up going with my original design, but ran into some problems with the chandelier.

WORDS OF ADVICE: Don’t fall in love with something “available online” only to find it’s no longer available online or in any of the stores… also try and find similar models from different sights, just as back-ups or comparison.

I could not find a replicated chandelier of the one in my original design post ANYWHERE. It was my mission, I was so determined, but found nothing! And I called almost every Home Depot asking for the Hampton Bay, Menlo Park 6-light chandelier… I even went as far as upstate NY near my parents searching for this bad boy. Sold. out.

So… I had to try and find something else, it was hard but we finally found a replacement that we both liked and played into the character of our 100-year old home. We also went with chairs from Target, not only are they durable (and beautiful) but getting two chairs for the price of one (if that) is unbeatable!  Our table was built by a friend’s friend who is a carpenter, we were able to pick the wood, customize the size (8-feet by 4-feet), legs, spacing, height…everything. We ended up staining and finishing the piece ourselves to save some money and it came out great.

Before

After

photo 2

Final touches; side table with table-top lamp, new blinds, decorative bowl for the center of the table and place mats, and I am sure about a million other things along the way! I am completely in love with this space and can’t wait to entertain and have many dinners, game nights, and parties around this table.

Happy Dining!

Transformation Tuesday no. 2

Hello Transformation Tuesday!

We are finally moved in, and it’s a strange feeling to have this whole house to ourselves. Again, I am realizing that I have been doing a horrible job at taking up-to-date “After” photos – but I still think the ones I have say a lot!

Bathroom Makeover

I underestimated what a little paint could do and switching out the original shower curtain… oh and I didn’t realize the ceiling needed to be painted until the first coat on the walls was up to reveal the ceiling was the same color.

For now this will work for us, but we eventually want to get a larger vanity and light fixtures, maybe even new flooring. But for now this paint job has made a huge different, it makes the room look 10x bigger, not to mention we didn’t need to break the bank.

Yellow Room Makeover

This room initially to me, didn’t need to be touched. But after the plaster cracks were fixed, the walls needed to be painted. Not to mention after we had the electric updated, the base trim had to be repainted, as it was completely removed from the workers. Hence, more painting… but what a difference. The top trim also had a large gap at the top near the ceiling, either it was from the house settling or a poor job to begin with. So, instead of replacing, we caulked in the gaps and painted to refresh… wait until you see…

We have also since replaced the ceiling fans, so they are less obvious and a little newer looking. Once again, inexpensive fixes, that make a huge different –

  • Caulk – $5 each (about 1-2 tubes needed)
  • Yellow Paint – $33 gallon
  • White Trim Paint – $41 gallon
  • Ceiling Fan (not pictured) – $34
    Total Makeover Cost = $118

Can’t wait to share more transformations with you!

Transformation Tuesday.

It’s my inaugural Transformation Tuesday! Are you excited? I am, this means we are starting to wrap this up! But since we aren’t quite finished or moved in, here are a few of the projects we’ve completed, although small in tow, have made a huge difference.

1. Carpet Removal – Hardwood Please
This one was simple… as soon as we saw this carpet, and the gorgeous hardwoods in the rest of the house we just had to tear this up. So we did, the first weekend we got in the house.  And with Moz’s help, poof! The carpet disappeared… luckily it was in a small area of the house.


2. Wallpapered Built-In’s
My first initial instinct was to add a little more life into these beauties by painting the inside yellow so they would pop! Then I remembered I had some left-over embellished wallpaper from when we made our bar (I’ll share in a future post).  After some measuring and cutting, I soaked the pre-glued wall paper, waited 5-minutes and then placed into the built-in’s… wah-la! Instant character.  I love this patterned wallpaper because it reminds me of tin ceilings, without actually having dark tin ceilings in your house. The pattern is subtle enough that it isn’t too distracting, and it brightens the cabinets up just enough, I love it.

I can’t wait to share more before and after pictures with you! Honestly, I have to keep reminding myself to take the before AND after pictures… hopefully we can get the majority of the work finished up this week.  We have been putting in long nights after work, and full weekends for the past three weekends. It’ll be nice when it’s all over.

Happy Homeowning!

House Hunters – Office Space

After two full weekends of house work, and keeping Lowe’s in business, the anticipation of moving into our house has been building… I just want to decorate and organize!!

Again, I blame pinterest for all of my design aspirations, including our future office. I want our office space to be chic and elegant but also sporty, we have some sports memorabilia that I’d like to be able to include in the same vein. So I feel like (once again) the contrast between dark navy blues with whites and greys is a good balance – but I know I can’t use this color pallet for every room… right? Another reason I love this color pallet so much is that it’s still sophisticated without being too girly, because frankly I would love to do something like this… But I wouldn’t do that to B. *smiles*

My inspiration:
MadeByGirl: Anya Kucheryavenko, small office defined by navy wall behind shelves, darling

Pulled from “Made By Girl” Blog via pinterest – Site linked to picture.

How to make this my own:


01 / 02 / 03 / 04

In the next week or two, we should finally be moving into the house. All of the work we have been wanting to get done is nearly under wraps! Then the before and after pictures will start coming… so get ready!

Until next time…

Homeowners.

As of Thursday evening, B and I are official homeowners… we got the keys to our house! The process has been so long, that the reality of it all is hitting me in waves.  We had a 60-day close, plus we are having some work done on the house, so there has been a lot of downtime.  Fortunately we have time left on our lease until the end of December, so we can get the house in tip-top shape and move in as needed.

We got a lot of work done around the house this past weekend, before and after pictures to come in a future post. But MY biggest accomplishment of the weekend was deciding on paint colors for the dining room and the living room… now only 5-other rooms to go… oh… and the actual painting…

We also met our neighbors this weekend, both sides seem super nice.. so I’m happy about that.


#homeownerselfie